Effects like reverb and delay are an essential part of any track. But it can be tricky to get them to sit right in the mix. In this blog, we’ll explore seven tips for enhancing your effects with EQ. We’ll show you how to prevent muddiness and harshness, how to add depth and width to your mix, and how to glue tracks together for a cohesive sound.

Never EQ In Solo
The basic rules are the same for EQing any instrument; cut frequencies that are getting in the way of the mix and boost frequencies that enhance the sound. However, since effects are (almost) always heard in parallel to the original track, it can be difficult to separate the two.
For instance, if you notice that the vocal sounds muddy, you might cut 250 Hz from the lead vocal track. If it still sounds muddy, you might cut a little more, and a little more—until the vocal somehow sounds muddy and thin at the same time.
In this instance, it’s probably not the lead vocal track that’s making the vocals sound muddy—it’s the vocal reverb. That’s why it’s dangerous to EQ in solo. Instead, make EQ adjustments with your effects enabled.
If you notice that you’re cutting (or boosting) a certain frequency by a significant amount without hearing a noticeable change, use a frequency analyzer to check and see if your effects sends are the source of the problem.

Roll-Off the Lows to Reduce Muddiness
Much like the example above, muddiness is a common problem when dealing with effects—especially reverb. Thankfully, the solution is fairly straightforward:
To reduce muddiness caused by effects, use a high-pass filter to roll-off the low end.
When we talk about reverb, we’re really referring to the slapback effect of a transient bouncing off of a surface. Low frequencies tend to make these reflections more difficult to hear, so get rid of them! Don’t be afraid to roll-off the lows up to 600 Hz, depending on the track.

Roll-Off the Highs to Push a Sound Back In the Mix
This trick works well when you want to use plenty of reverb but you don’t want it to sound overpowering.
Large amounts of reverb can sound good in certain circumstances, but it often makes the lead vocal difficult to hear. The long decay times can cause reverb tails to overlap the beginning of the next lyric, forcing you to use shorter reverb times.
Instead, use an EQ to roll-off the high frequencies above 10 kHz. This will help push the sound of the reverb back in the mix, allowing your ear to pick up the transients of the vocal without confusion.
This way, you get the best of both worlds: a long lush, reverb and clear, intelligible vocals.

Boost the Mids to Bring an Effect Forward in the Mix
Sometimes you don’t want to push a track back in the mix. Instead, you want to draw attention to it and push it right up to the front of the speakers.
If that’s the case, use an EQ to boost the upper-mids, specifically around the 1-5 kHz region. This trick works particularly well to help delays pop out of the speakers. By adding a slightly different EQ curve to the delay returns, you can help create separation from the lead vocal.
Just be careful—our ears are particularly sensitive to this range, and too much can quickly become overbearing. If your delays sound harsh, use a de-esser to tame any sibilant frequencies for a smoother sound.

Boost the Highs to Add Width
It’s common to use stereo effects like reverb and delay to make mono tracks sound wider. With a mid/side EQ like MIXROOM, you can make effects sound like they’re jumping right out of your speakers.
Boost the high-end of the effects return with a shelf—anywhere from 6 kHz to 12 kHz, depending on your track. Then click the “S” button on the band to isolate this boost to the side channels.
By boosting the highs on the sides only, you draw the listener’s ear to the “edge” of the mix, making your track seem wider than it really is. Plus, it leaves plenty of room for the dry vocal in the center channel, preventing any muddiness or smearing.

Cut the Highs to Add Depth
Another common reason for using reverb and delay is to add depth to a track. Whether you’re working with mono or stereo channels, MIXROOM makes it easy to increase the perceived depth of your effects.
Cutting the highs typically pushes an instrument back in the mix, making it sound like it’s coming from farther away. But if you only cut the highs on the sides, it makes it sound like the reflections are coming from the center channel—almost like you’re listening from the end of a long hallway.

The Abbey Road Reverb Trick
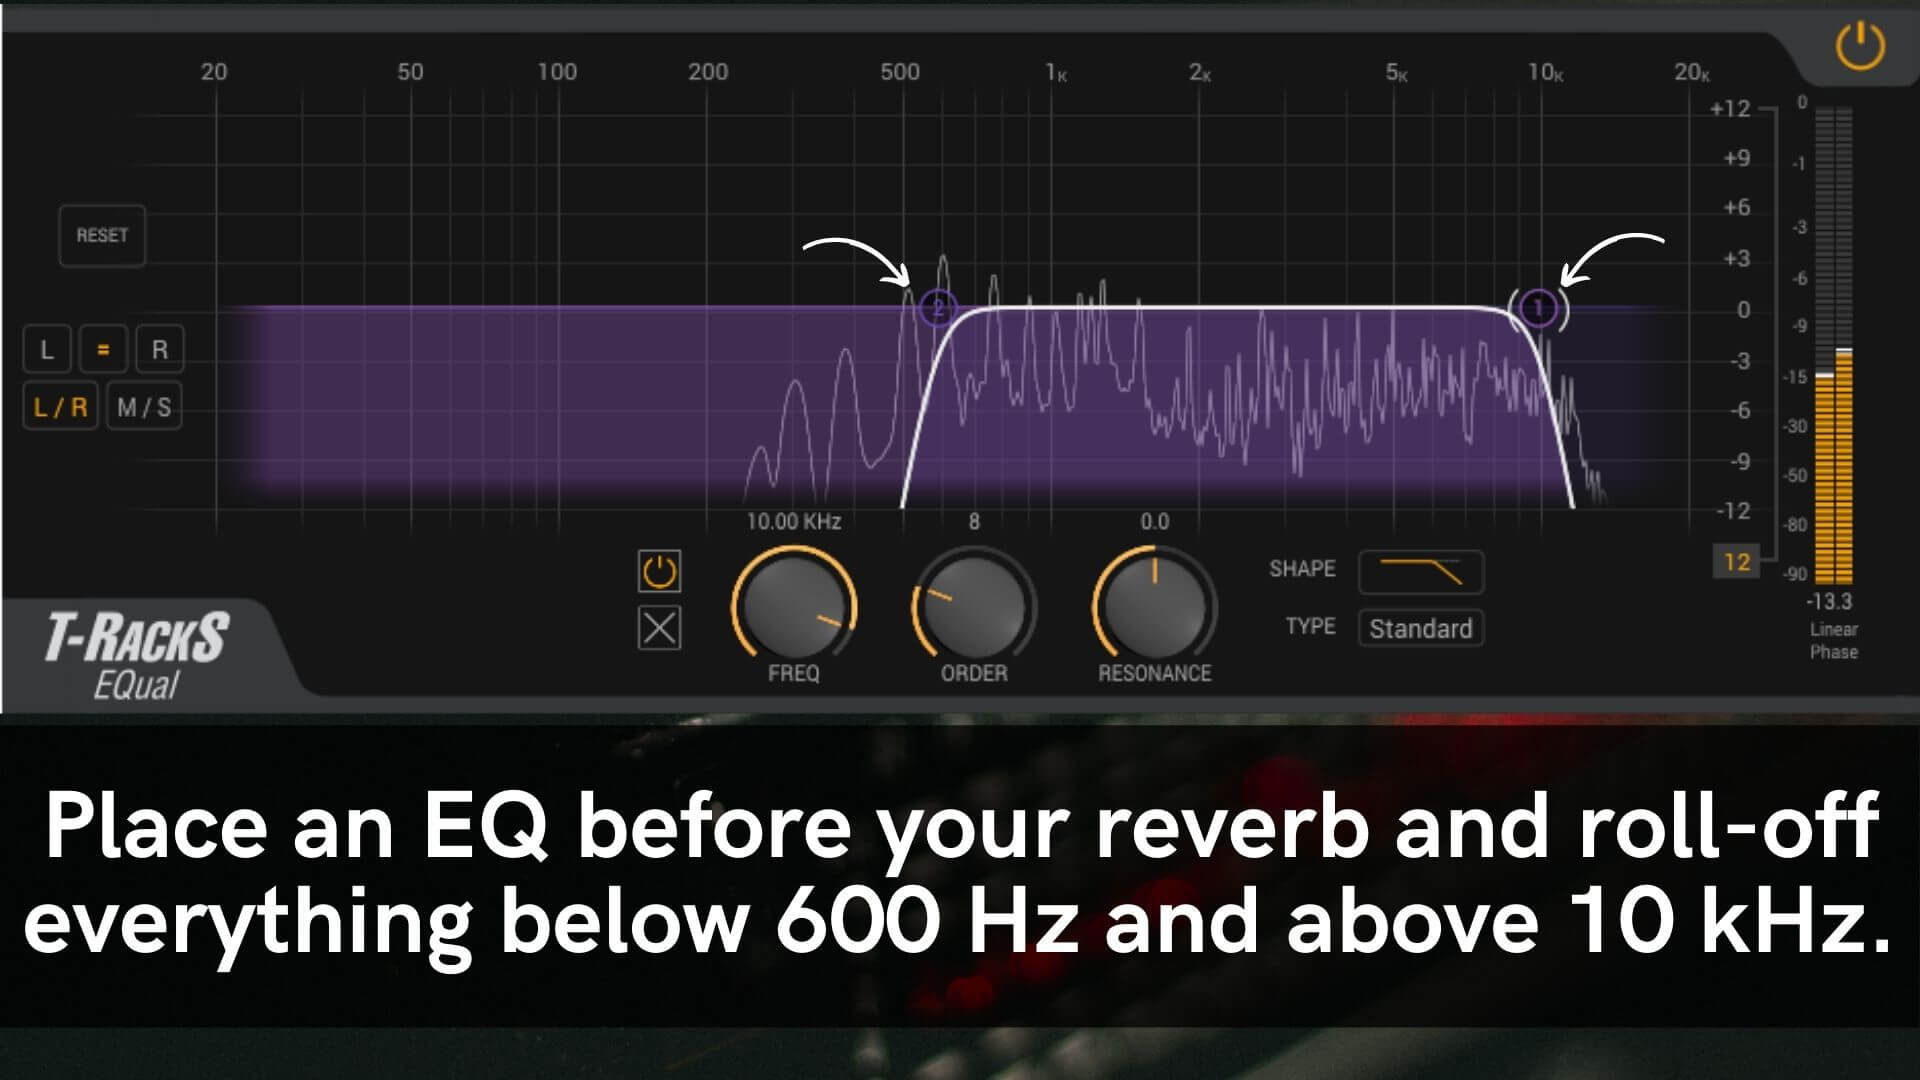
The legendary Abbey Road studios are known for world-class mixes. Decades ago, they developed a trick that helped carve out space in dense tracks.
Start by inserting an EQ on your effects send before the reverb plug-in. It’s important to filter out frequencies before they hit the effect.
Next, use a high-pass filter to roll-off everything below 600 Hz. It may seem high, but these frequencies tend to muddy up the mix once they start bouncing around.
Finally, use a low-pass filter to roll-off everything above 10 kHz. This helps reduce any harshness and makes it easier to hear the lead vocal.
While Abbey Road famously used plate reverbs, this trick works with any reverb plug-in. Plate reverbs tend to take well to this approach due to their dark, metallic tone.
Try out these tips on your next mix to help glue your tracks together for a tight, cohesive sound.


