Mid/side processing is a versatile mixing and mastering technique that allows you to process the center and side signals of a stereo track separately. When used correctly, mid/side processing has the power to make your tracks sound wider, deeper, and more focused.
However, it can be a difficult concept to understand. In this blog, we’ll teach you everything you need to know about mid/side processing so you can start creating bigger, better mixes.

What Is Mid/Side Processing?
Unlike traditional mono or stereo processing, which affects the entire signal, mid/side processing allows you to treat the center and sides of a stereo channel independently. By isolating these signals, you can shape the balance of your stereo image, giving you more control over your mix.

While it may seem like a modern concept, mid/side recording was pioneered by renowned EMI engineer Alan Blumlein in 1933. The process uses two microphones—one with a figure-8 pattern and one with a cardioid pattern—to capture wide stereo imagery with a strong, focused center.
At the time, the mid/side recording technique was used extensively for live broadcasts because of its strong center signal and guaranteed stereo compatibility.
In the digital era, mid/side processing plug-ins work by converting a stereo track into two signals. The Mid signal contains the information that shows up in both speakers, while the Side signal contains the information that is unique to the left and right speakers.
This allows you to treat each signal separately to further enhance their differences for a more dynamic sound. It can be used on individual tracks, instrument groups, or even on the mix bus.

Why You Should Use Mid/Side Processing In Your Mix
Technically, mid/side plug-ins can utilize any type of signal processing. The most basic forms of mid/side processors simply allow you to adjust the level or stereo spread of each signal.
Mid/side compressors let you control dynamics for the center and sides of a mix separately—with their own ratio, attack, and release settings. Kind of like a multi-band compressor on steroids.
There are even some time-based effects like delays that offer mid/side processing for super-spacey effects.
But the most common form of mid/side processing is EQ. Mid/side EQ allows you to isolate different frequency ranges at the center or sides of your mix.
Mid/side EQ can be a powerful tool for removing muddiness by focusing the low-end in the center of the mix, freeing up space on the sides.
They can also be used to enhance the width of a mix by boosting the high-end on the sides, drawing the listener to the edge of the mix.
Mid/side EQs can even be used to add depth to your mix by focusing your EQ adjustments on a specific point in the stereo image, creating more space and isolation between each instrument.
Mid/side processing is also very useful when mastering. Unless you’re stem mastering, you won’t have access to the original tracks, or any way to rebalance the mix while mastering. But with a mid/side EQ, you can easily isolate the thump of the kick drum, the bite of the guitars, or the sizzle of the cymbals and give that frequency a boost in the mix, bringing them closer to the listener.

How to Use Mid/Side EQ
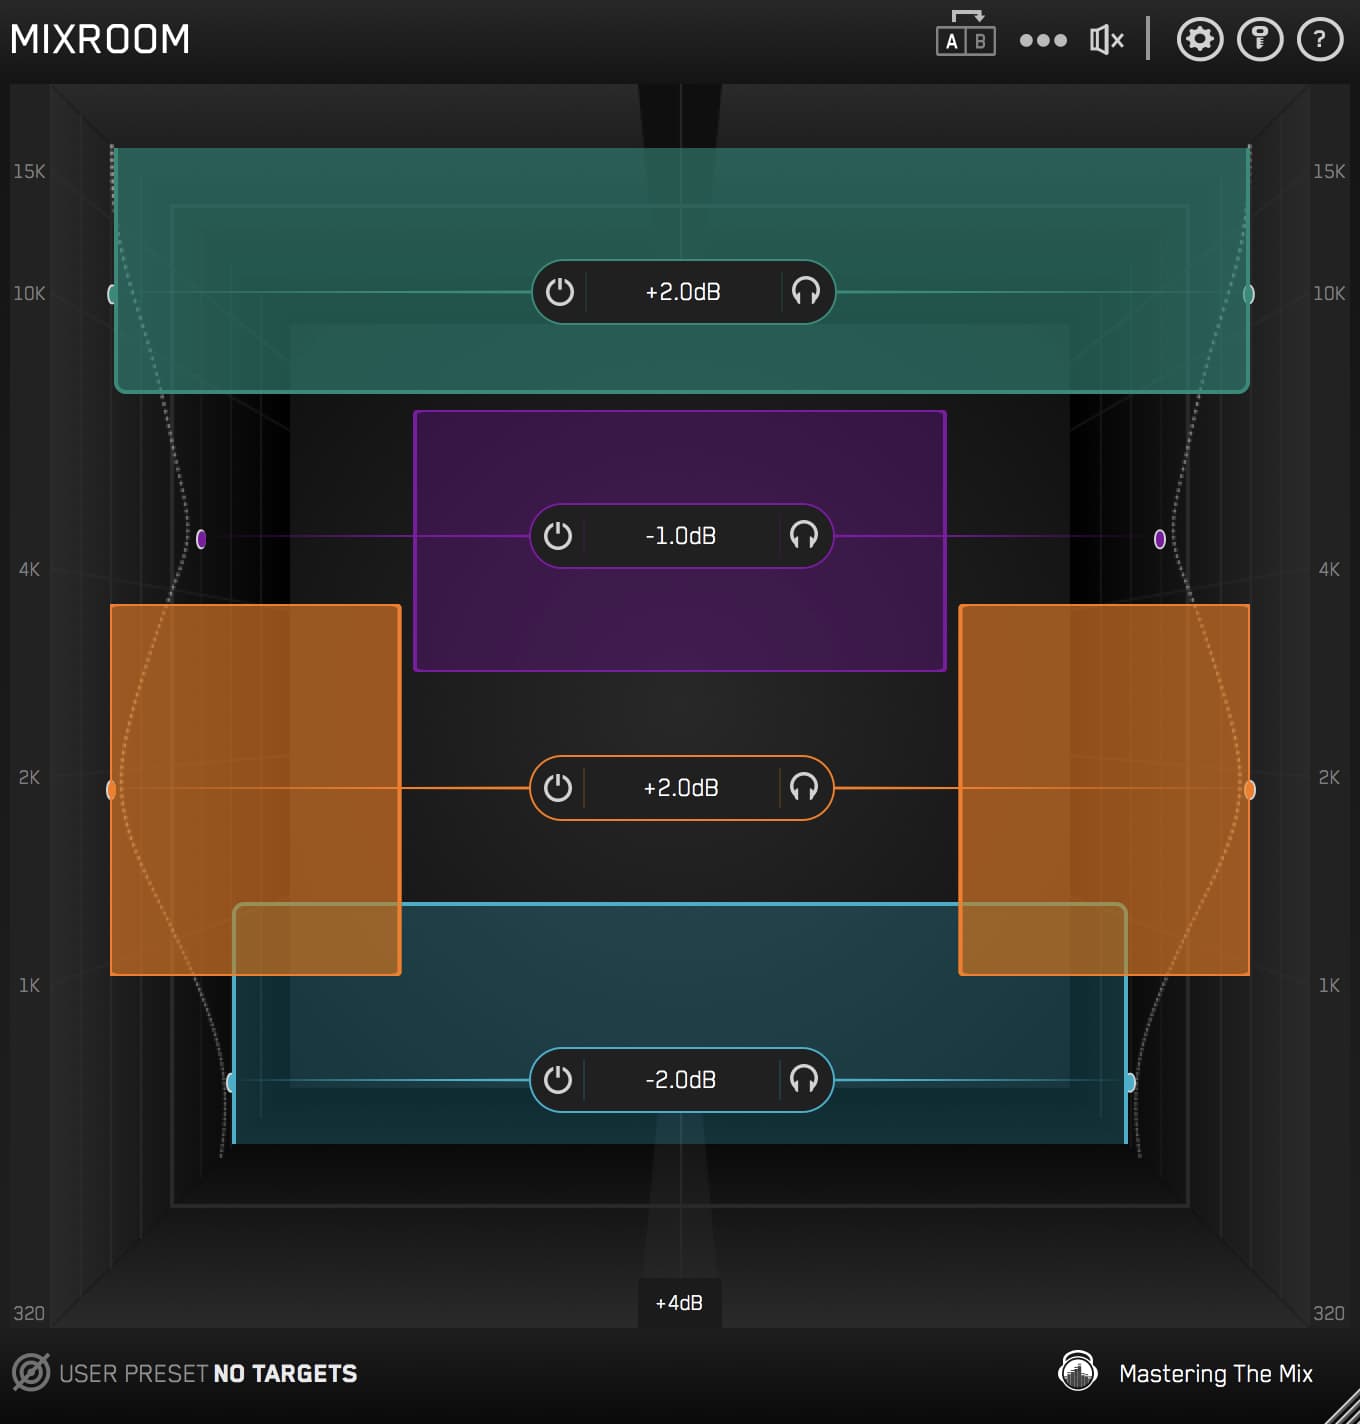
Mid/side EQs like MIXROOM make it easy to sculpt the stereo image of your mix. Insert MIXROOM on an individual channel, an instrument group, or even your mix bus and select an appropriate target preset.
If you’re not sure where to start, try one of the genre-specific presets or create a brand-new target EQ curve using some of your favorite reference mixes.

Next, click the ‘Add Smart Bands’ button to instantly load EQ bands that match the target EQ curve, giving you clear visual cues on what you should tweak.
Be sure to enable the level match feature to maintain the same loudness after applying EQ to ensure a fair comparison when A/Bing tracks.
To adjust the gain of a particular frequency in a specific stereo position, hover over a bands control panel to reveal the stereo icon. Click the M to the left to isolate the mid-band, or click the S to isolate the sides.
You can also click and drag the stereo icon in the center to the left or the right to adjust the amount of mid or side signals in the mix, similar to a wet/dry control.

One of the most common uses for mid/side EQ is to control the power of the low-mids of the track to give it a solid foundation in the center of the mix.
Start by creating a band near the bottom of the frequency spectrum around 500 Hz. Adjust the Q so the bottom of the band reaches all the way down to 320 Hz and the top reaches up to about 700 Hz. Then click the M to filter only the middle of the signal.
If your track was feeling weak, try boosting this band to give your track some more power whilst increasing the centered feel of the low-mids.
If the track was sounding bloated, try attenuating this band, helping to clean up any muddiness, and create more space in your mix.

MIXROOM is also great for bringing out the highs of your mix. Try inserting MIXROOM on your mixbus and create a new band at the top of the spectrum.
Click the S to filter only the sides, then click the bell icon to the left of the Q controls to convert the band into a shelf, allowing you to process everything above the selected frequency with a single band.
Give the frequencies above 10kHz a subtle boost to add air and space to your mix. For a more dramatic effect, try scooping the mids on the sides as well.

You can also use MIXROOM to process individual instruments.
Focus the sound of the kick and bass with a mono band in the low-end. Add width and depth to complex instruments like snare drums and guitars by enhancing the low frequencies in the center band and the high frequencies on the sides. Push the sound of the cymbals and guitars to the side of the mix to carve out space for the vocal in the center.
Just be careful—using excessive mid/side processing in a mix can make your track sound overhyped and exaggerated. Even worse, it can cause phase problems. To avoid these issues, use gentle settings, and be sure to check your mix for phase problems using a metering plug-in like LEVELS.

Now that you know how to use mid/side processing to enhance the width, depth, and focus of your tracks, you can use these techniques to take your mixes to the next level.
Frequently Asked Questions
What is mid/side processing?
Mid/side processing lets you treat the centre and the sides of a stereo signal independently rather than affecting the whole image at once. The Mid signal contains what appears in both speakers, while the Side signal holds the information unique to the left and right, giving you finer control over width, depth, and focus.
Is mid/side a new technique?
Not at all. Mid/side recording was pioneered by EMI engineer Alan Blumlein back in 1933, using a figure-8 and a cardioid microphone to capture a wide stereo image with a strong, focused centre. It was used heavily for live broadcasts thanks to its solid centre and guaranteed mono compatibility.
Besides EQ, what other mid/side processors are there?
Mid/side can apply to almost any processing. The simplest forms adjust the level or stereo spread of each signal, while mid/side compressors control dynamics for the centre and sides separately, each with their own ratio, attack, and release. Some time-based effects like delays also offer mid/side options for spacious results.
How do I use mid/side EQ to tighten the low end?
Create a band around 500 Hz, widening the Q so it reaches from roughly 320 Hz up to 700 Hz, then isolate the mid channel. Boost it to add power and a stronger centred low-mid foundation if the track feels weak, or attenuate it to clear muddiness and open up space if the track sounds bloated.


