The lead vocal is the focal point of most modern music. Consequently, the vocal can make or break a mix.
A great-sounding vocal will lure in a listener, while a subpar one will have them reaching for the "next" button. Hence, it's important that your song's vocal achieves sounds as good as — or even better — than the other songs in your listener's playlist.

That's where reference tracks come in. A reference track is a professionally mixed and mastered song that you use for a sonic reality check.
A reference track enables you to regain perspective after you've been lost in your own mix for an extended period. It's also a reliable way to ensure that your mixes will translate across a wide range of playback systems.
Reference tracks are a vital part of building a killer-sounding vocal mix, and our REFERENCE 3 plug-in makes it a piece of cake. With Smart Reference Tracks auto-suggesting the best-matching references from your library, auto-looping locking onto the loudest section, and automatic level matching, you can focus on the creative work. In this post, we'll outline how you can use REFERENCE 3 to craft ear-grabbing vocals on a par with top-tier, pro-level mixes.

Mixing is All About Balance
Choose a reference track with a vocal sound you'd like to emulate. Be sure that your reference is a close match to the genre, vibe and instrumentation you're working with. In REFERENCE 3, Smart Reference Tracks will auto-suggest the best matches from your library based on your mix.
Next, listen closely to the reference track's vocal track and use it as a guide for how loud your vocals should be relative to the other elements in your mix. REFERENCE 3's Mix Balance feature can also suggest gain adjustments for vocals, drums, music, and bass to help you nail the balance. This is arguably the most important step, and it's one that many amateur mix engineers don't pay enough attention to.
If your tracks are well-balanced, you won't need EQ, compression, and other processing to attain a cohesive sound; it will already be there (although the mix will likely sound unfinished).
So, before you start piling on your favorite plug-ins, get your levels right. This will save you lots of time, and it will lead to an overall better mix in the long run.

It's also important to check how your mix sounds in mono. After all, many of your listeners will be using a low-quality smartphone speaker or Bluetooth speaker to play back your mix.
Mixing in mono is a great way to reveal the flaws in your mix — your levels will need to be spot on. After all, you can't hide behind your pan knobs!
You'll also find equalization issues, phase cancellations, and a host of other problems that you weren't able to detect while monitoring in stereo.
Beyond that, your center channel will be as bulletproof as it can get.

Solve Resonance Issues with RESO
Unwanted acoustic resonances are like kryptonite to a mix engineer — they make achieving an accurate mix extremely difficult.
Resonances occur when one of the frequencies in your mix interacts with the natural frequency of your room, playback system, or something else within your mix. You'll hear this as a runaway vibration perceived as feedback, or a buildup of a frequency or set of frequencies.
Unwanted resonances are definite mix-wreckers. They'll lend an ear-splitting or muffled character to your vocal track, thanks to harsh or buried upper mids and out-of-control lower frequencies.
On top of that, these runaway frequencies will absolutely kill your vocal track's dynamics, and masked frequencies will create a seriously out-of-whack mix. Let’s hear below how a resonant rock vocal can ruin a mix:
If your room's acoustics or your playback system are causing unwanted resonances, you'll need to deal with those issues physically with sonic isolation and acoustic treatment. That said, if your mix is the problem, our RESO plug-in will make locating and dialing out resonances easier than taking candy from a baby.
RESO is a dynamic resonance suppressor that finds and eliminates the problematic resonances in your mix — automatically.
Just instantiate it on your vocal track, then click the Calculate Targets button. The plug-in will then supply you with Target Nodes, as well as helpful setting suggestions for the plug-in's parameters.
Solving resonance issues is a surefire way to achieve a clearer, more accurate mix that's pleasant to listen to, and vocals that are intelligible and engaging.

Compression: How to Squash Your Vox Effectively
After you've got your resonant frequencies sorted out, it's time to tame your vocal track's dynamics.
While you may be tempted to reach for a compressor first, this is a mistake. The right move is to write automation before applying dynamic compression.
While you can theoretically fix an extra-dynamic vocal with compression, this will also squeeze all the life out of the track. Truth be told, over-compressed vocals are a common sign of an amateur mix.

Conversely, the vocals in a professional mix sound dynamic, exciting, and sit up front comfortably without being overbearing.
Simply put, compression should not be used to correct a dynamic performance.
Instead of applying heavy compression, try "riding the fader." If the vocal track gets too quiet, automate a 1dB–2dB boost; if it gets too loud, automate a 1dB–2dB cut.
This is just a starting point, of course. You'll likely need to tweak your automation all throughout the mixing process to make your vocal sit properly.
After you get your vocal to sit properly in the mix, then it will be time to apply compression to take it the rest of the way. Compression is also a great way to add character to your vocal.
A common compressor combination for vocals is to use an 1176-style comp to catch stray peaks and an LA-2A-style comp to add fullness and character.
Set the 1176 with a high compression ratio (around 12:1) and a fast attack and release. Ensure that the compressor isn't exceeding 2dB–3dB of gain reduction during the loudest peaks.
Set the LA-2A's Compress/Limit switch to compress, then tweak the other controls until you like what you hear. You can use aggressive settings on the LA-2A, since the 1176 is taming the large peaks, which would have caused the LA-2A to over-compress during louder passages.

Distressor-style compressors are also a great choice for vocals. These flexible processors can mimic both 1176 and LA-2A comps, and they can also inject an ear-grabbing distortion into your tracks.
It's important that you continuously toggle back and forth between your mix and your reference mix for a reality check during this process. With REFERENCE 3's automatic level matching, A/B comparison is effortless — you'll hear differences in tone, not just volume. This will ensure that the changes you're making sound great in the real world, and not just in the context of your own mix.

EQ: Sculpting Your Vocal Track to Perfection
Once your vocal's dynamics are sorted out, it's time to start carving out its place in the frequency spectrum. You'll do this with an equalizer.
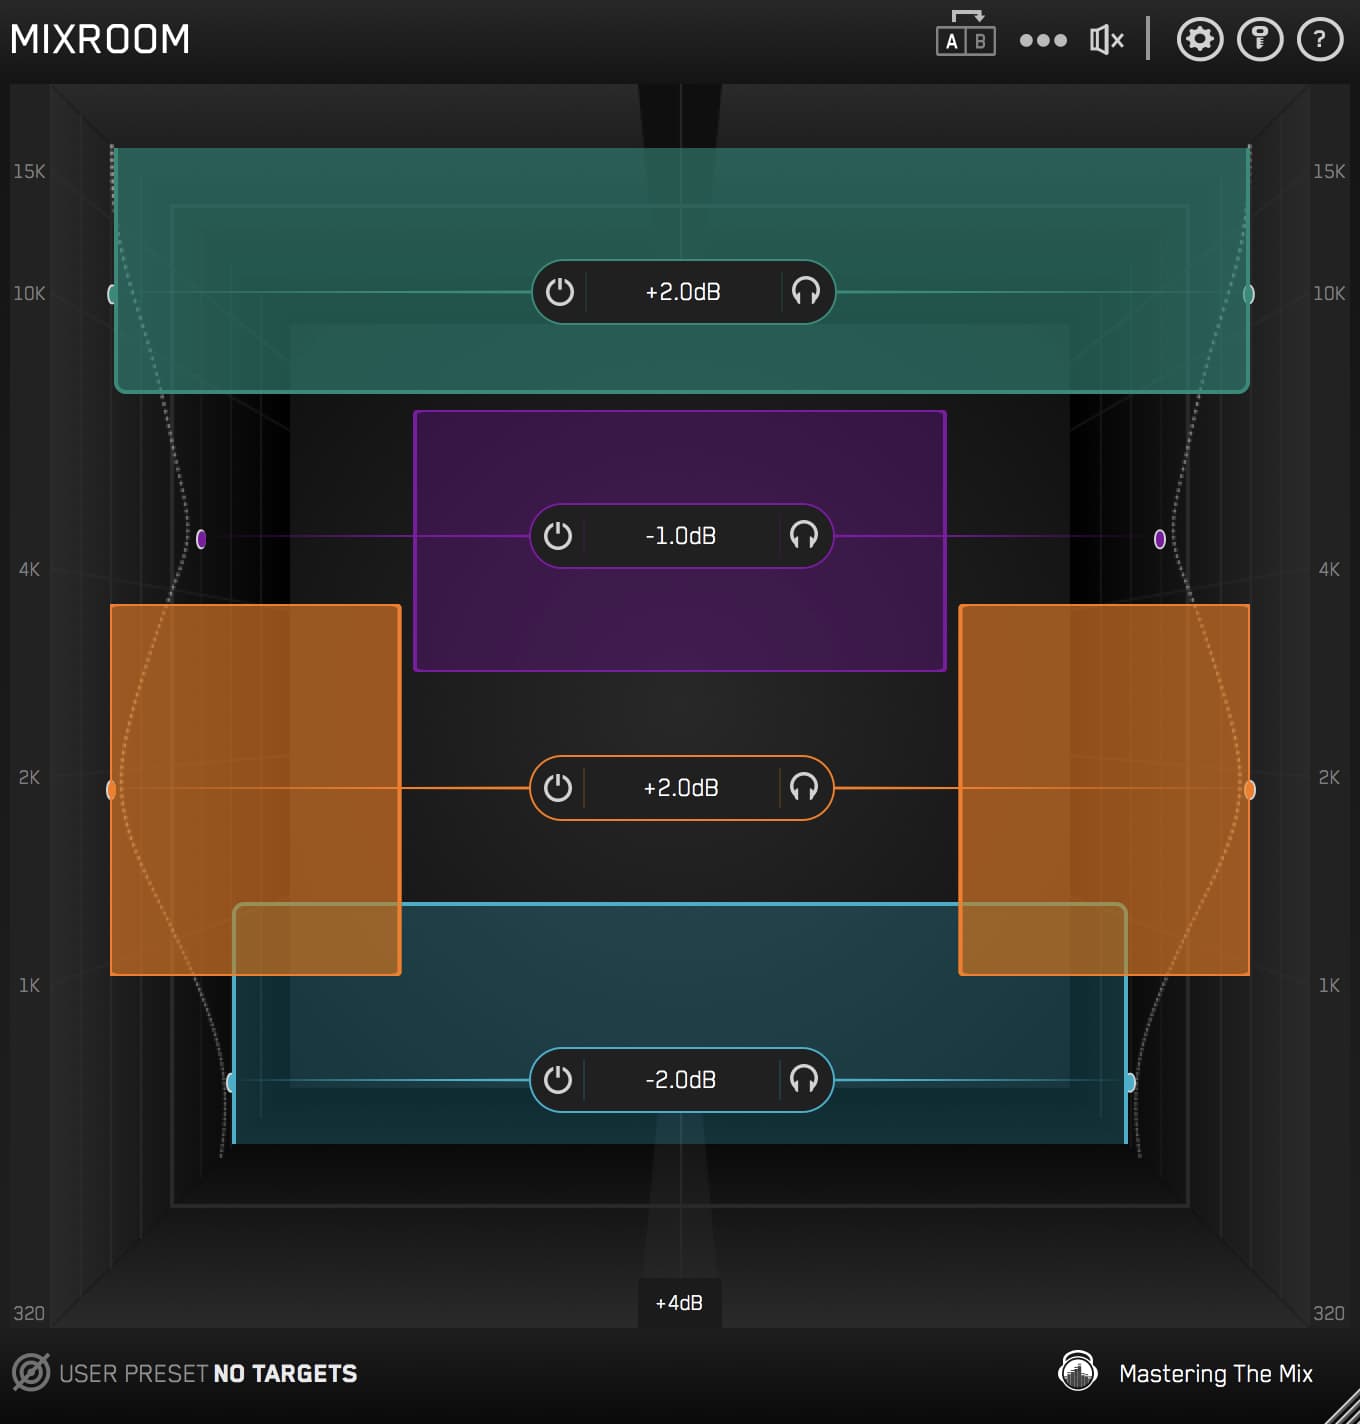
Our MIXROOM plug-in is tailor-made for this application. MIXROOM is a huge time-saver, providing you with application-specific presets and target frequencies based on a reference track.

Using MIXROOM is a breeze. To start with, load the plug-in on an insert of your vocal track.
Next, choose an applicable channel preset from the Vocals section. You can also create custom target values by clicking the Target icon on the bottom left corner and importing a reference track.
After that, choose a loud section of your vocal track. MIXROOM's Target EQ Curve permits you to skip the guesswork and dial in a pro sound — quickly and easily.
What's more, the Add Smart Bands button instantly loads EQ bands that match the Target EQ Curve, providing you with an intelligent starting point for your tone shaping.

Unless you're aiming for an obvious "effected" sound, try not to be heavy-handed with vox EQ. You'll be shocked at how much presence a gentle, narrow boost at 5kHz will add, or how much body a mild 500Hz bump will add.
While you're sculpting your vocal track, it's vital that you compare the sound of your mix with your reference mix regularly. This is how you'll ensure that your track offers a similar sound to the reference.
Avoid frequent soloing of your vocal track. While there are times that you'll want to solo the track (i.e., to correct a hard-to-hear anomaly), it's more effective to EQ each track within the context of your entire mix.
Most of the time, perfecting a vocal track in isolation won't translate to a vocal track that sounds great in a mix. Quite the opposite, a track that sounds horrible in isolation could be exactly what your mix needs.
Download the free trial of MIXROOM (Don’t skip this, it will transform your mixes!)

Reverb: Lending Dimension to Your Vocals
Most of the time, you'll want to add ambience to your vocals. Much like singing in the shower, this will add space and dimension to your track.
This is when you'll want to deploy reverb and delay plug-ins. You can use either one of these effects, or you can combine the two for a slick, studio-produced sound.
There are a myriad of different types of reverbs: halls, rooms, chambers, plates, and more. You should choose the one that sits best in your mix.
Halls are very lush; however, they take up a lot of space in your mix. Reserve these for sparse, open arrangements.
Chambers sound similar to halls, but with an extra bit of clarity that guards against wash-outs. These offer a vintage-tinged sound reminiscent of classic Beatles recordings.
Rooms re-create the sound of a smaller acoustic space. These are ideal for adding dimension to a vocal, while maintaining an up-front, intimate character.
Plates offer a dense sound that can really take a vocal over the top. If you're aiming for an Abbey Road vibe, a plate is the right choice.
While reverb is an effect, it's different from compression and modulation in that it becomes audible after the main signal — it's essentially a separate instrument. Thus, it can be helpful to treat spatial effects like an independent element.
You do this by instantiating your reverb plug-in on a stereo bus. Then, route your tracks through the plug-in using the sends on your DAW's mixer.
Note: make sure the wet/dry mix on the reverb plug-in is set to 100% wet.
Also be aware of your reverb's pre-delay setting. Longer pre-delays permit your source to sound before the reverb kicks in — essential if you're trying to maintain intelligible vocals.
One of the biggest issues with reverb and delay is using either too much or too little. Refer to your reference track often, and try to match your reverb level with that of the reference.

Solid Reference, Solid Mix
As we noted previously, it's easy to get lost in the sound of your own mix. Using a reference track will ensure that your vocal track remains in its rightful place — up-front and center.
Beyond that, proper referencing will ensure that your mix sounds great in your studio, in a club, in a car, or on earbuds. Our REFERENCE 3 plug-in — with Smart Reference Tracks, Mix Descriptors, Masterscope, Match %, Mix Instructor, and Mix Balance — along with a solid reference track — is a surefire way to achieve a pro-level mix.

Frequently Asked Questions
How do reference tracks help you mix vocals?
A reference track is a professionally mixed and mastered song used as a sonic reality check. It helps you regain perspective after being lost in your own mix and guides how loud the vocal should sit relative to the other elements.
Why check a vocal mix in mono?
Many listeners use a single smartphone or Bluetooth speaker. Mixing in mono reveals level problems, EQ issues and phase cancellations you cannot detect in stereo, and forces your levels to be spot on since you cannot hide behind panning.
Should you automate or compress vocals first?
Write automation before compressing. Ride the fader with 1 to 2dB boosts and cuts to get the vocal sitting first, then apply compression to take it the rest of the way. Compression should not be used to fix an overly dynamic performance.
What pre-delay setting keeps reverberant vocals clear?
Use a longer pre-delay so the dry vocal sounds before the reverb kicks in, which keeps vocals intelligible. Match your reverb level to a reference track to avoid using too much or too little.


