
As the music consumption model moves from ownership to streaming platforms, producers are left with fewer reference tracks in their library to chose from.
In this blog, I’ll show you how to use Mastering The Mix plugin REFERENCE 3 to stream reference tracks from any browser or application such as Spotify, Apple Music, Youtube, Amazon Music, Tidal etc.
Not only will you have a much greater choice of the latest songs, you’ll also be able to utilize the powerful tools available in REFERENCE 3, such as accurate real-time level matching, tonal balance analysis, stereo width analysis, mix balance analysis and more.

For this explanation, we’ll be focusing on Logic Pro on Mac. To configure for you system, copy and paste this blog post into your favourite AI tool and ask it to translate it for your set up. All configurations are different and we can’t guarantee that this workflow will work on your system.
1. Get A Virtual Audio Router
To begin, you’ll need a virtual audio routing program. Various virtual audio-routing protocols exist for Windows and Mac. Here are some popular options:
- VoiceMeeter (Windows)
- Jack (Windows and Mac)
- iShowU Audio Capture (Mac only)
- Soundflower (Mac only)
- Black Hole (Mac only, known issues with current release)
- Rogue Amoeba Loopback (Mac only)

Follow the instructions for installation. Once installed, the virtual audio router will show up as audio drivers in your audio settings, your DAWs preferences, and the preferences of other audio-enabled applications.
2. Set Your Computer Output To The Virtual Audio Router
On Mac, go to system preferences -> Sound -> Output and select the virtual audio router.

3. Set Your DAW Input To The Virtual Audio Router

4. Create A New Channel To Receive The Streamed Audio
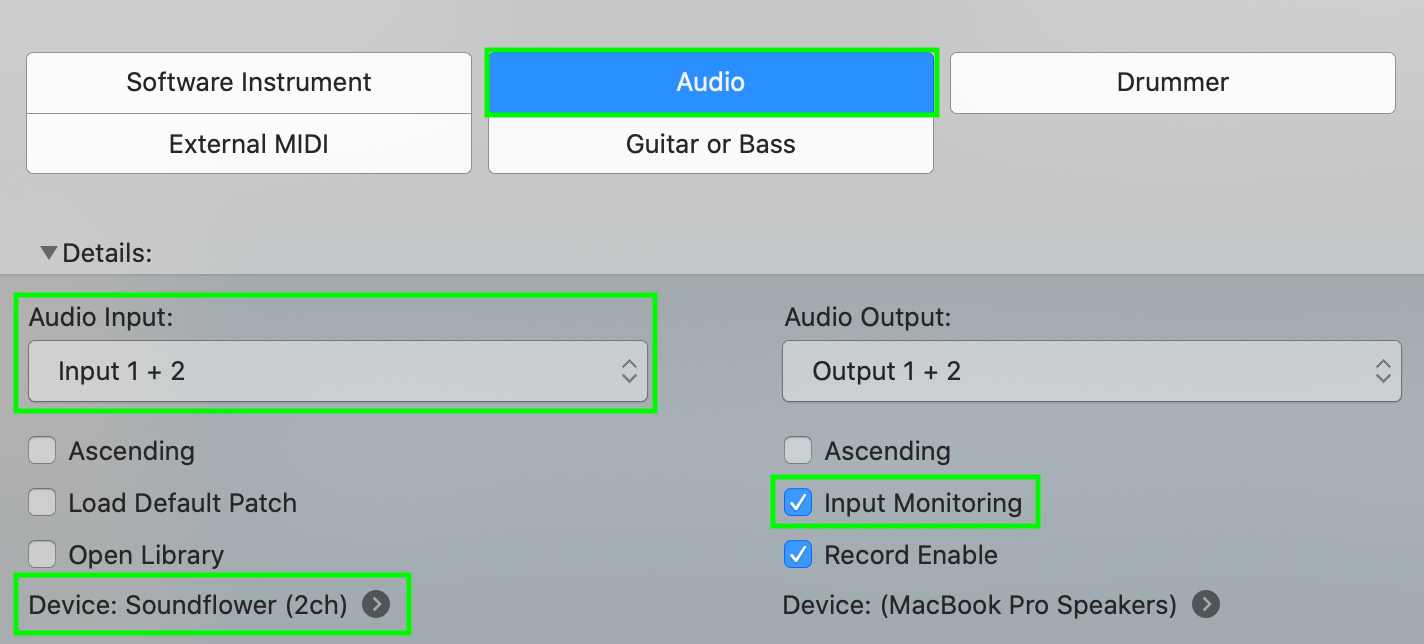
- Create an audio channel
- Select Input 1 + 2
- Ensure your Digital Audio router is the selected device (if not then go back to step 3).
- Tick the box that says ‘Input Monitoring’ [IMPORTANT!]
5. Load REFERENCE 3 and REFSEND In Your Project

- Load REFSEND on the channel created in step 4.
- Load REFERENCE 3 on your master output.
- Ensure the output of the channel created in step 4 is set to ‘No Output’
- Select the channel created in step 4
- Ensure ‘Input Monitoring’ is enabled on the channel created in step 4.
6. Open Your Music Streaming Application Or Your Browser And Start Playing Your Music.

7. Use The Tools In REFERENCE 3 To Help You Get Your Mix or Master Sounding More Like Your Reference Track
Level Match
Your mix will most likely be a lot quieter than your reference tracks giving you the misconception that it has a weaker bass and less clarity in the high frequencies. The Level Match button will allow you to compare your mix to the reference tracks without bias, allowing you to make informed mixing decisions.

Gain Insights
The visuals in the Master Scope show you how your EQ balance, stereo width, and dynamics compare to your reference track. You can also solo frequency bands to zone in on the intricate differences between your mix and your references.

Mix Balance
Click the burger menu to the left of the Master Scope button to switch to Mix Balance. Mix Balance suggests gain adjustments for your vocals, drums, music, and bass to match your reference. The analysis is real-time, so be sure to compare like-for-like.

One drawback of using this method is that you’re not able to set loops or manage the timeline of the reference track. You’ll need to set the playback point of your reference tack in the application or browser.


