Mastering music is an art form that transcends mere sound adjustment—it's about sculpting an auditory experience that resonates across various listening environments. Whether a track is played through the immersive soundsystem of a club, the intimate setting of a home stereo, the diverse platforms of streaming services, or the classic grooves of vinyl, each medium demands a unique approach in mastering.
For music producers, understanding the nuances of mastering for different mediums is crucial. It's not just about making a track louder or adding a shiny veneer; it's about ensuring that your music communicates its intended emotion and energy, regardless of where it’s played. In the age where music consumption is more varied than ever, producers face the challenge of creating masters that stand out and maintain their integrity across streaming services, clubs, CDs, and vinyl records.

This comprehensive guide aims to equip you with actionable techniques and insights for mastering across different mediums. We'll delve into the specific considerations and limitations each medium presents, from the digital realm of streaming and CDs to the physical constraints of vinyl.
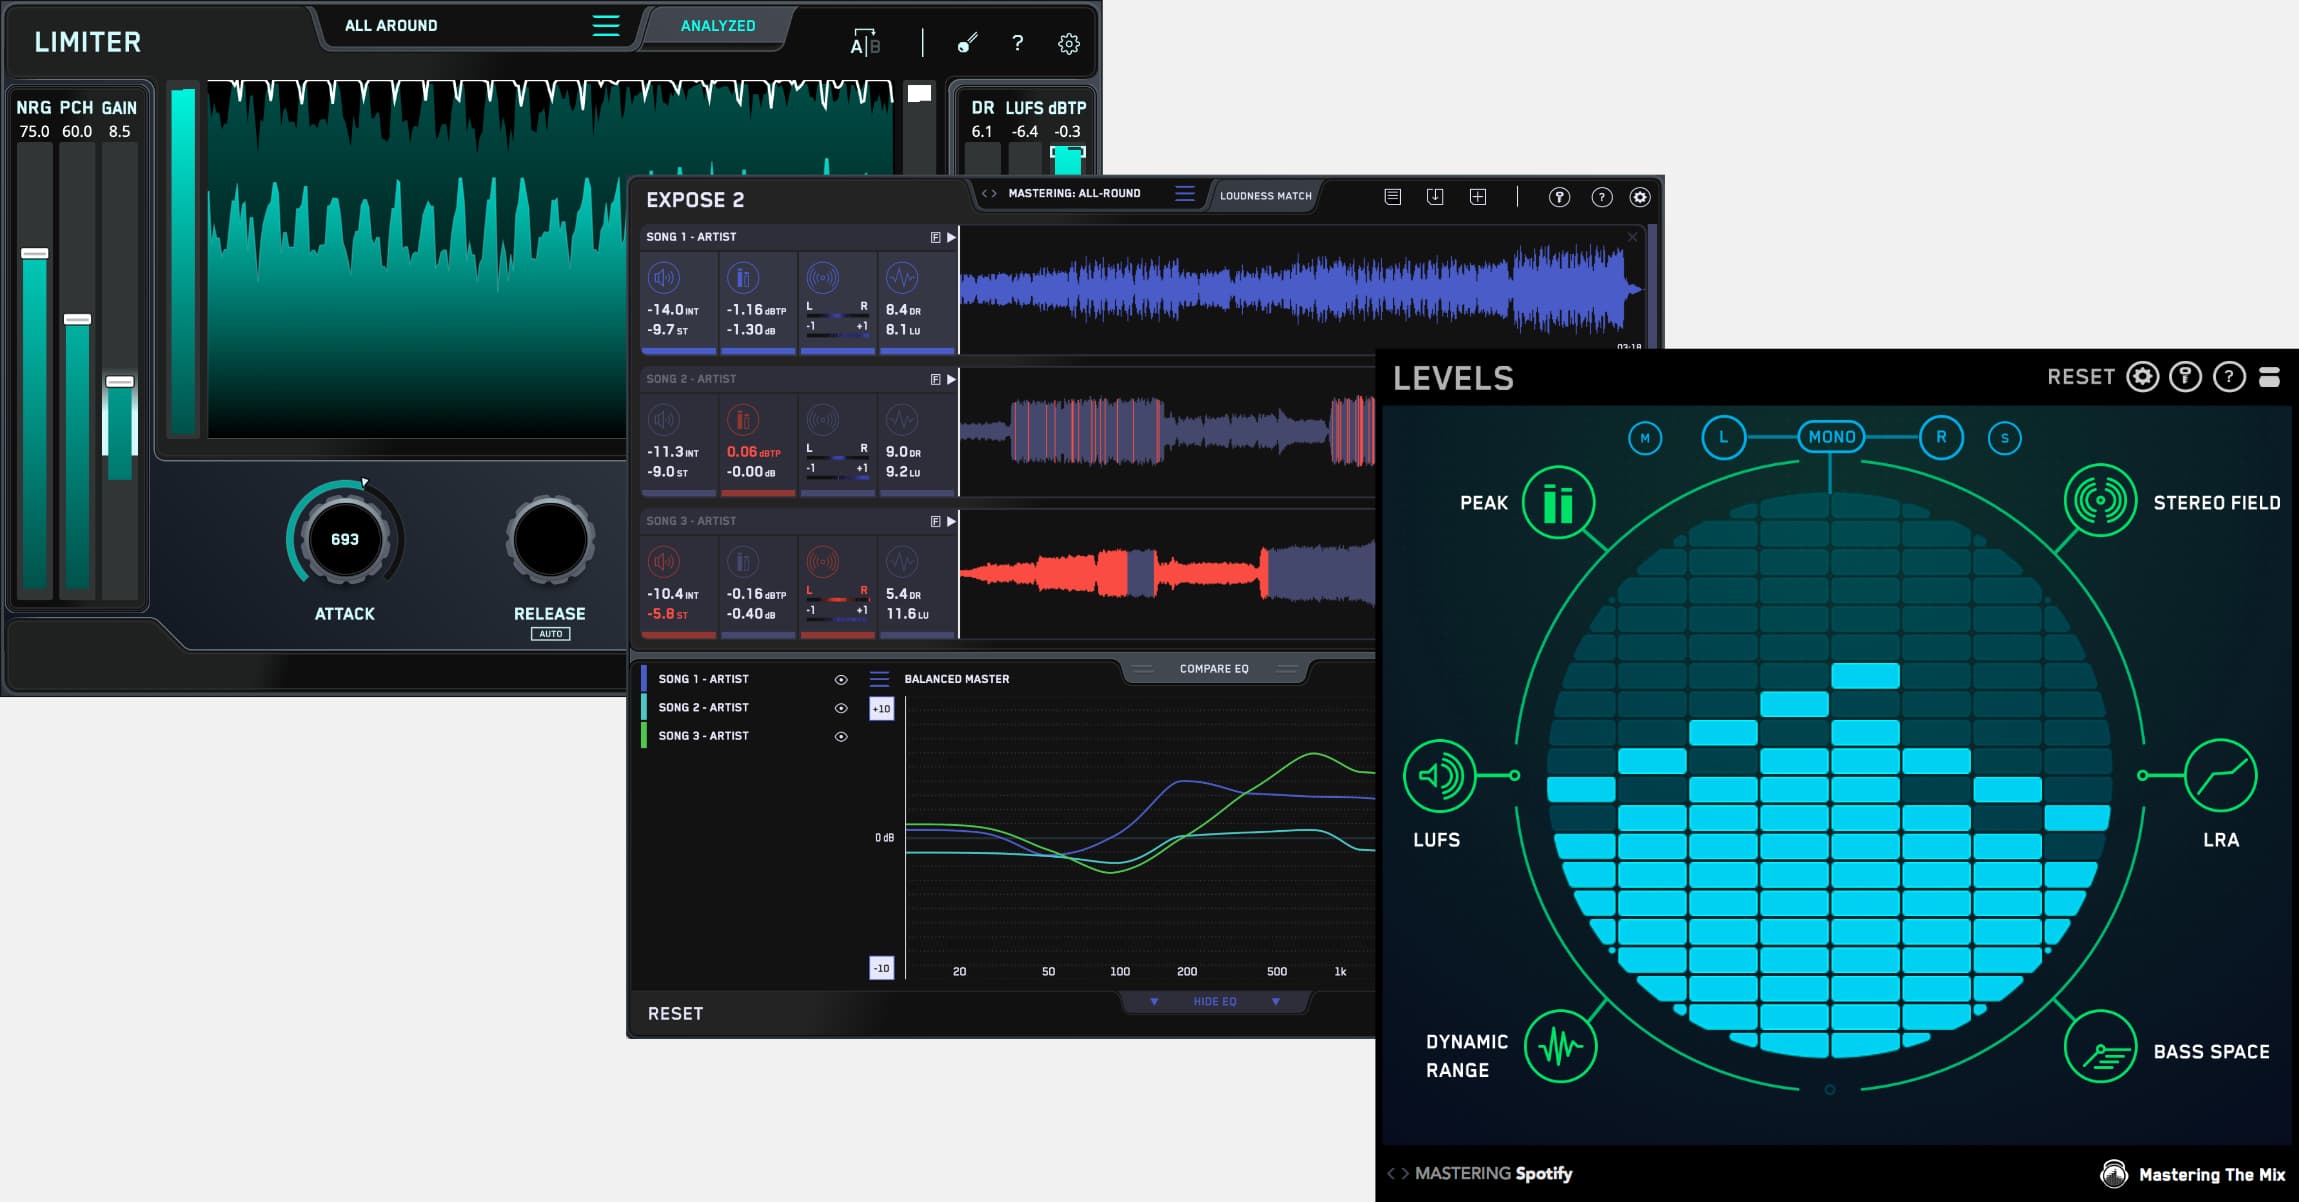
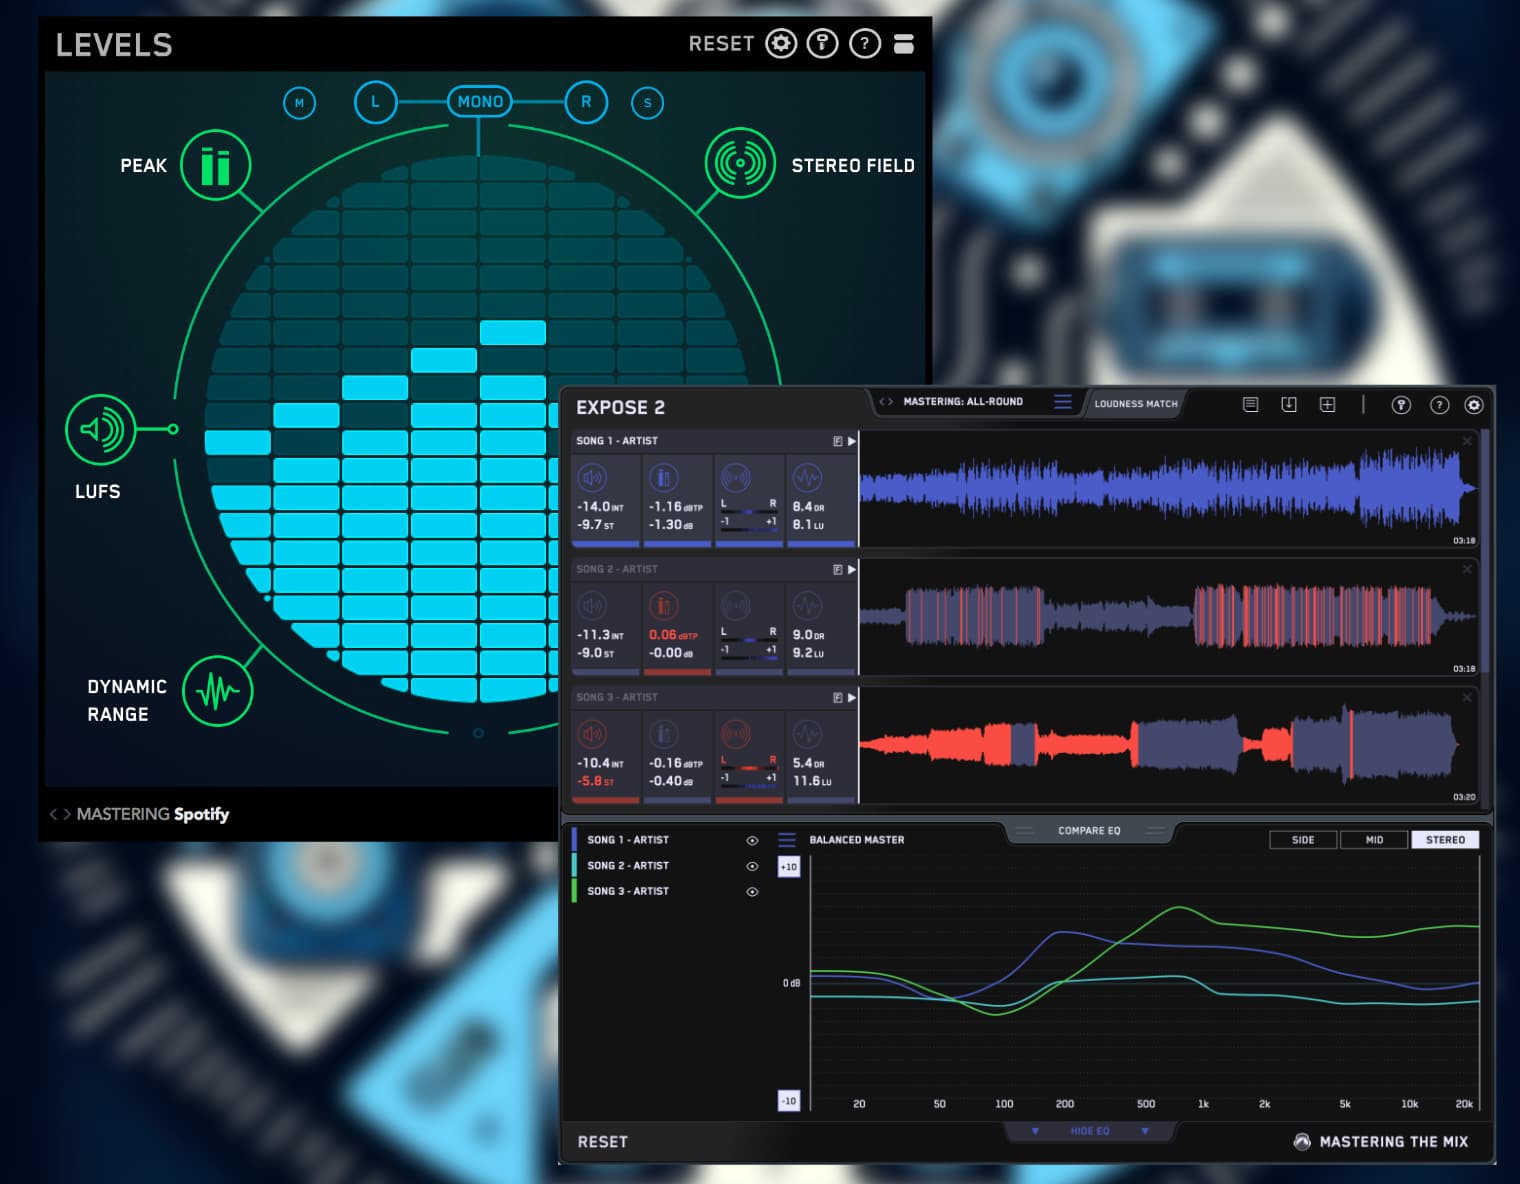
We'll take a look at how to use LEVELS and EXPOSE 2, to measure technical details like loudness (LUFS), true peak, and dynamic range, ensuring your tracks meet the requisite standards and qualities of each format.
Join us on this sonic journey as we uncover the secrets of mastering for diverse listening experiences. Prepare to elevate your mastering skills and ensure your tracks not only sound professional but also captivate listeners, no matter the medium.
How To Master for Streaming Platforms
Loudness Normalization: Most streaming services use loudness normalization, which adjusts the playback volume of tracks for a consistent listening experience. This is measured in LUFS (Loudness Units Full Scale).
Target Loudness Levels: Platforms like Spotify, Tidal, Amazon Music, and YouTube typically target around -14 LUFS, while Apple Music targets -16 LUFS. Mastering your track louder than this can lead to unwanted volume reduction or dynamic changes when streamed.

Mastering Techniques for Streaming
Optimizing Loudness: Aim for a loudness level that aligns with your target platform’s standards. Use a LUFS meter, like the one in LEVELS, to gauge your track's loudness.
Managing Dynamics: Preserve the dynamic range. Over-compression can make a track sound lifeless, especially after loudness normalization.
True Peak Control: Ensure your track’s true peak level doesn't exceed -1 dBTP. This prevents digital clipping and distortion from lossy codecs like AAC used by streaming services.
EQ Adjustments: Apply subtle EQ adjustments to enhance clarity and balance. Avoid extreme boosts or cuts that might lead to issues post-normalization.
Using LEVELS and EXPOSE 2 for Streaming
LEVELS: Use LEVELS to monitor loudness (try to aim for around -14 LUFS int, or -16 LUFS for Apple Music), true peak (try to keep it below -1dBTP), stereo field, and dynamic range. Its visual feedback is crucial for making informed decisions.
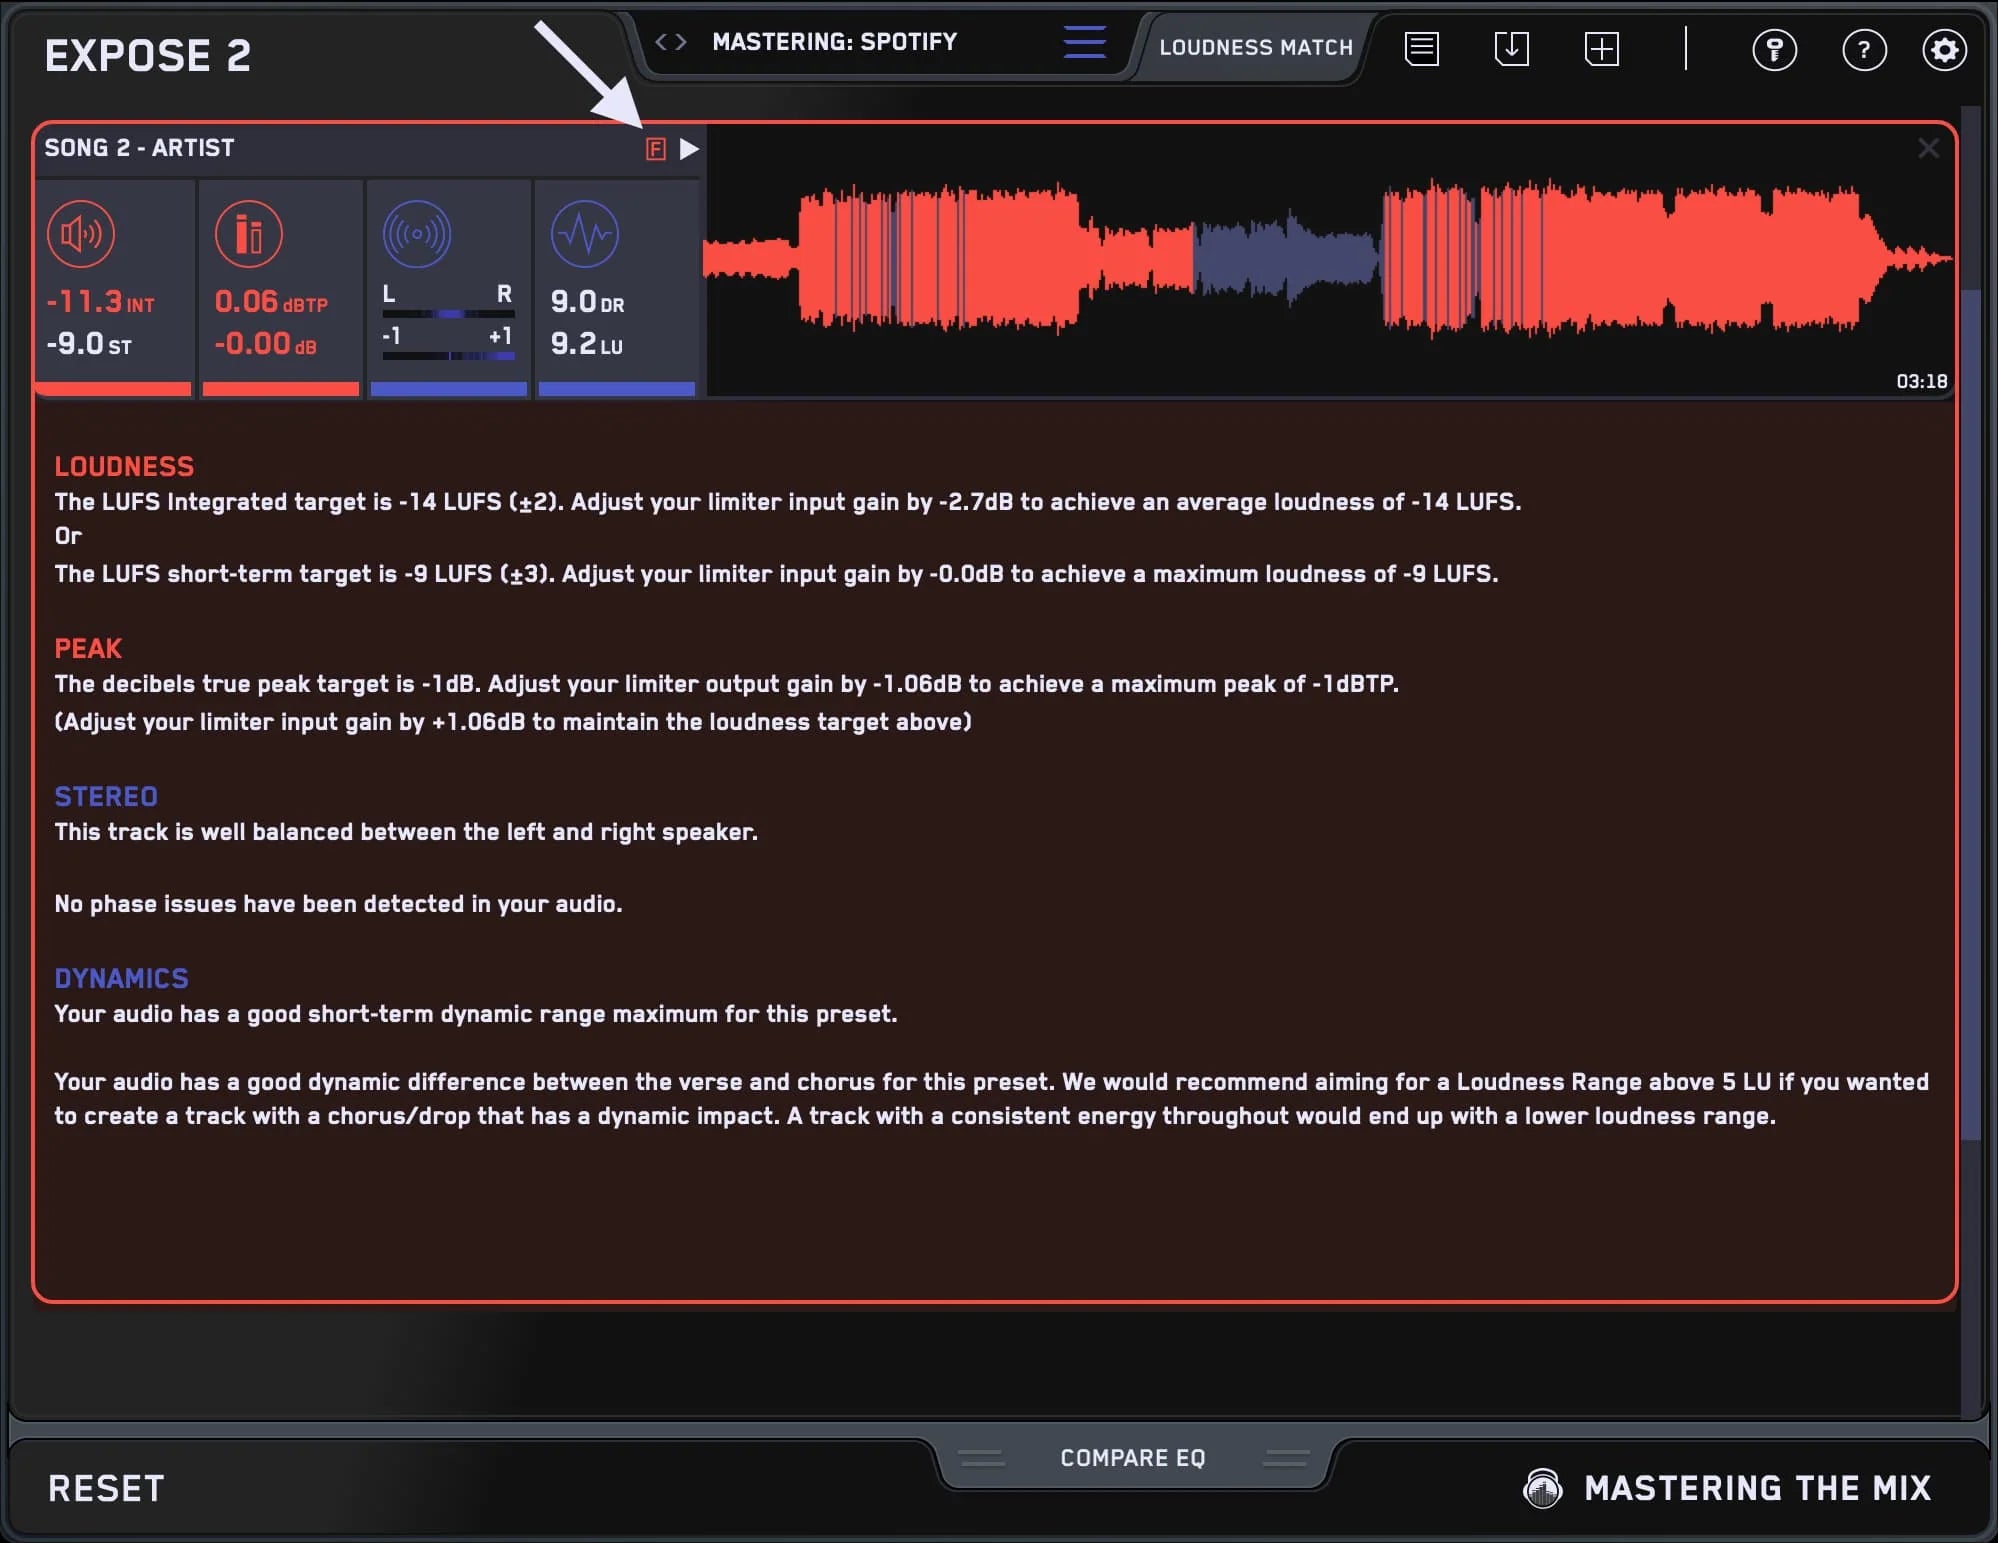
EXPOSE 2: After bouncing your audio, use EXPOSE 2 to analyze your final track. It highlights any technical issues like loudness inconsistencies or true peak problems, ensuring your track meets the requirements of streaming platforms. Select 'Spotify' as your preset and EXPOSE will warn you if you have any technical issues. Click the 'F' (feedback) button for actionable insights on how you can fix the problems.
Practical Tips
Reference Tracks: Compare your track with well-mastered songs on streaming platforms. This provides a benchmark for loudness and tonal balance.
Avoid the Loudness War: Don't sacrifice dynamics for loudness. A well-balanced and dynamic master will sound better on streaming services.
Test on Multiple Devices: Listen to your mastered track on different devices to ensure it translates well across various listening environments.
By mastering these techniques and utilizing tools like LEVELS and EXPOSE 2, you can ensure that your music not only meets the technical standards of streaming services but also retains its intended emotional impact and sonic quality.
How To Master for The Club
Mastering for club play is a unique challenge. The goal is to ensure that the track not only sounds great but also resonates with energy and impact in a club environment, characterized by large sound systems and an atmosphere that demands a physical response from the audience. This section explores the key considerations and techniques for mastering music that thrills club-goers.

Bass Emphasis: Clubs systems are designed to deliver powerful low-end frequencies, making bass management crucial in mastering.
High Volume: Tracks are played at high volumes, so mastering must ensure clarity and prevent distortion at loud levels.
Spatial Dynamics: The sense of space and stereo imaging must be carefully managed to maintain energy and engagement on the dance floor.
Mastering Techniques for Club Tracks
Bass Management: Ensure the bass is powerful yet tight. Avoid muddiness that can overwhelm the mix in a club setting.
Mid-High Frequency Clarity: Clarity in mid and high frequencies is essential, as they cut through the ambient noise of the club.
Loudness and Dynamic Range: Aim for a louder master to compete with other club tracks but maintain enough dynamic range to keep the energy and punch.
Stereo Imaging: Optimize stereo width for a spacious feel, but avoid extreme stereo effects that might cause phase issues on club systems.
Using LEVELS and EXPOSE 2 in Club Mastering
LEVELS Plugin: Use LEVELS for precise bass management and to monitor loudness and stereo imaging, ensuring your track performs well on club systems.
Pro Tip: Use BASS SPACE in LEVELS to ensure that only your kick and bass channels are outputting low-end energy. This will help keep your low-end sounding clear, defined and powerful.

EXPOSE 2: After mastering, analyze the track with EXPOSE 2 to check for issues like clipping, over-compression, or stereo phase problems.
Practical Tips
Reference Club Tracks: Compare your mastering with tracks known to perform well in clubs. This helps in matching the energy and sonic qualities.

Avoid Over-Compression: While loudness is important, avoid squashing the life out of your track. The dynamics are what make a club track engaging.
Mono Compatibility: Ensure the track sounds good in mono, as some club systems might sum your stereo mix to mono.
Mastering for club play requires a balance between power and finesse. By focusing on these techniques and leveraging tools like REFERENCE 3, LEVELS and EXPOSE 2, you can craft a master that not only sounds good in the studio but also electrifies the club environment.
How To Master for CD
Mastering for CDs requires a distinct approach, focused on delivering a high-quality audio experience that complements the medium's physicality and longevity. Unlike the transient nature of digital formats, a CD encapsulates your music in a tangible form, making the mastering process even more crucial for ensuring lasting audio fidelity.
Red Book Standard: CDs follow the Red Book standard, which dictates specific technical requirements such as a 44.1 kHz sampling rate and 16-bit depth.
Headroom and Dynamic Range: Adequate headroom and a wider dynamic range are preferred for CDs to maintain audio integrity and prevent clipping.

Mastering Techniques for CDs
Bit Depth and Sampling Rate: Ensure your final master is in the 16-bit/44.1 kHz format. Higher resolution files should be properly downsampled and dithered.
Loudness and Headroom: While CDs can handle higher loudness levels, avoid excessive loudness that compromises dynamic range and introduces distortion.
Stereo Image and EQ: A balanced stereo image and well-managed EQ are vital for a pleasing listening experience on various playback systems.
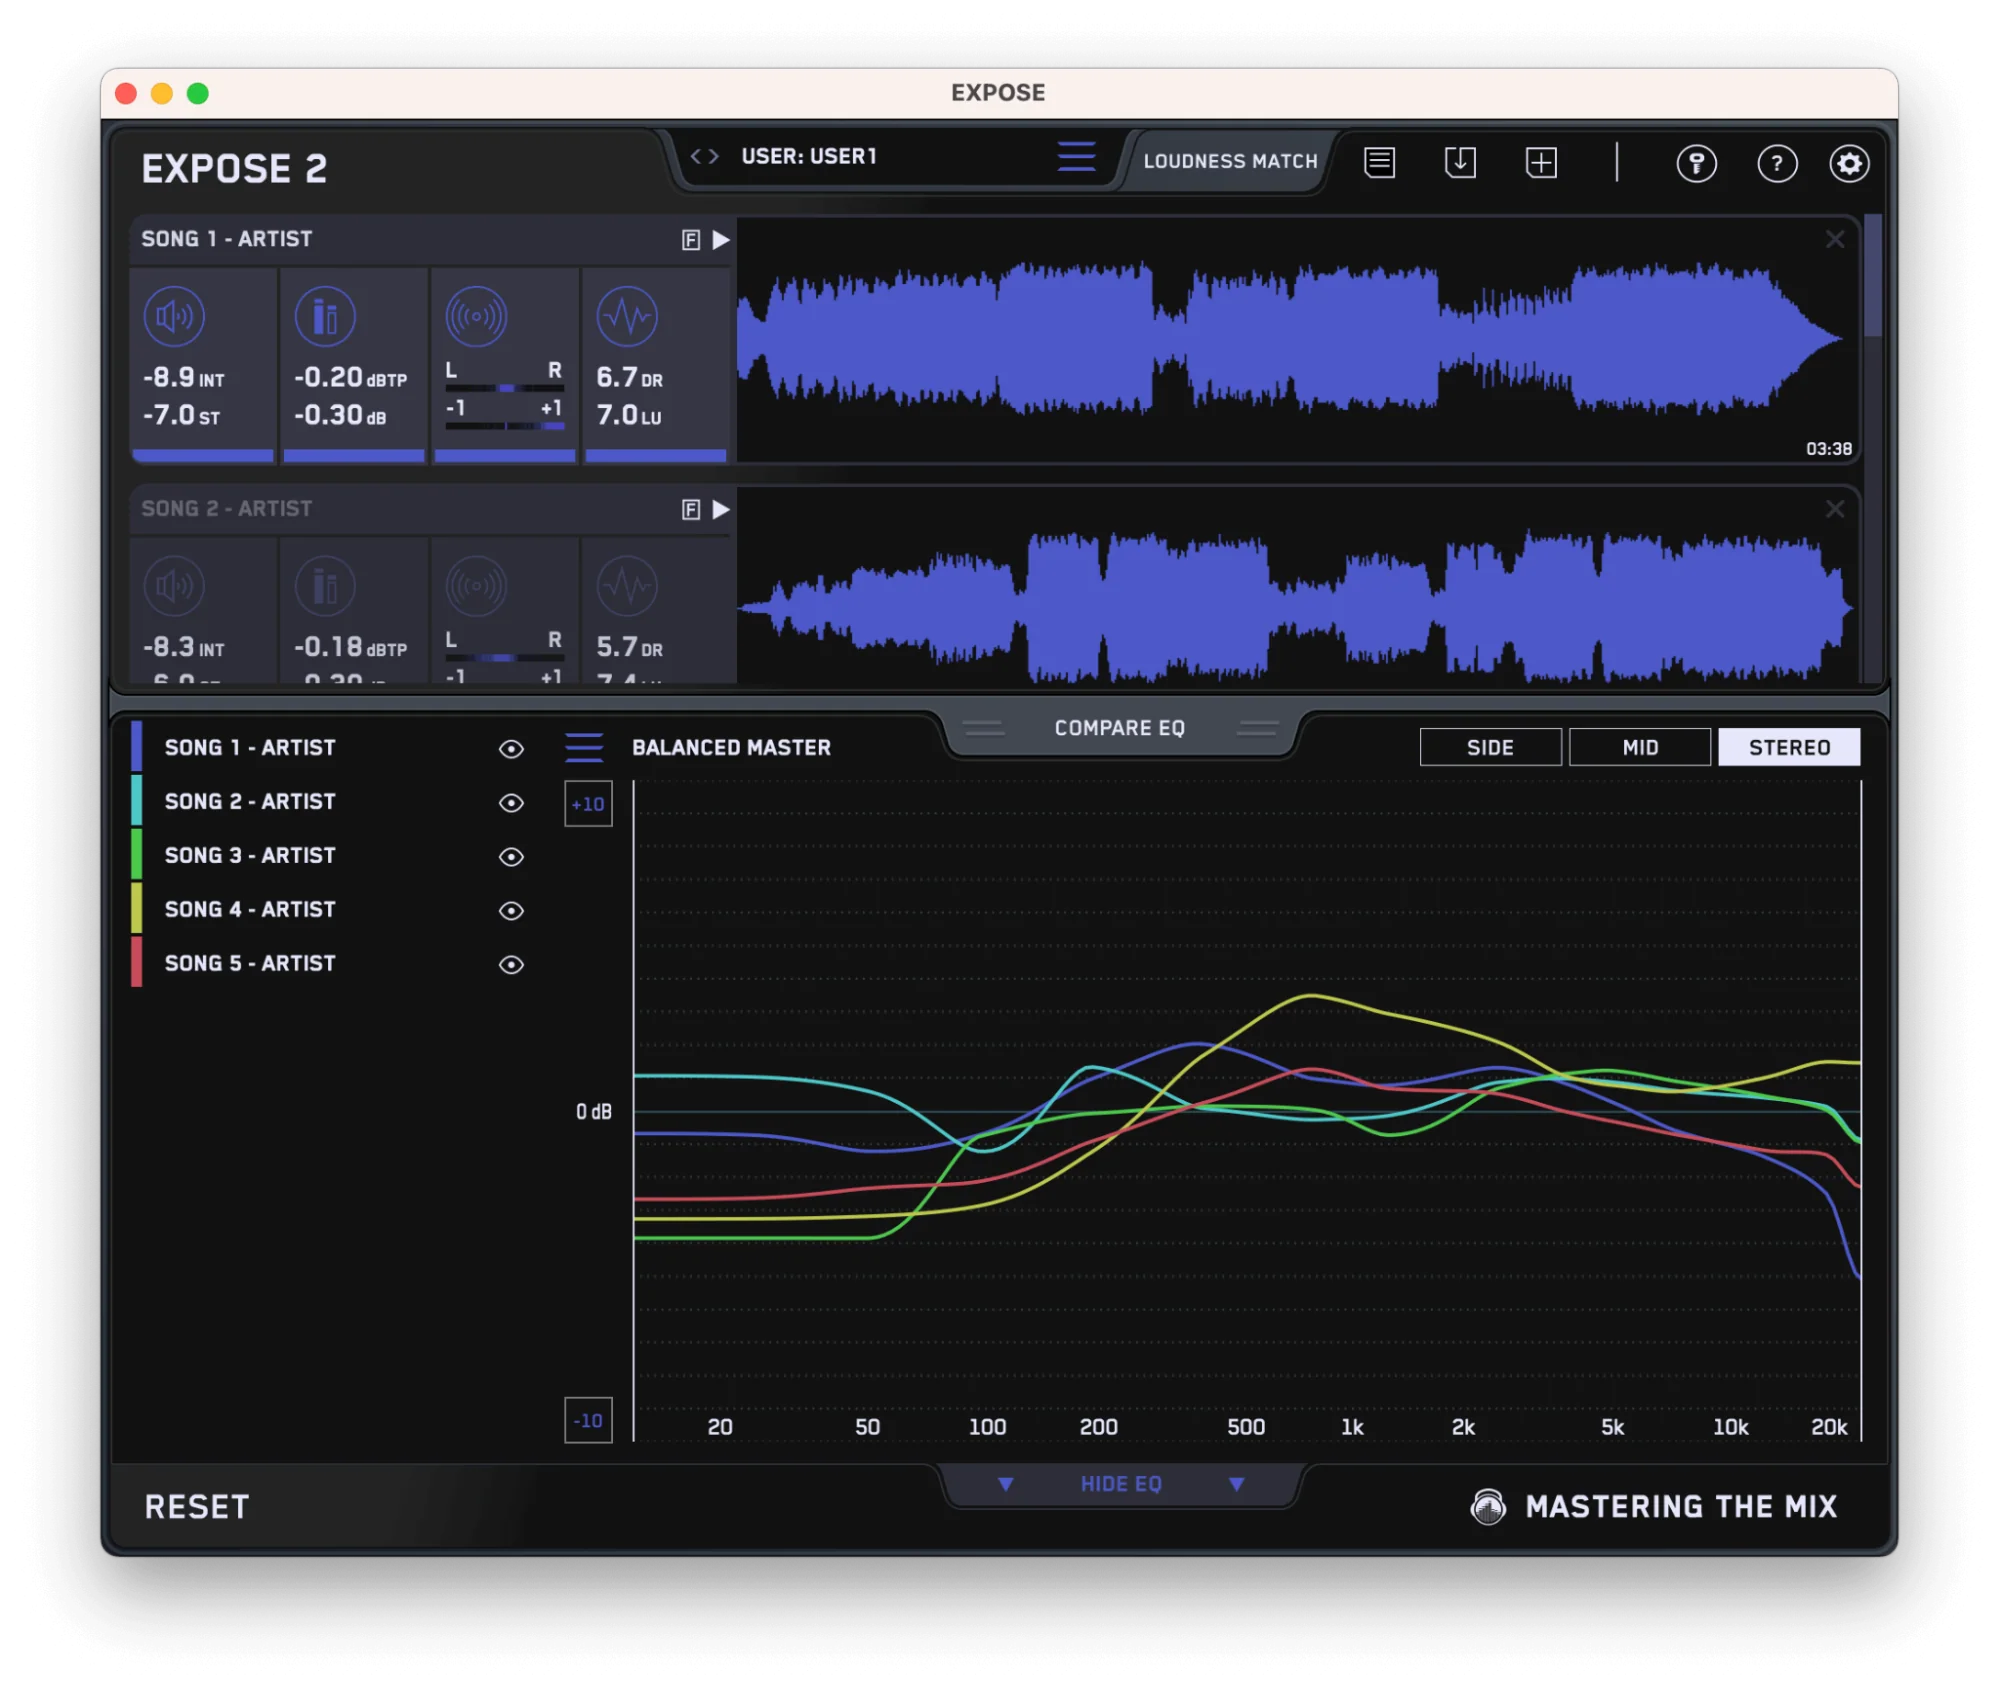
Consistency Across Tracks: For albums or EPs, ensure consistency in tonal balance and loudness across all tracks.
EXPOSE 2 can help you ensure all your bounced tracks have a comparable tonal balance and loudness. This will ensure you give your listener a great experience when they consume your album as a complete body of work. (This is pretty crucial for all mastering mediums).
Practical Tips
Dithering: Apply dithering when reducing bit depth to prevent quantization errors and preserve audio quality.
Track Spacing and Order: Consider the spacing and order of tracks on the CD. Transitions should be smooth and enhance the listening experience.
Test on Various Systems: Listen to your mastered tracks on different CD players and systems to ensure consistent quality.
Mastering for CD is both a technical and artistic process that requires a nuanced approach to preserve the essence of your music. The medium's enduring nature demands a master that withstands the test of time and technology.
How To Master for Vinyl
Mastering for vinyl is a craft that combines technical precision with an appreciation for the medium's unique qualities. Vinyl records have made a significant resurgence, prized for their warm sound and physical presence. Mastering for this format requires a different approach, considering its analog nature and physical limitations.

Unique Challenges of Vinyl
Physical Limitations: Vinyl's physical grooves impose constraints on loudness, bass frequencies, and stereo imaging.
Bass Management: Excessive low frequencies can cause the needle to skip. Therefore, managing and often mono-izing low frequencies is crucial.
High Frequency Sibilance: Excessive high frequencies can create distortion. Careful de-essing and treble management are essential.
Mastering Techniques for Vinyl
Bass Considerations: Keep bass frequencies centered and under control. Stereo bass can cause phase issues and groove distortion.
Dynamics and Loudness: Vinyl cannot handle the same loudness levels as digital formats. Preserve dynamics and avoid over-compression. Aiming for a maximum of -9LUFS short-term will be ideal.
High-Frequency Management: Tame harsh sibilance and high frequencies to prevent distortion and ensure a smooth playback experience.
Track Spacing and Length: Longer tracks mean tighter grooves and potentially lower sound quality. Plan your tracklist accordingly.
Practical Tips
Test Pressings: Always get a test pressing of your vinyl record. This is the best way to ensure that the mastering translates well to the format.
Mono Compatibility: Ensure your mix is mono-compatible, particularly in the low end, to avoid playback issues.
Respect the Medium: Remember, vinyl has a character of its own. Embrace its warmth and analog nuances in your mastering process.
Mastering for vinyl requires a delicate balance between the artistic and technical aspects of audio production. It's about respecting the medium's limitations while bringing out the best in your music, ensuring a listening experience that vinyl enthusiasts cherish.

Conclusion
As we conclude this comprehensive journey through mastering music for different mediums, it's crucial to reflect on the key insights and techniques that tie these diverse processes together. Each medium - streaming, club, CD, and vinyl - presents its unique set of challenges and opportunities, demanding specific mastering approaches. However, the core principles of balance, clarity, and fidelity remain constant, guiding the mastering process regardless of the final format.
Recapitulating Key Points
Streaming: Focus on achieving the right loudness without sacrificing dynamic range, adhering to the loudness norms of streaming platforms.
Club Play: Master for high volume and energy, ensuring bass management and clarity to make the tracks stand out in a live setting.
CD: Maintain high fidelity with careful attention to dynamic range, ensuring consistency across tracks for a seamless listening experience.
Vinyl: Respect the physical limitations of the medium, focusing on mono compatibility in low frequencies and avoiding excessive sibilance and high-frequency content.
The ability to adapt your mastering approach to suit the medium is a testament to your skills as a music producer and mastering engineer. Stay updated with the evolving standards and technologies in audio mastering to keep your skills sharp and relevant. Mastering tools like LEVELS and EXPOSE 2 are invaluable in achieving the desired results, providing visual feedback and technical insights.
Mastering is not just a final step in music production but a crucial phase that shapes the listener's experience. Whether it's a digital stream, a pulsating track in a club, a physical CD, or the warmth of vinyl, your mastering choices directly impact how the audience connects with your music. Embrace these challenges, and let your creativity and technical expertise shine through in every mastered track.
Frequently Asked Questions
What loudness should I master to for streaming?
Most streaming platforms normalise playback, with Spotify, Tidal, Amazon Music, and YouTube targeting around -14 LUFS integrated and Apple Music around -16 LUFS. Mastering louder than that just gets turned down, so aim near those figures, keep the true peak below -1 dBTP, and preserve dynamics rather than chasing volume.
How is mastering for a club different?
Club systems are built for powerful low end and high playback volumes, so the bass needs to be strong but tight to avoid muddiness, and the mids and highs must stay clear to cut through. Aim for a louder master that still keeps its dynamics and punch, manage stereo width carefully, and make sure the track holds up in mono.
What do I need to know about mastering for vinyl?
Vinyl's physical grooves limit loudness, bass, and stereo width. Keep low frequencies centred and largely mono so the needle does not skip, tame harsh sibilance and highs to avoid distortion, and preserve dynamics, aiming for a maximum of around -9 LUFS short-term. Always check a test pressing before committing to a full run.
What are the technical requirements for mastering to CD?
CDs follow the Red Book standard, so your final master should be 16-bit and 44.1 kHz, with higher-resolution files properly downsampled and dithered to avoid quantisation errors. Leave adequate headroom, avoid excessive loudness that compromises dynamic range, and keep tonal balance and loudness consistent across every track on the disc.


