Why Use Reference Tracks?
Reference tracks are used by producers and engineers at all stages of their careers. It’s a great way to make sure our mixes sound as good (or at least comparable) to commercially successful releases.
Reference tracks shouldn't stifle your creativity or force you to make decisions that aren't right for the music. Reference tracks help you recalibrate your ears when you’ve been working on a track for a long time. They help you create music that translates well on different playback systems and in different environments.
Preparing the Comparison

In your mixing session, load up an instance of REFERENCE as the final plugin on your master bus. REFERENCE should come after your metering plugin but before any speaker/headphone calibration software (if you use it).
Drag and drop the reference tracks you want to use onto the Wave Transport, or click ‘ Add Reference Tracks and select your files from your computer.

Here is a checklist to follow when selecting your reference tracks:
- Choose reference tracks that are in the same genre as the mix you’re working on.
- Choose reference tracks with similar instrumentation and sounds to the mix you’re working on.
- Use reference tracks that you think sound amazing.
- If possible, select reference tracks that have had commercial success.
- Use high-quality files. You don’t want to try and match your sound to a low-quality MP3 which can often lack bass and sound harsh.
Once you’ve loaded your Reference tracks, click the Level Match button to balance the tracks so they all have the same perceived loudness. REFERENCE gives you a few options for level matching, ‘Match To Original’, Match To Quietest’, and ‘All to -14 Short-Term LUFS’. ‘Match To Original’ will lower all of your mastered references to the loudness of your quieter mix, making it an appropriate setting when mixing.

As mentioned, your mix will most likely be a lot quieter than your reference tracks. Due to the way our human ear perceives the frequency spectrum, quieter music can sound like it has a weaker bass and less clarity in the high frequencies. This is a misconception and when we match the loudness it removes this bias allowing you to make informed mixing decisions.

Comparing your mix to the reference tracks
Now that your tracks are level matched, you can begin to objectively look at how your mix sounds compared to your reference tracks.
Start by monitoring the chorus of both your reference track and the original track you’re working on, as this often represents the part of the song with the widest range of frequencies.
Some questions to ask yourself when using reference tracks:
- Are the vocals too hot?
- Is the Kick level too loud?
- Is the bass too quiet?
- How do the reverb, delays, and other spatial effects compare?
- How does the balance compare with other tracks in a similar genre?
- Is the stereo image wide enough?
You might choose to make your mix slightly more dynamic than the mastered reference tracks to compensate for any compression and limiting that might be applied to your mix during mastering.
Trinity Display
When you listen to your reference track and you compare it to your own music, it can be difficult to put your finger on what changes you need to make. The Trinity Display uses intelligent algorithms to show you how the frequency balance, stereo width, and punch of your track compares to your reference.

Level Line
The white Level Line tells you how the EQ balance of your original song differs from your reference track.
The Trinity Display has a thin, faint line through the middle. This represents 0dB.
Use an EQ to match the level line curve to get your music sounding like your selected reference track.
Boost where the level line is above 0dB and cut where the level line is below 0dB.
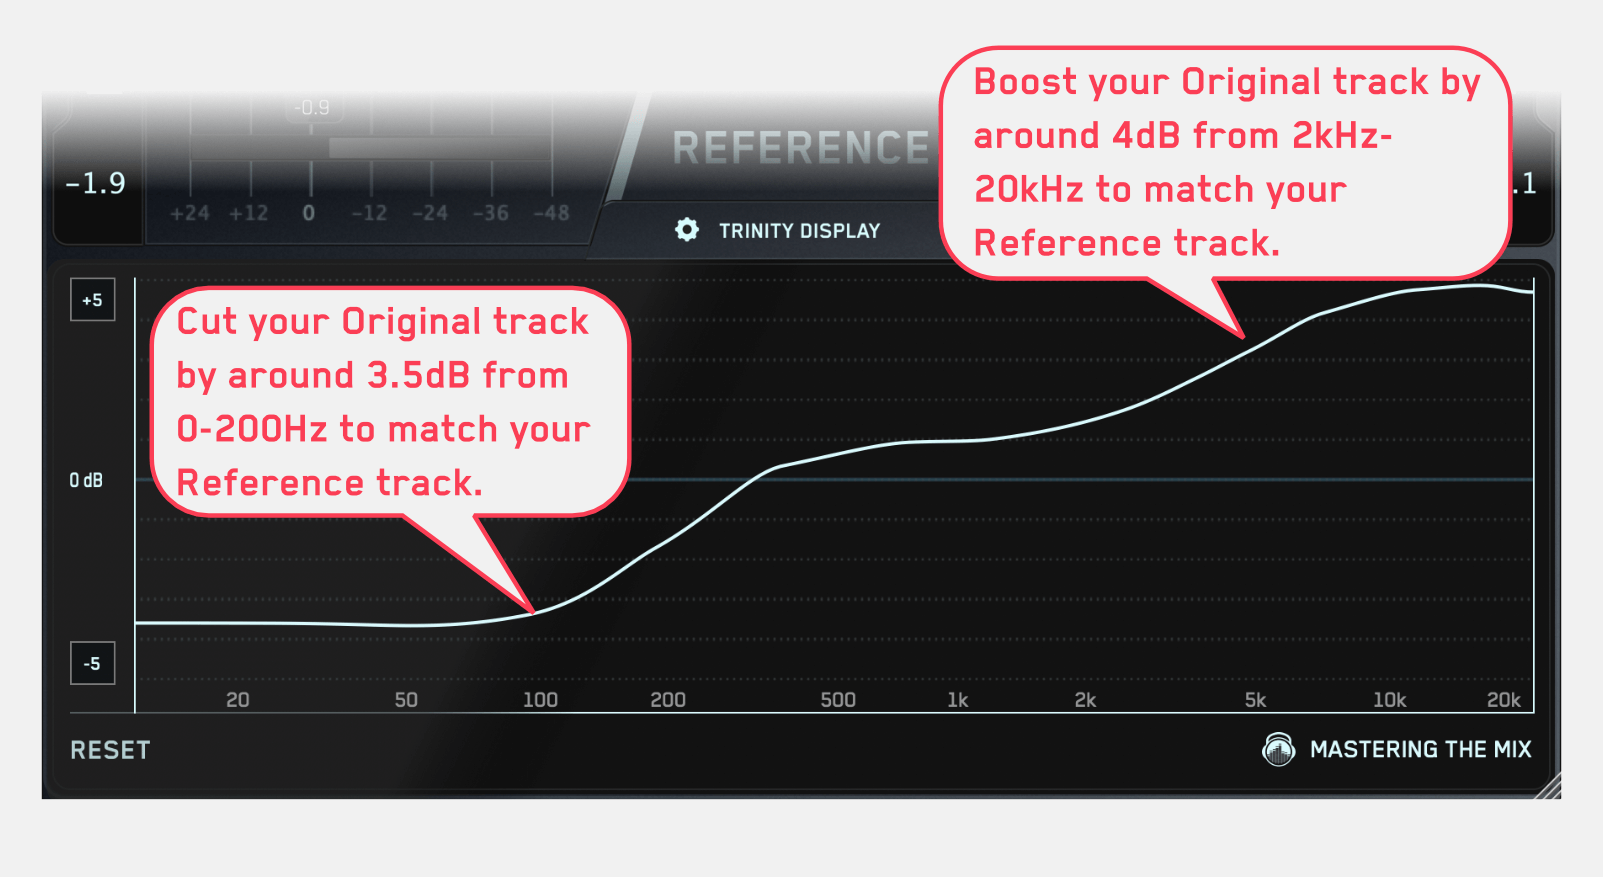
If the Level Line in the low-frequency range is lower than the central 0dB line, you may choose to decrease the volume of your kick and bass. Alternatively, you may decide that introducing EQ cuts to the low end of your bass elements might be a better option to get your low frequencies sounding more comparable to your reference.
If the Level Line in the high frequencies is above the central line, you might decide to increase the volume of your hi-hats, cymbals, and sweeping effects. Alternatively, you may decide to add some EQ boosts to increase the high-end energy to make it comparable to your reference.
Stereo Field
The Stereo Width shows you how wide the audio is across the entire frequency range of either the original track you’re working on or your reference.

Understanding the stereo spread of both your original track and your reference will help you get closer to the sound you want. You can use panning in your DAW or a stereo tool to reduce or increase the width of a specific frequency range in your track.
When mixing, you have full control over the individual elements of your session. Try to apply stereo adjustments to individual channels rather than the full mix. If you feel the upper-mid-frequencies need a boost, try to find the specific channel that would benefit most from this adjustment, such as the synths or the upper-harmonics of the bass. This will give your mix a better sense of space and lead to better clarity across the whole frequency spectrum.
Punch Dots
The Punch Dots in the Trinity Display will tell you how the short-term dynamic range of your track compares to the short-term dynamic range of your reference.
The Punch Dots will move towards the 0dB line if that frequency band is more compressed in your original than in the corresponding frequency range of your reference.
The Punch Dots will move away from the 0dB Line if that frequency range is less compressed in your original than in the corresponding frequency range of your reference. The more opaque the dots are the larger the difference between the punch of your track and the punch of the reference.
In the example below, we can see that the low-end from around 50-200Hz is showing the Punch Dots moving towards the 0dB line. This tells us that our original track has more compression in the low frequencies than the reference track. This might prompt us to reduce the compression on our kick or bass elements.
We can also see that from 200-1.5kHz the Punch Dots are barely visible. This means our original track has a similar amount of compression to our reference.
Finally, we can see that from 1.5kHz to 20kHz, the Punch Dots are moving away from the 0dB line. This means that the high frequencies are punchier in our track than in the reference. We may decide to compress these transients using a multi-band compressor, or we might decide that we actually like the punchy top end and leave it just as it is.

Conclusion
If you’ve ever spent hours tweaking your mix only to later realise you made the sound worse then you understand how painful this realisation is. Utilizing reference tracks is a great way to ensure your mix is heading in the right direction. Make it a habit to check in with a reference track every few minutes to get more efficient at dialing in a pro sound.
Frequently Asked Questions
Why use reference tracks when mixing?
Reference tracks let you check that your mix holds up against commercially successful releases and help recalibrate your ears after long sessions. They guide you toward mixes that translate across different playback systems, without forcing creative choices that are wrong for the music you are making.
Why do you need to level match a reference track?
Your mix is usually much quieter than a mastered reference, and quieter music can seem to have weaker bass and less high-end clarity. That is a perception bias. Matching the perceived loudness removes the bias so you can compare the two tracks objectively and make informed mixing decisions.
What should you compare between your mix and a reference?
Monitor the chorus, since it usually has the widest frequency range. Ask whether the vocals are too hot, the kick too loud, the bass too quiet, how the spatial effects compare, and whether the stereo image is wide enough relative to other tracks in the same genre.
Should you apply stereo width to the whole mix or individual channels?
When mixing you control every element, so apply stereo adjustments to individual channels rather than the full mix. If the upper mids need widening, find the specific channel that benefits most, such as synths or bass harmonics. This gives better space and clarity across the spectrum.


