
The lead vocal is the main focus of most modern music. Consequently, a strong vocal performance will draw a listener in, while a poor one will have them frantically searching for the "next" button.
A well-crafted vocal will sound clean and intelligible without becoming shrill or fatiguing. In this post, we'll go over tried-and-true methods for getting pro-quality vocal tracks with maximum clarity and zero harshness.

Start with a Great Vocal Recording
An EQ plug-in isn't the first step to achieving a pro-level vocal track; rather, it begins at the tracking stage. Regardless of vocalist or genre, you should always strive to combine a stellar vocal performance with correct mic technique and proper gain-staging.
A microphone is the channel through which an artist connects with their audience. That's why utilizing proper mic technique is so important.
After all, even if a vocalist delivers a once-in-a-lifetime performance, if it's harsh and unpleasant, listeners won't want to stick around for very long. To capture a vocalist effectively, you'll want to ensure that their microphone is placed at a proper distance, especially if you're using a cardioid microphone (which is easily the most common type of studio vocal mic).
If you position the mic too close to the vocalist's mouth, then its proximity effect will overwhelm their vocal delivery with an excess of low-end frequencies. If you position the mic too far away, then their voice will sound thin and distant.
The microphone should be close enough to produce a full, present sound without any unnatural-sounding low end.
A seasoned vocalist will know how to regulate the volume of their voice and how to adjust their proximity to the microphone to compensate for expressive level variations.
If a vocalist is whispering, they should lean in. If a vocalist is going to belt, they should back off the mic.
Sometimes vocals are replete with plosives — the bursts of air created by p and b sounds that cause loud, low-frequency pops and thumps when they reach a microphone diaphragm. Solving this issue is as easy as placing a pop filter between the vocalist and the microphone.
Gain-staging is equally important. If your recording levels are too low, then you’re going to experience increased noise; if your levels are too high, then you might experience clipping.
Best practice dictates that peaks should hit between -12dBFS and -10dBFS while you're recording, so keep an eye on your meters!

Make Space For The Vocals
Trying to use EQ to push the vocal clarity above the brightness of other elements in the mix is a fast way to introduce harshness into your mix.
Aiming to enhance the clarity and prominence of vocals in your mix, our plugin FUSER offers a strategic solution. When dealing with a mix that's dense with competing audio elements, achieving a balanced sound can be challenging. FUSER's primary goal is to alleviate this challenge and create a sonic environment where vocals can shine. Here’s a step by step approach to create space for vocals in your mix:
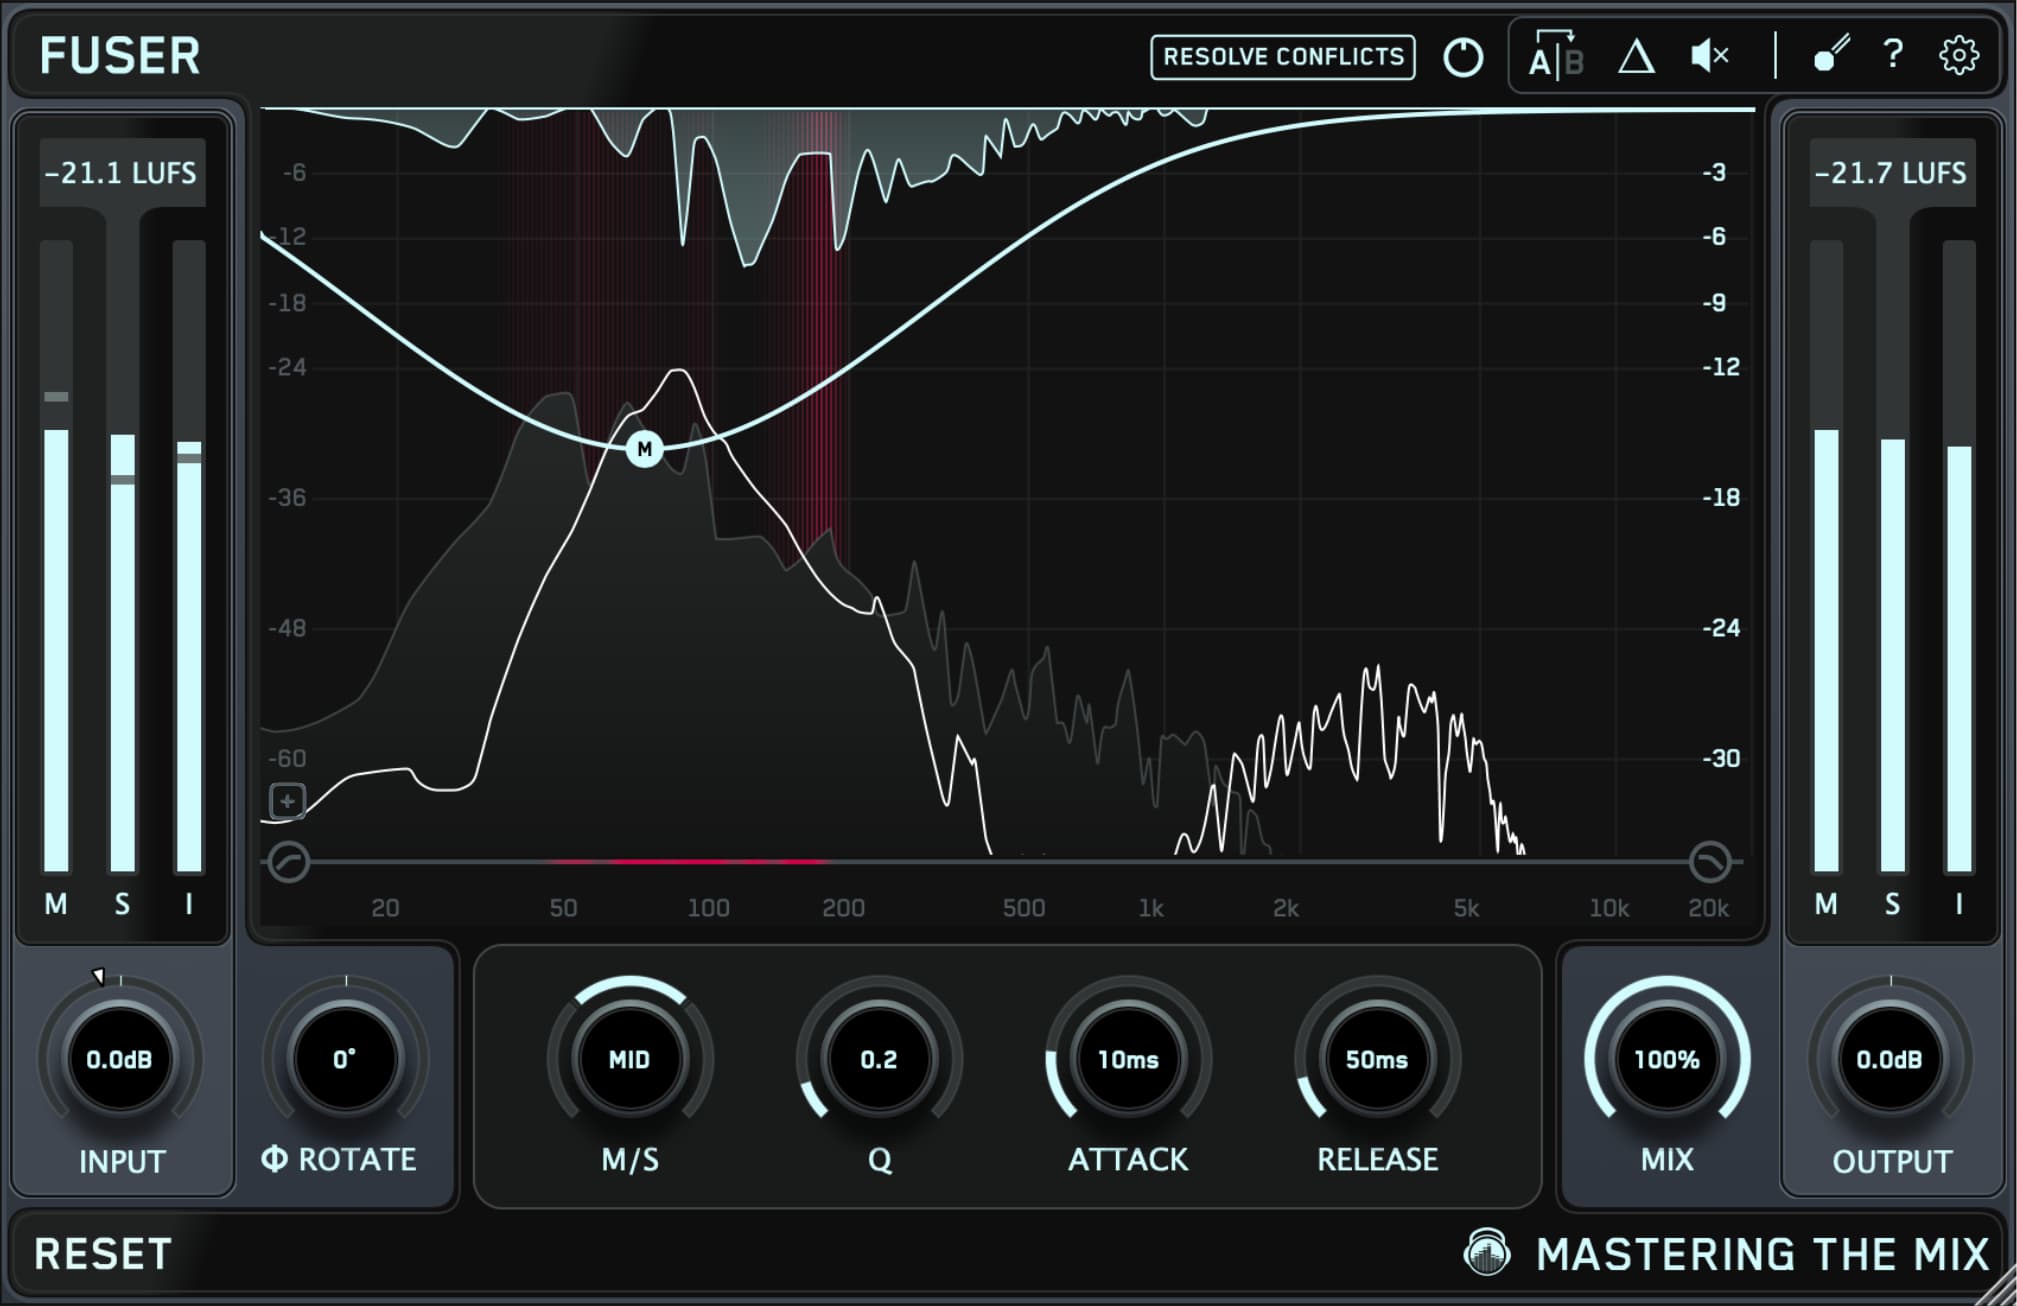
- Identify Conflict: Determine which instruments or elements in your mix are clashing with the vocals. These could include pianos, synths, guitars, and more.
- Position FUSER: Place FUSER as the final plugin on the channel (or group) conflicting with the vocals.
- Configure Sidechain: Sidechain the vocal channel in FUSER.
- Visual Clarity: Utilize FUSER's visual tools. The frequency display shows the frequency content of both the submissive and dominant channels. The dominant channel is represented by a white line, and the submissive channel is represented in gray. Mid conflict is sdisplayed as a red glow, and side conflict is shown as yellow.
- Resolve Conflicts: FUSER provides a "Resolve Conflicts" function. When activated, this feature automatically applies adjustments that transparently address the audio clashes between the two channels.
- Fine-tune with Manual Adjustments: For more precise control, double click to manually create nodes on the frequency display, then adjust the stereo positioning, Q bandwidth, attack and release to work well with you audio. Pro Tip: Engage delta and solo your sidechained signal then set the attack and release so the delta signal is heard in unison with the sidechain signal. This will help you get a tight and controlled sound. You can specifically target and attenuate frequencies where conflicts arise, ensuring they don't overpower the vocals.
- Monitor Visual Feedback: Keep an eye on the red and yellow conflict glow as you adjust settings. This visual feedback aids in making informed decisions about where and how much to reduce conflicting frequencies.
- Avoid Overdoing It: The goal is to create space for vocals without sacrificing the character of the other elements. FUSER's technology is designed to strike this balance.
- Experience the Result: Once adjustments are made, you'll likely notice that the vocals now occupy a more prominent and clear position in the mix, standing out without being overshadowed by other sounds. This sets you up for success when you EQ your vocal.
In essence, FUSER streamlines the process of carving out space for vocals within a mix. By addressing frequency conflicts and intelligently adjusting the audio, it empowers music producers to enhance the clarity, presence, and impact of vocals, making them the focal point of the composition.
Tone-sculpting Manoeuvres for Vocals
Once you have a great-sounding vocal track to work with, it's time to break out your EQ plug-in so you can carve out a place for it in your mix.
Our MIXROOM plug-in is an excellent choice for sculpting vocal tracks. Not only does it offer top-level clarity and transparency via its state-of-the-art filters, but it also saves you time with application-specific presets and target frequencies.
Using MIXROOM is pretty straightforward. To start, instantiate the plug-in on an insert of your vocal track.
Next, choose an applicable channel preset from the Vocals section. MIXROOM's presets are far-reaching, with male- and female-specific selections along with a wide spectrum of genres to choose from.
You can also create custom target values to help you get closer to the sound of your favorite songs. You do this by clicking the target icon in the bottom left corner and importing reference tracks.
After that, choose a loud section of your vocal track, such as during the drop or chorus. MIXROOM's Target EQ Curve permits you to skip the guesswork and dial in a pro sound in mere seconds.
Moreover, you get an Add Smart Bands button that instantly loads EQ bands that match the Target EQ Curve, providing you with an intelligent starting point for your tone shaping.
It's vital that you try not to be heavy-handed with your EQ maneuvers. You'll be stunned at how much presence a gentle, narrow boost at 5kHz will add or how much body a subtle 500Hz bump will add.
You should also try to avoid soloing your vocal when EQing for the most part. While there will be times that you'll want to solo the track (i.e., to correct a hard-to-hear artifact or anomaly), it's more effective to EQ your vocals within the context of your entire mix.
Most of the time, perfecting a vocal track in isolation won't translate to a vocal track that sounds great in a mix. Quite the contrary, a track that sounds awful in isolation could be exactly what your mix needs!

Harsh-sounding Acoustic Resonances
Does your vocal track sound shrill? You could try to tame it with a high-frequency shelving curve on a standard static EQ, but this will likely not solve the problem, and making a drastic high-frequency cut will suck all the "air" out of your track.
So, what's the problem, then? The answer: unwanted acoustic resonances.
Resonances take place when one of the frequencies in your mix interacts with the natural frequency of something else within your mix. This will sound like an out-of-control vibration that you'll perceive as a buildup of a particular frequency or group of frequencies.
Unwanted resonances are the bane of every engineer's existence. They'll impart a harsh or muffled character to your vocal track by way of strident or buried upper mids and out-of-control lower frequencies.
Moreover, these unbridled frequencies will rob your vocal track of its dynamics, and masked frequencies will create a seriously off-kilter mix.
Solving unwanted resonances used to be a time-consuming endeavor. But, thanks to our RESO plug-in, locating and dialing out resonances is easier than ever.
RESO is a highly advanced dynamic resonance suppressor that not only locates these sonic gremlins but also eliminates problematic resonances — automatically.
To deploy RESO, load it onto an insert of your vocal track, then click the Calculate Targets button. The plug-in will then automatically provide you with Target Nodes, along with sensible setting suggestions.
Removing resonances from your vocal tracks will make them sound cleaner and clearer, plus it will permit you to add flattering EQ curves to your track without amplifying unwanted sonic artifacts.

Put an End to Sibilance
Another phenomenon that can spoil your vocal tracks is sibilance. Sibilance refers to s, z, sh, ch, and similar sounds that contain lots of high-frequency information.
When sibilance is hyped or overemphasized, such as with high-frequency EQ boosts or dynamic compression, the result sounds very unpleasant.
The easiest way to eliminate sibilance is with a de-esser. A de-esser is essentially a high-frequency limiter that automatically engages when sibilance rears its ugly head.
This will allow you to boost your vocal track's upper-mid and high frequencies, which will really help it rise above your mix without accentuating every "s" an artist sings.
You can use a de-esser either during the tracking stage or during the mixing stage. A word of caution, however: use de-essers in moderation, or you'll cause your vocalist to sound like they have a speech impediment.

Conclusion
Vocals are the most important part of any modern song. Thus, the quality of your lead vocal track will make — or break — your mix.
But, by recording great-sounding vocals, EQ-ing them properly, and eliminating acoustic resonances and sibilance, you'll be able to build ear-grabbing mixes that can stand toe-to-toe with any pro-level release out there.
Keep following our blog for more expert recording, mixing, and mastering tips and techniques!
Frequently Asked Questions
How do you record a vocal that EQs well later?
A pro vocal starts at tracking with good mic technique and gain staging. Place a cardioid mic at the right distance to avoid excess low end from the proximity effect or a thin distant sound, use a pop filter, and aim for peaks around -12 to -10dBFS.
Why does pushing vocal EQ above the mix cause harshness?
Using EQ to force vocal clarity above the brightness of other elements quickly introduces harshness. It is better to make space for the vocal first by resolving conflicts with competing instruments, then EQ the vocal gently.
Why does a shrill vocal not respond to a high cut?
A high-frequency shelf often will not fix shrillness and a drastic high cut removes the air. The real cause is usually unwanted acoustic resonances, which need dynamic resonance suppression rather than a static EQ move.
How do you control sibilance on a vocal?
Use a de-esser, a high-frequency limiter that engages automatically when sibilant s, z, sh and ch sounds appear. This lets you boost upper-mids and highs without accentuating every s, but use it in moderation to avoid a lisp-like sound.


