Bass instruments are the foundation of the rhythm section and an integral part of modern music production. But it can be challenging to dial in a powerful bass tone that cuts through on any system.
In this blog, we'll share some of our favorite tips for getting bass lines to cut through a mix and hold their presence on small speakers like cell phones, laptops, or even ear-buds.

Make Sure Your Low-End Has Space
It’s common for low-end rumble to make its way into a mix through vocal recordings and rumbly synth patches. If you have many channels emitting low-end, the frequencies will overlap with your kick and bass, and fight for the space. This conflict affects how rich and punch the low-end that you actually want will be.

The Bass Space section in our plugin LEVELS identifies if any channels within your mix are outputting unwanted low frequencies.
To use Bass Space, first mute your kick and bass elements within your DAW. The frequency bars in the central display area will give you a reading at 40Hz, 80Hz 120Hz and 160Hz. They will jump into the upper red half of the circle if there is too much low-end energy. If this is the case you need to identify which channels are outputting the excess low frequencies. Mute the individual channels one at a time until the bars drop into the green to find the culprit and then use a high pass filter to clean up this excess low-end rumble to maximise the clarity and power of your track. Be careful to not remove the material you actually want to hear in your mix.
Remove Low-End Using A High Pass Filter
One of the keys to mixing bass is a powerful low-end, but too much can make your track sound boomy or muddy, making it difficult to actually hear what the bass is playing. It might sound great in your studio, but as soon as you listen back on a system with a subwoofer, the bass becomes overpowering.
It may seem counter-intuitive, but using a high-pass filter to remove low-end from the bass can actually make the bass sound more powerful. By cutting out any unnecessary low-end, you can make more room for the bass frequencies you actually want to hear.
Start with the filter set at 20 Hz, then slowly move the frequency up and listen closely until the bass sounds clear and full. If you move the filter too high, the bass will sound thin and weak. If the frequency is set too low, the bass will sound boomy and muddy.
If you're having issues identifying exactly where the cut-off point should be, use a frequency analyzer to help find exactly where the filter should go. Any higher than 50Hz and you may be cutting too much out, weakening the sound, so be cautious.

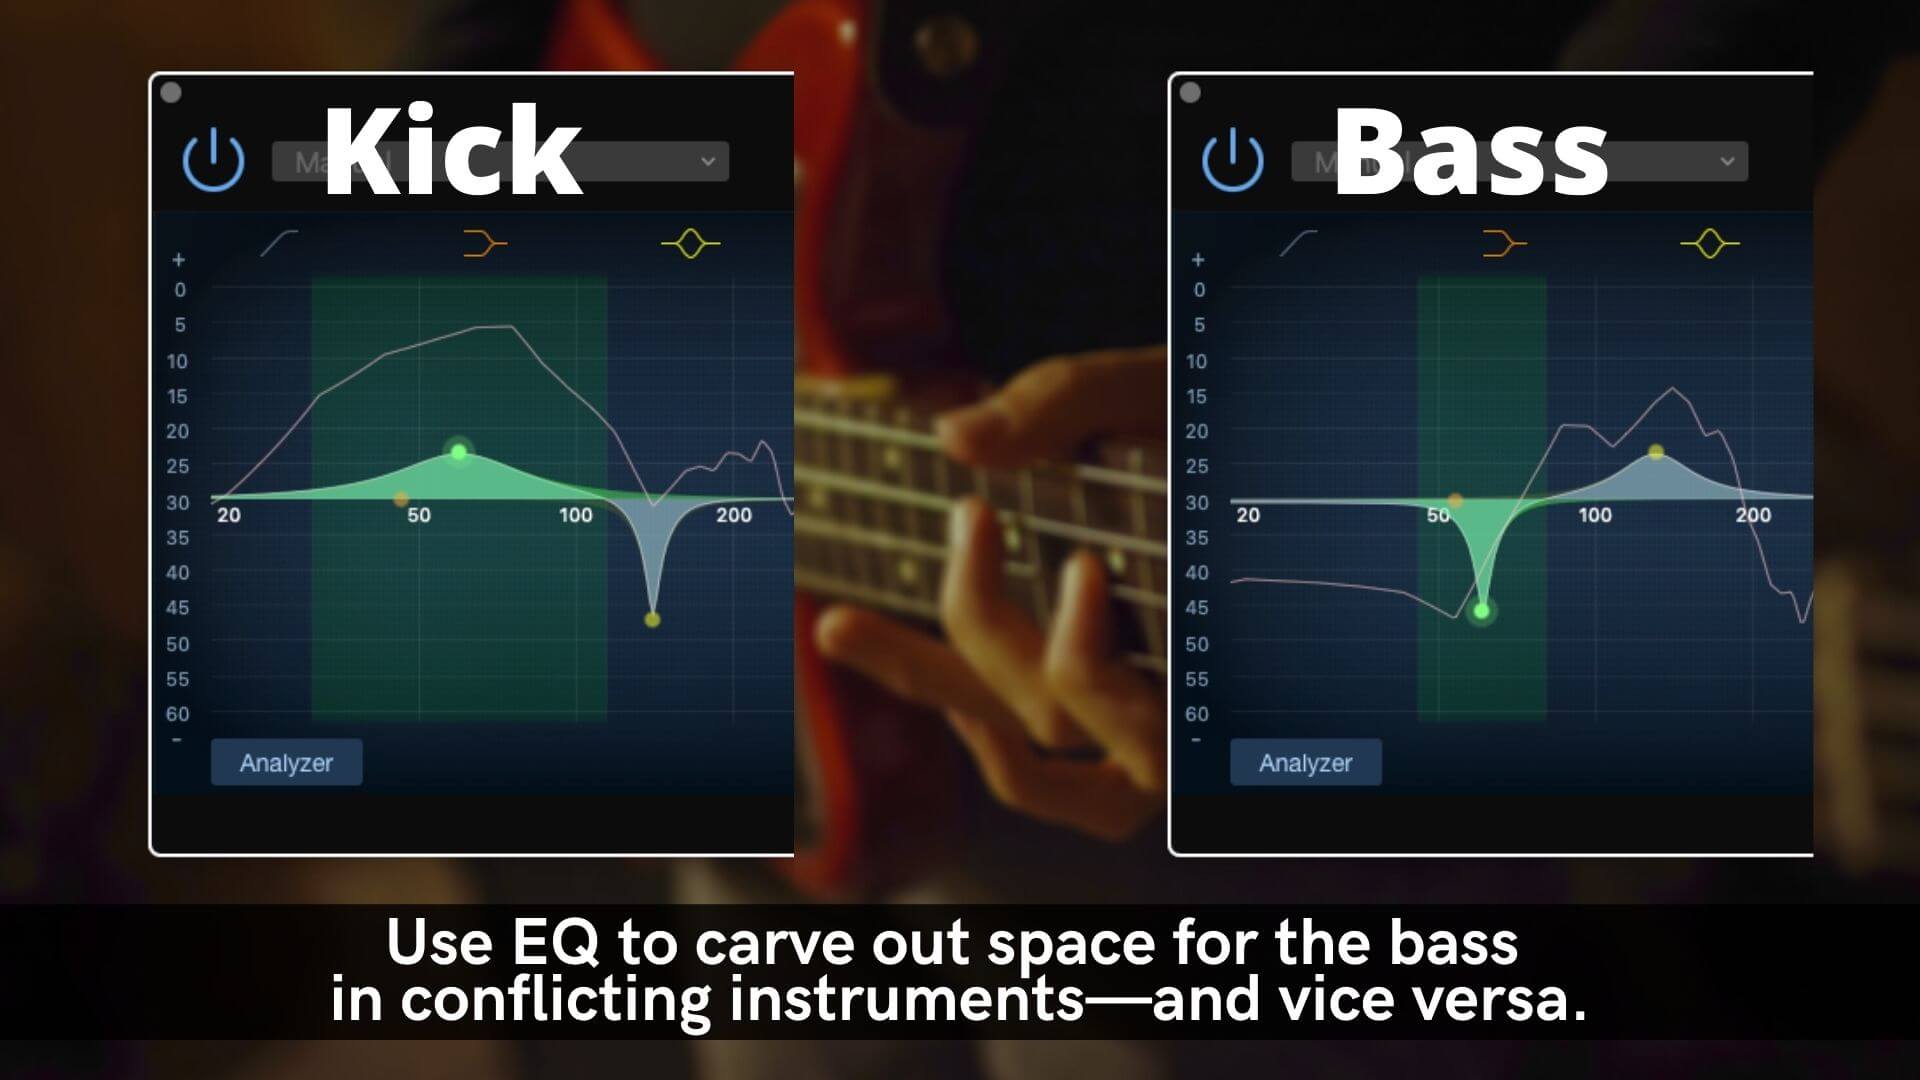
Carve Out Space In Other Instruments
One of the biggest issues when mixing bass instruments is masking, which causes low-end instruments to overpower other tracks in the mix. Thankfully, you can solve this dilemma with some surgical EQ.
Start by identifying the fundamental frequencies of the bass. Use a frequency analyzer to pinpoint one or two dominant frequencies that you want to accentuate. Gently boost these frequencies using a wide bell with a low Q value.
Next, identify any tracks that are fighting with the bass—typically a kick, synth, or heavy guitar. Use an EQ with a narrow bell and a high Q value to cut the same frequencies you boosted on the bass. This helps accentuate the fundamental frequencies of each instrument while keeping other tracks out of the way.
Finally, repeat this process in reverse with any tracks that conflict with the low end. For instance, if the kick is the culprit, use a frequency analyzer to identify one or two fundamental frequencies and gently boost them. Then, cut those same frequencies on the bass track. This helps create synergy between each track for a cohesive-sounding mix.
Boost The Upper-Mids
Boosting the upper-mids can be a great way to make the bass sound louder and more present in your mix. This trick works especially well on busy bass parts with lots of movement. It brings out the attack and brightness of the bass, which helps make the bass more audible on small speakers that are unable to accurately recreate the low-end.
Start by creating a subtle boost with a wide bell around the 1-4 kHz range. This will help bring out the bark and bite of the bass, which is great for aggressive genres like punk and metal. For funk and slap bass performances, try boosting a little higher—around 8 kHz—to bring out the snap of the strings.

Side-Chain Compression
If you're still struggling to get your bass to sit right in the mix, try using side-chain compression. In most cases, masking occurs between the kick and the bass, so let's use that as an example.
Start by placing a compressor with a side-chain input on the bass track. Then, create a send on the kick drum channel called "side chain." Finally, set the key input on the compressor to the side-chain aux send—this will act as the trigger to our compressor.
For a more natural sound, use a fast attack time (<10 ms) and a fast or automatic release time. To achieve the classic EDM-style pumping effect, use slower attack and release times based on the BPM of the track—the compressor should pump in time with each quarter note.
Tip: be sure that the compressor returns back to a non-compressing state before the kick hits again. This will ensure you don’t lower the volume of the bass where it’s not needed.

Saturation
Finally, saturation can be another powerful tool for getting your bass tracks to cut through the mix. It may seem like an aggressive approach, but adding some saturation to your track will create harmonics, filling out the upper range of the frequency spectrum with rich tones that perfectly complement the low-end.
A little bit of saturation goes a long way, so it's important to take it easy. For a subtle effect, create a new aux track with a distortion plug-in to apply parallel processing. This allows you to achieve clean, powerful low-end from the original track while adding a bit of color and character in parallel.
For a more aggressive sound, add the distortion plug-in directly to the channel—just be careful not to overdo it or the bass may sound harsh and conflict with the guitars.
For best results, try using a dynamic harmonic distortion plug-in like IGNITE. With variable saturation settings, IGNITE makes it easy to increase the perceived loudness, power, and presence of a channel without the pumping effects of a compressor.
Adjust the Filter to select the frequencies you want to affect, lower the threshold so that the signal is consistently pushing above the line, and increase the percentage amount to give your bass the perfect amount of saturation.


Follow these tips during your next mixing session to help you dial in crystal-clear basslines that cut through the mix on any speakers.
Frequently Asked Questions
How do I get bass to cut through on small speakers?
Make sure the low end has space, then boost the upper-mids of the bass around 1 to 4 kHz to bring out attack and brightness. This helps the bass stay audible on phones, laptops and earbuds that can't reproduce low frequencies.
Why does a high pass filter make bass sound more powerful?
Cutting unnecessary sub frequencies makes room for the bass tones you actually want, preventing a boomy, muddy result. Start the filter around 20Hz and raise it slowly until the bass sounds clear and full without going thin.
How does sidechain compression help bass sit in a mix?
Triggering a compressor on the bass from the kick clears space when they would otherwise mask each other. Use a fast attack and release for a natural result, ensuring the bass returns to full level before the next kick hits.
Can saturation help bass cut through?
Yes. Saturation adds harmonics that fill out the upper frequency range and complement the low end, increasing perceived presence. A little goes a long way, and parallel processing keeps the original low end clean while adding character.


