Compression is a topic that is often discussed at length by producers and engineers. We talk about our favorite compressors, popular techniques, and the best settings to use for any and every situation. But one thing we don't often talk about is how to actually hear compression.
When you're first starting out, it's important to train your ears to be able to identify small but important details of music, like level balance, frequency response, and of course, dynamics. In this blog, you'll learn how to hear compression, and what to listen for while dialing in a compressor.

What Is A Compressor?
A compressor is a powerful tool used to reduce the dynamic range of a signal. Compressors attenuate the loudest parts of a signal, making the quiet parts more noticeable. More specifically, compressors attenuate transients, or high-energy bursts at the beginning of a sound, while increasing the decay for a more balanced, natural sound.
Compressors are commonly used to accomplish a variety of different tasks, including:
-
Reducing peaks or preventing clipping
-
Glueing tracks together
-
Adding color and character to tracks with harmonic saturation
-
Increasing the attack or impact of a sound
-
Increasing the sustain or decay of a sound
-
Adjusting the envelope of a sound
Compressor Controls
In order to learn how to hear compression, you need to know how each of the controls affects the sound. Let's take a quick look at the most common compressor controls and what they do.
Threshold sets the level at which the compressor begins working. Signals above the threshold are compressed, while signals below the threshold are left unchanged.
With a high threshold, only the loudest portions of the signal will be compressed. This approach is perfect for preventing signals from peaking or clipping.

With a low threshold, most of the signal will be affected by the compression. This approach is great for glueing tracks together and fattening up the sound of a mix.
Ratio controls how much of the signal is compressed when it exceeds the threshold. High ratios (typically anything above 4:1) compress the signal more aggressively, while low ratios (such as 2:1) are more gentle and gradual.
High ratios tend to create a more noticeable compression effect, while low ratios are more subtle. Typically, high ratios are used when trying to prevent peaks or clipping, while low ratios are used to glue tracks together.

The attack and release controls have a big impact on your sound. In order to really "hear" compression, you'll need to master how these controls work.
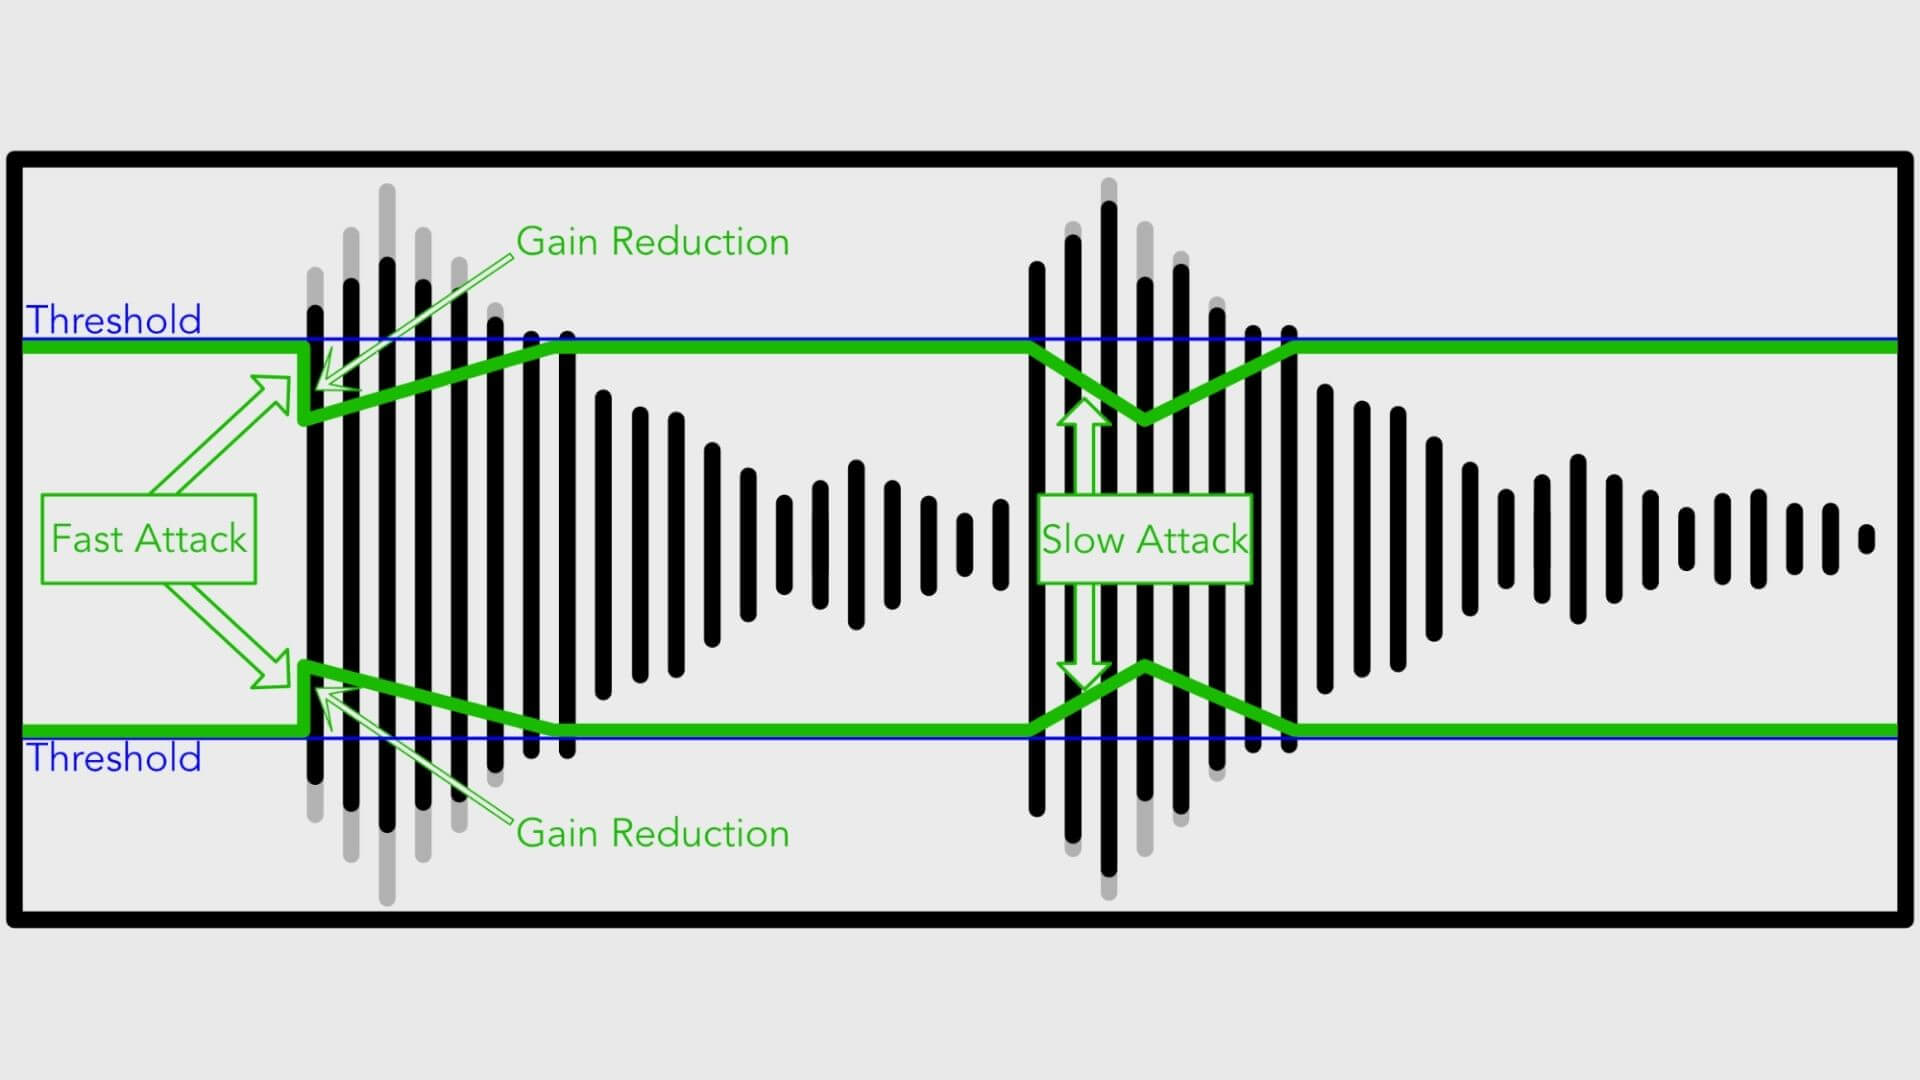
Attack controls how quickly the compressor begins to clamp down on the signal. A slow attack time allows for the initial impact of the transient to pass through the compressor, while clamping down on the sustain or decay portion of the sound. This can be a great way to make a track sound more punchy or "up-front."
While slow attack times are great for enhancing transients, they're not very effective at preventing peaks. If the attack time is too slow, you run the risk of letting some transients slip by undetected, which can cause your track to sound inconsistent and sloppy.
Fast attack times are best for preventing peaks, as the compressor clamps down on the signal as soon as it passes the threshold. This can be useful for making tracks sound smoother and tighter. Just be careful—if the attack time is too fast it can push a track back in the mix or make it feel a bit lifeless.
Release controls how long it takes for the compressor to return the signal to normal. This setting has the biggest impact over the sustain or decay of the signal.
With a fast release time, the compressor quickly releases the signal, creating a punchy, aggressive sound. Use the make-up gain to increase the level of the sustain and the perceived loudness of the track. Just be careful—extremely short release times can cause nasty pumping artifacts and unwanted distortion.
Slow release times can be used to make a performance sound tighter and more controlled. With a slow release time, the signal recovers smoothly and gradually from the gain reduction. However, if the release time is set too slow, the compressor won’t be able to recover before the transient, which can cause your track to sound dull and quiet.
In the examples below, we'll explore a few different scenarios on how you might use different attack and release times to achieve different sounds.

How Different Types of Compressors Affect Your Sound
Not all compressors are created equally. Some excel at peak limiting while others are better for adding glue to bus groups or enhancing a track with harmonic distortion. There are four types of compressors, each with their own unique sound.
VCA (or Voltage Controlled Amplifier) compressors like the SSL G-Series Bus Compressor and the API 2500 are clean, punchy and precise, making them easy to use in just about any situation—from peak limiting to bus compression.

Optical compressors like the Teletronix LA-2A are program-dependent, meaning the attack and release times change automatically based on the input signal. Optical compressors tend to be slower than other types of compressors, making them best for gentle, sustained compression. Many optical compressors are tube-based, which can be great for adding subtle (or not so subtle) harmonic distortion to your track.

Similarly, FET or Field Effect Transistor Compressors like the legendary Universal Audio 1176 feature solid-state transistors used to emulate the sound of tape. Because of this, they tend to have super-fast attack and release times, making them perfect for peak limiting. FET compressors are also the most colorful type of compressor, making them an ideal choice for adding grit and grime to any track.

Finally, there's Variable-Mu compressors like the Fairchild 670 and the Manley Vari-Mu. Similar to optical compressors, these tube-based compressors are completely program dependent, meaning the amount and intensity of compression increases along with the input signal. These types of compressors are great for glueing tracks together and controlling dynamics.

EXERCISE 1—Hearing Attack
One of the most common techniques engineers and producers use for setting a compressor is to use aggressive settings in order to better hear what the compressor is doing, then dialing back the controls for a more subtle sound. Keep this in mind when trying to find the right attack settings!
Compression works especially well on percussive instruments, so we'll use a drum kit to demonstrate. Pull up a kick drum track and add your favorite compressor. For this example, let's use a VCA compressor to showcase a few different approaches.
-
Start with the slowest attack setting and a medium or auto-release.
-
Next, set the ratio to 4:1 and adjust the threshold until you're seeing about 6 dB of compression on the meter.
-
Adjust the make up gain to compensate, so that the track is the same level before and after compression.
Toggle the compressor on and off and listen to the difference. You should be able to hear that the attack of the kick drum is more pronounced—almost like the transient is jumping out of the speaker for a second.
Next, set the attack to the fastest setting and listen to the initial impact. With a fast attack time, the compressor clamps down quickly before the transient has time to fully develop, reducing the amount of attack or impact and creating a tight, clicky sound. It almost sounds like the compressor is shaving off the initial attack of the transient and pushing the kick drum further back in the mix.

EXERCISE 2—Hearing Release
To hear how the release settings of a compressor affect the sound of a signal, let's practice adding sustain to a snare drum. Let's use a VCA compressor again, as they offer the most control over the release settings.
-
Start with a moderate attack time (around 50 ms) and the fastest release setting.
-
Set the ratio to 4:1 and adjust the threshold until you're seeing about 6 dB of compression on the meter.
-
Adjust the make up gain to compensate, so that the track is the same level before and after compression.
Toggle the compressor on and off and listen to the difference. With a moderate attack time, the compressor should clamp down just after the peak of the initial transient. With a fast release time, the compressor quickly "let's go" of the signal.
With the make up gain boosted, the sustain of the snare will sound noticeably louder, and more consistent with the level of the initial transient. It adds excitement and energy to the track—almost like the drummer is hitting the drums harder. However, if the release time is too fast, it can create an unnatural pumping effect.
Next, set the release to the lowest setting and adjust the make up gain accordingly. With a slow release speed, the compressor doesn't have time to let go of the signal before the next hit, which can make your transients sound flat and boring.
To find the ideal settings, adjust the release until the compressor’s decay emphasizes the sustain of the sound, without sounding unnatural.

EXERCISE 3—Hearing Dynamics
Over-compressing causes the transients of a signal to get squashed into the sustain of the signal, which can suck the life out of your mix. One common misconception is that over-compression is caused by the threshold and ratio settings, but the truth is that the attack and release controls have just as much impact.
For this example, let's use a VCA compressor on the mix bus. Our goal is to make sure that the compressor is pumping in time with the music, complimenting the natural dynamics of the performance.
-
Start with a slow attack time and a fast release time.
-
Set the ratio to 4:1 and lower the threshold to apply about 6 dB of gain reduction (so we can hear what the compressor is doing).
-
Increase the attack time until the sound is punchy yet controlled.
-
Decrease the release time so that the compressor breathes with the music. The needle should just bounce between - 6 dB and 0 dB to the tempo of the track.
-
For a punchier sound, adjust the release time so that the needle reaches 0 just before the next hit.
-
For a more controlled sound, adjust the release time so that the needle almost reaches 0 dB before the next hit, but not quite.
Finally, reduce the ratio to 2:1 and lower the threshold so that you're seeing about 3 dB of gain reduction.Toggle the compressor on and off and listen to the difference. You should notice that the transients pop a little bit more, but the overall mix feels more controlled.

EXERCISE 4—Matching the Reference
Now it's time to put your skills to the test. Being able to hear compression is great, but these skills don't exist in a vacuum. For this exercise, let's try to recreate the sound of a popular track.
Import a copy of one of your favorite reference mixes. REFERENCE makes it easy to quickly compare your track to other mixes to make sure you're on the right track. Just drag the reference track into the Wave Transport, press play and toggle between the original and reference tracks to hear the difference.
Listen closely to the drums and try to recreate the compression effect. Adjust the attack time to ensure the transients are powerful and punchy. Tweak the release so that the timing is tight and controlled. And adjust the ratio and threshold to make sure the mix remains dynamic.

Hear the difference? Follow these steps during your next mixing session to help dial in a professional, punchy sound.
Frequently Asked Questions
How do you actually hear what a compressor is doing?
A useful trick is to set aggressive settings first so the effect is obvious, then dial back for a subtle sound. Apply around 6 dB of gain reduction, match the level with make-up gain, and toggle the compressor on and off to hear how it changes transients and sustain.
How do attack and release shape a compressed sound?
A slow attack lets the transient punch through before clamping the sustain, sounding more up-front. A fast attack catches peaks but can dull a track. A fast release adds energy and loudness but risks pumping, while a slow release sounds tighter but can flatten transients.
What are the main types of compressor and how do they sound?
VCA compressors are clean, punchy and versatile. Optical compressors are slower and smooth, great for gentle compression. FET compressors have very fast attack and add colour, ideal for peak control and grit. Variable-Mu tube compressors are program-dependent and excellent for gluing tracks together.
What does over-compression sound like?
Over-compression squashes transients into the sustain, sucking the life out of a mix. It is caused as much by attack and release as by threshold and ratio. Aim for the compressor to breathe in time with the music, the needle bouncing back toward zero before each hit.


