Drums are the heart and soul of rock music. With the kick drum pounding on the downbeat and the snare drum thundering on the backbeat, drums act as the pulse of a song, moving and breathing to the tempo.
And nothing sucks the life out of a rock song faster than a weak drum mix. You want the kick drum to hit you in the chest and the snare drum the smack you in the face! It may sound aggressive, but those are the keys to a killer drum mix.
In this blog, we’ll teach you everything you need to know about mixing big, punchy rock drums.

Editing
There’s an old saying in the music business; “Crap in, crap out.” There’s no magic spell for turning a bad drum performance into a radio-ready recording. That’s why it’s crucial that you get a solid drum recording from the beginning.
Having said that, no drummer is perfect (except for Neil Peart, of course). If there are any errors in timing, be sure to quantize them before you start mixing.

Similarly, if there are any issues with velocity, tonal consistency or just straight up bad recordings, use sample replacement software to help compensate for these issues.
Depending on your particular sub-genre, it’s pretty common to enhance the sound of kicks, snares and even tom with sampled drums. Just be careful not to over-do it. Try to retain as much of the original recording as possible. Only use samples to make up for what the original recording is missing.
Check the Phase
Once you have your final drum tracks prepared and ready to go, it’s time to make sure each of the tracks is in phase with each other. If one microphone was off by even half an inch during the recording process, that could cause phase problems which make the whole drum kit sound weak and thin.
To check the phase of your tracks, load LEVELS on your drum bus and jump to the Stereo Field tab. Make sure the meter on the left side hovers near +1 at the top for a well-balanced mix. If the meter past the center point, towards -1, your drums are out of phase.
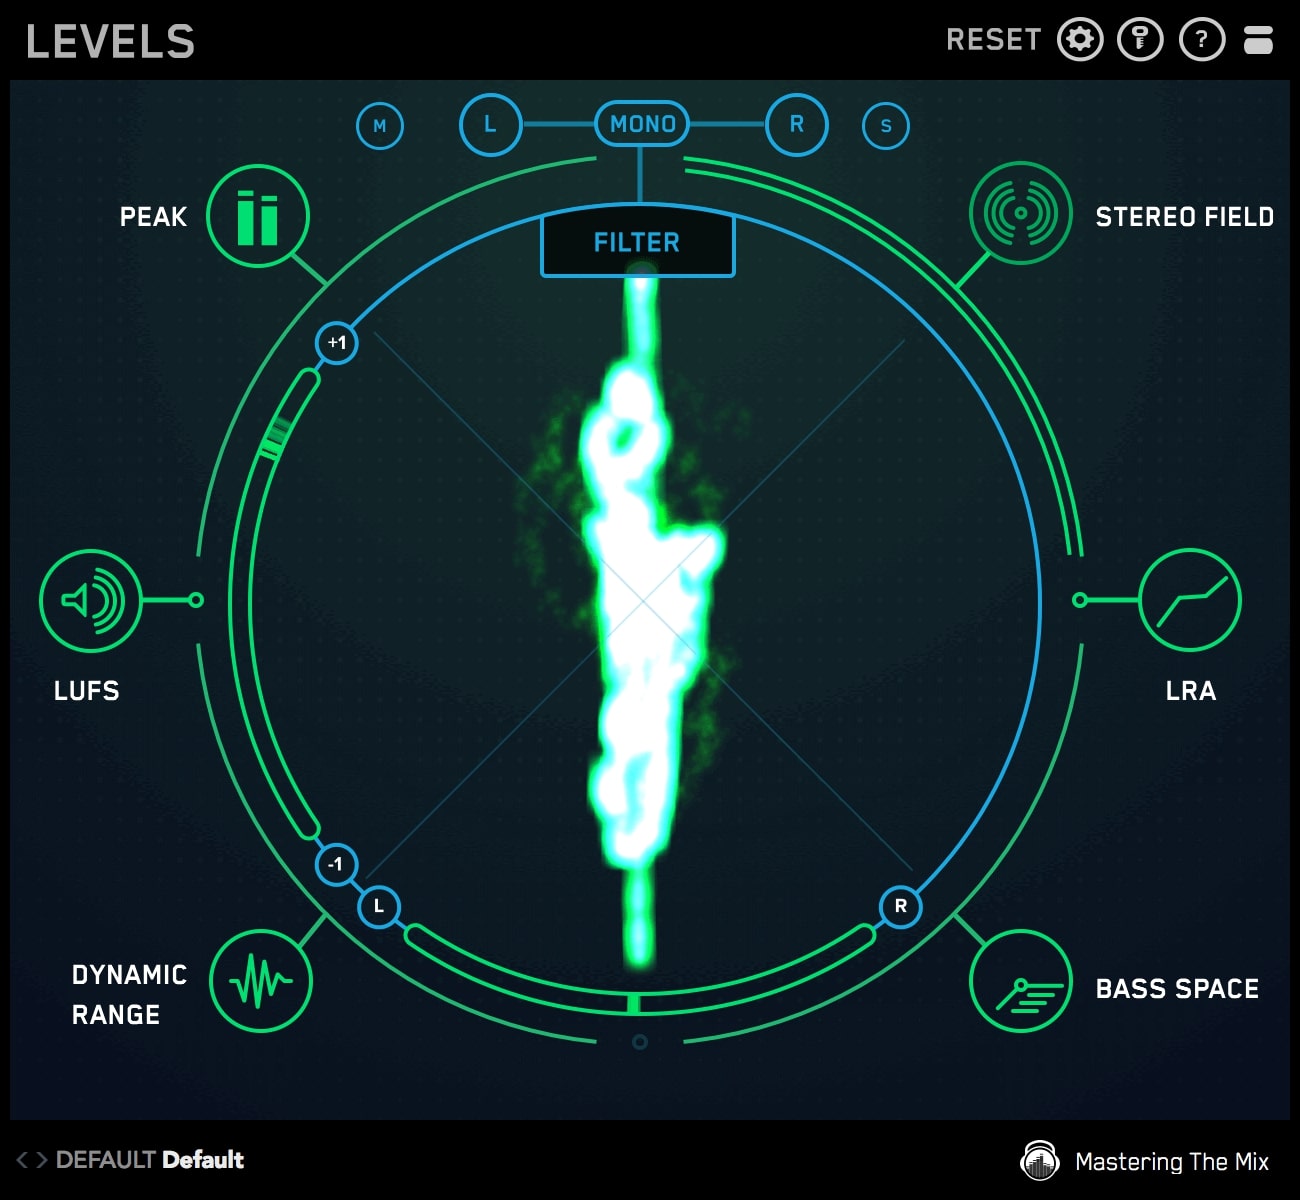
To correct phase issues with drum tracks, simply zoom in on the audio track in your DAW. It should be easy to see which track is out of phase because the transients will be ahead or behind the rest. Simply slide the out-of-phase track over to manually line up the transient of the first downbeat with the other mics.
After properly lining up each of the tracks you should hear a noticeable improvement in your drum tracks.

Panning
The next step to a rocking drum mix is to simply start balancing all of your drum tracks. Start by adjusting volume levels. If one instrument is too loud or too quiet, it can cause your whole mix to feel out of whack.
The loudest element in the drum kit should be the snare drum, followed by the kick drum. The toms can also be about this volume, assuming they’re used sparingly. Close-mic’d cymbals like the hi-hat should come next. Finally, blend in the overhead and room mics to create the desired amount of space for your mix.
Once you can clearly hear each instrument in the mix, it’s time to create a little separation using the pan knob. There are three basic approaches to panning drums: the drummer’s perspective, audience perspective, or freestyle.
With drummer’s perspective panning, you would pan each drum channel where the actual drum would live if you were sitting behind a drum kit. The hi-hat is panned slightly to the left, with the toms panned to the right from highest to lowest.
In an audience perspective, the panning is reversed—as if you were watching a drum perform from the audience. The hi-hat is on the right, with the toms panned to the left from highest to lowest.

In both methods, the kick and snare mics are almost always panned dead center. Although some engineers like to pan their snare drums a hair to the left side to simulate the actual snare placement behind the kit.
Noise Gates
Most people think the key to rock music is being loud, but a good drum mix benefits just as much from silence. Noise gates eliminate noise bleed, which helps make drums sound tighter and punchier.
Most tom mics need noise gates. Toms are typically used for accents and fills in a song, so those mics only need to be audible when the toms are in use. Otherwise, they can be muted. That’s where noise gates come in.
Simply insert a noise gate on the drum channel and loop a section where the tom is being hit. Give yourself enough space to hear the entire decay of the tom.

Increase the threshold on the gate until the tom becomes muted. Then, slowly decrease the threshold until only the tom opens the gate (and none of the other drum hits from the noise bleed).
You can also adjust the release time to fit with the tempo of the track so the gate “closes” just before the next beat of the song.
Gates are also commonly used on kick and snare drums with a similar, yet slightly less aggressive approach.
To add even more excitement to your drum tracks, try using ANIMATE’s Punch mode for a little extra smack on the kick, snare, and toms.

EQ
Look, let’s just get this out of the way up-front. There are no magic EQ settings that you can use to make your drums sound good. Every mix is different and will require different EQ settings to achieve the desired results.
Each frequency range affects each drum differently. So I can’t tell you the exact frequencies to cut and boost for each drum, but I can tell you what frequency ranges I focus on.
Kick Drum
Start by removing any necessary low end using a high-pass filter, typically up to 40 or even 50 Hz.
Next, emphasize the low-end of the kick drum with a shelf EQ—typically around 80 to 120 Hz. BASSROOM can help you fine-tune the low-end.
Kick drums tend to sound boomy around 200 to 250 Hz, and boxy around 300 to 600 Hz, so cut these ranges as needed.
Rock drums are all about snap and attack, so add a little beater noise between 2 to 4 kHz.
Finally, depending on your particular sub-genre, you may choose to accentuate or attenuate the clickiness of the kick.

Snare Drum
For the snare drum, start with a high pass filter to roll off the low end. Depending on the song you may go up to 80 or even 100 Hz to leave space for the kick and toms.
If the snare needs more power, try adding a little low-end around 100 to 200 Hz.
If it sounds boxy, try taming the 300 to 600 Hz range with a bell EQ. If it sounds thin or hollow and needs more body, try boosting this range.
The snap and crack of the snare typically sits around 2 to 4 kHz. Try boosting for more attack.
Finally, add a little sparkle to your snare with a high shelf around 10 kHz. The cymbals also occupy this range, so be careful not to overdo it.

Toms
For the toms, take a similar approach to the kick. Start with a high-pass filter to remove low-end rumble. The specific frequency will depend on the drum.
Boost the lows with a shelf around 80 to 120 Hz to add power.
Cut liberally around 200, 500, and 800 Hz as needed.
Add a little bit of snap in the around 4-6 kHz to bring out the attack.

Overhead and Cymbals
Some engineers high pass their cymbals and overheads up to 500 Hz for a hyper-focused sound. Personally, I try to retain as much of the sound of the original recording as I can.
I typically bus these mics and apply subtle EQ to taste. I usually end up cutting some of the boxy midrange and bringing out a little bit of sparkle in the high end with a high shelf.

Compression
Compression is one of the secrets to a great drum mix. Especially on kick and snare, it’s common to see as much as 6 dB of compression on a single channel.
For a particular punchy sound, try using a compressor with fast attack times like a VCA or FET compressor.
Start with a slow attack and fast release for a natural sound. With a slow attack time, more of the initial transient passes through the unit without being compressed. Slowly increase the attack time until you find the perfect blend of tight and punchy.
Fast release times are great for snappy drums. Start with the fastest release time possible, then slowly decrease the knob until the compressor starts to “breathe” in time with the music. The gain reduction meter should almost return to 0 just before the next drum hit.

More Compression
Parallel compression is a great way to add grit, aggression, and energy to any drum mix.
Create a new aux bus and add a fast, colorful compressor—the most common choice is the 1176 for the classic “all buttons in mode.”
Next, route your kick, snare and overhead mics to the new aux bus and smash them to pieces with the compressor.
Seriously, use the highest ratio possible and the fastest attack and release times and just peg the needle. I’m talking downright destruction.
Then, bring the fader all the way down and slowly increase the levels until you can just barely hear the compressed signal under the original mix.
This will help fatten up tracks and increase the perceived loudness.

EVEN MORE COMPRESSION
Oh, you thought we were done? Not even close. Route all of your drum tracks to a drum bus and add your favorite bus compressor, like the SSL Master Bus compressor.
Unlike parallel compression, bus compression is all about subtlety. Use a gentle ratio like 2:1 and apply 1 to 2 dB of compression to glue all of the instruments together.
It’s a subtle difference, but it makes drums sound more cohesive and polished. This is especially useful when working with samples.

Harmonic Distortion
While we have the drum bus up, let’s add a little bit of harmonic distortion to fatten things up.
Rock music was born on multi-track tape machines, and the subtle compression and unique form of harmonic distortion that they provide is the cherry on top of any drum mix.
Load up your favorite tape machine simulation or ANIMATE’s Ignite mode on the drum bus and add a touch of harmonic distortion—just enough to glue the sound together, but not enough to audibly distort them.

Reverb
Reverb is the effect that varies the most from subgenre to subgenre. In some cases, like punk and indie rock, you may use subtle room reverbs. In others, like 80s rock and some forms of metal, you may use massive plate reverbs.
Create a new aux bus and add your favorite reverb. Depending on what room mics you have available, you may only need to add a little reverb to the snare. Or if you’re working with samples. you may have to route ever drum channel to the reverb bus to create your own atmosphere.

Do It All Again
Mixing is not a linear process. Every time you adjust something, it affects something else in the mix.
Take a break and clear your ears. When you come back, try to evaluate each element again.
How is the balance, the frequency response, the dynamics and the overall energy of the mix? If there are any issues, use the steps above to tweak each channel as needed.
It can take a lot of practice but with these tips and tricks, you’ll be on your way to a killer drum mix in no time!
Author BIO:

Brad Pack is an award-winning audio engineer and writer based in Chicago, IL. He currently owns and operates Punchy Kick, a professional mixing and mastering studio that specializes in pop-punk, emo, punk, grunge, and alternative music. When he’s not in front of his laptop, Brad can be found gaming with his wife, spending time with his son, or throwing down in the mosh pit.
Frequently Asked Questions
How do I check drums are in phase?
Load a metering tool on the drum bus and watch the stereo field correlation; a well-balanced mix sits near plus one, while drifting toward minus one means tracks are out of phase. To fix it, zoom in on the audio, find the track whose transients sit ahead or behind the rest, and slide it so the first downbeat lines up with the other mics.
How should I EQ a rock kick drum?
Start with a high-pass filter up to around 40 to 50 Hz, then emphasise the low-end body with a shelf around 80 to 120 Hz. Kicks tend to sound boomy near 200 to 250 Hz and boxy around 300 to 600 Hz, so cut those as needed, and add beater attack and snap between 2 and 4 kHz for that punchy rock feel.
How much compression do rock drums need?
It is common to see as much as 6 dB of compression on a single kick or snare channel. Start with a slow attack and fast release for a natural, snappy sound, then layer techniques: aggressive parallel compression adds grit and perceived loudness, while a gentle 2:1 bus compressor applying just 1 to 2 dB glues the kit together.
How do I make rock drums sound bigger and punchier?
Begin with a solid recording and tidy editing, get the kit in phase, then balance levels with the snare loudest, followed by the kick. Use noise gates to tighten toms, EQ each drum for attack and body, and add parallel compression plus a touch of harmonic distortion on the drum bus to fatten everything without audible distortion.


