Releasing a track is a big moment. There are no do-overs. Once it’s out there, it’s out there.
Unless you’re Kanye West, of course (The Life of Pablo, anyone?)
But for the rest of us, we only get one shot to knock it out of the park. That’s why it’s so important to make sure your track sounds perfect before uploading it to your website, social media accounts, and streaming services.
Thankfully, there are plenty of useful tools to help you make sure your track sounds its best before you show it to the world. In this blog, we’ll show you how to prep your tracks for release using our plugins: REFERENCE, LEVELS, BASSROOM, ANIMATE, and EXPOSE.

Start With A Reference Mix
So, you just finished a new song. Congratulations! It’s a great feeling. But it can quickly come crashing down when you compare your new track to some of your favorite records.
The writing stage is only part of the process. Before you release your new track, it’s wise to spend a little time polishing things up.
It can be tricky to identify exactly what separates one song from another. That’s where REFERENCE comes in. REFERENCE lets you compare the technical elements of your mix with other tracks to help you get closer to the sound of your favorite records.
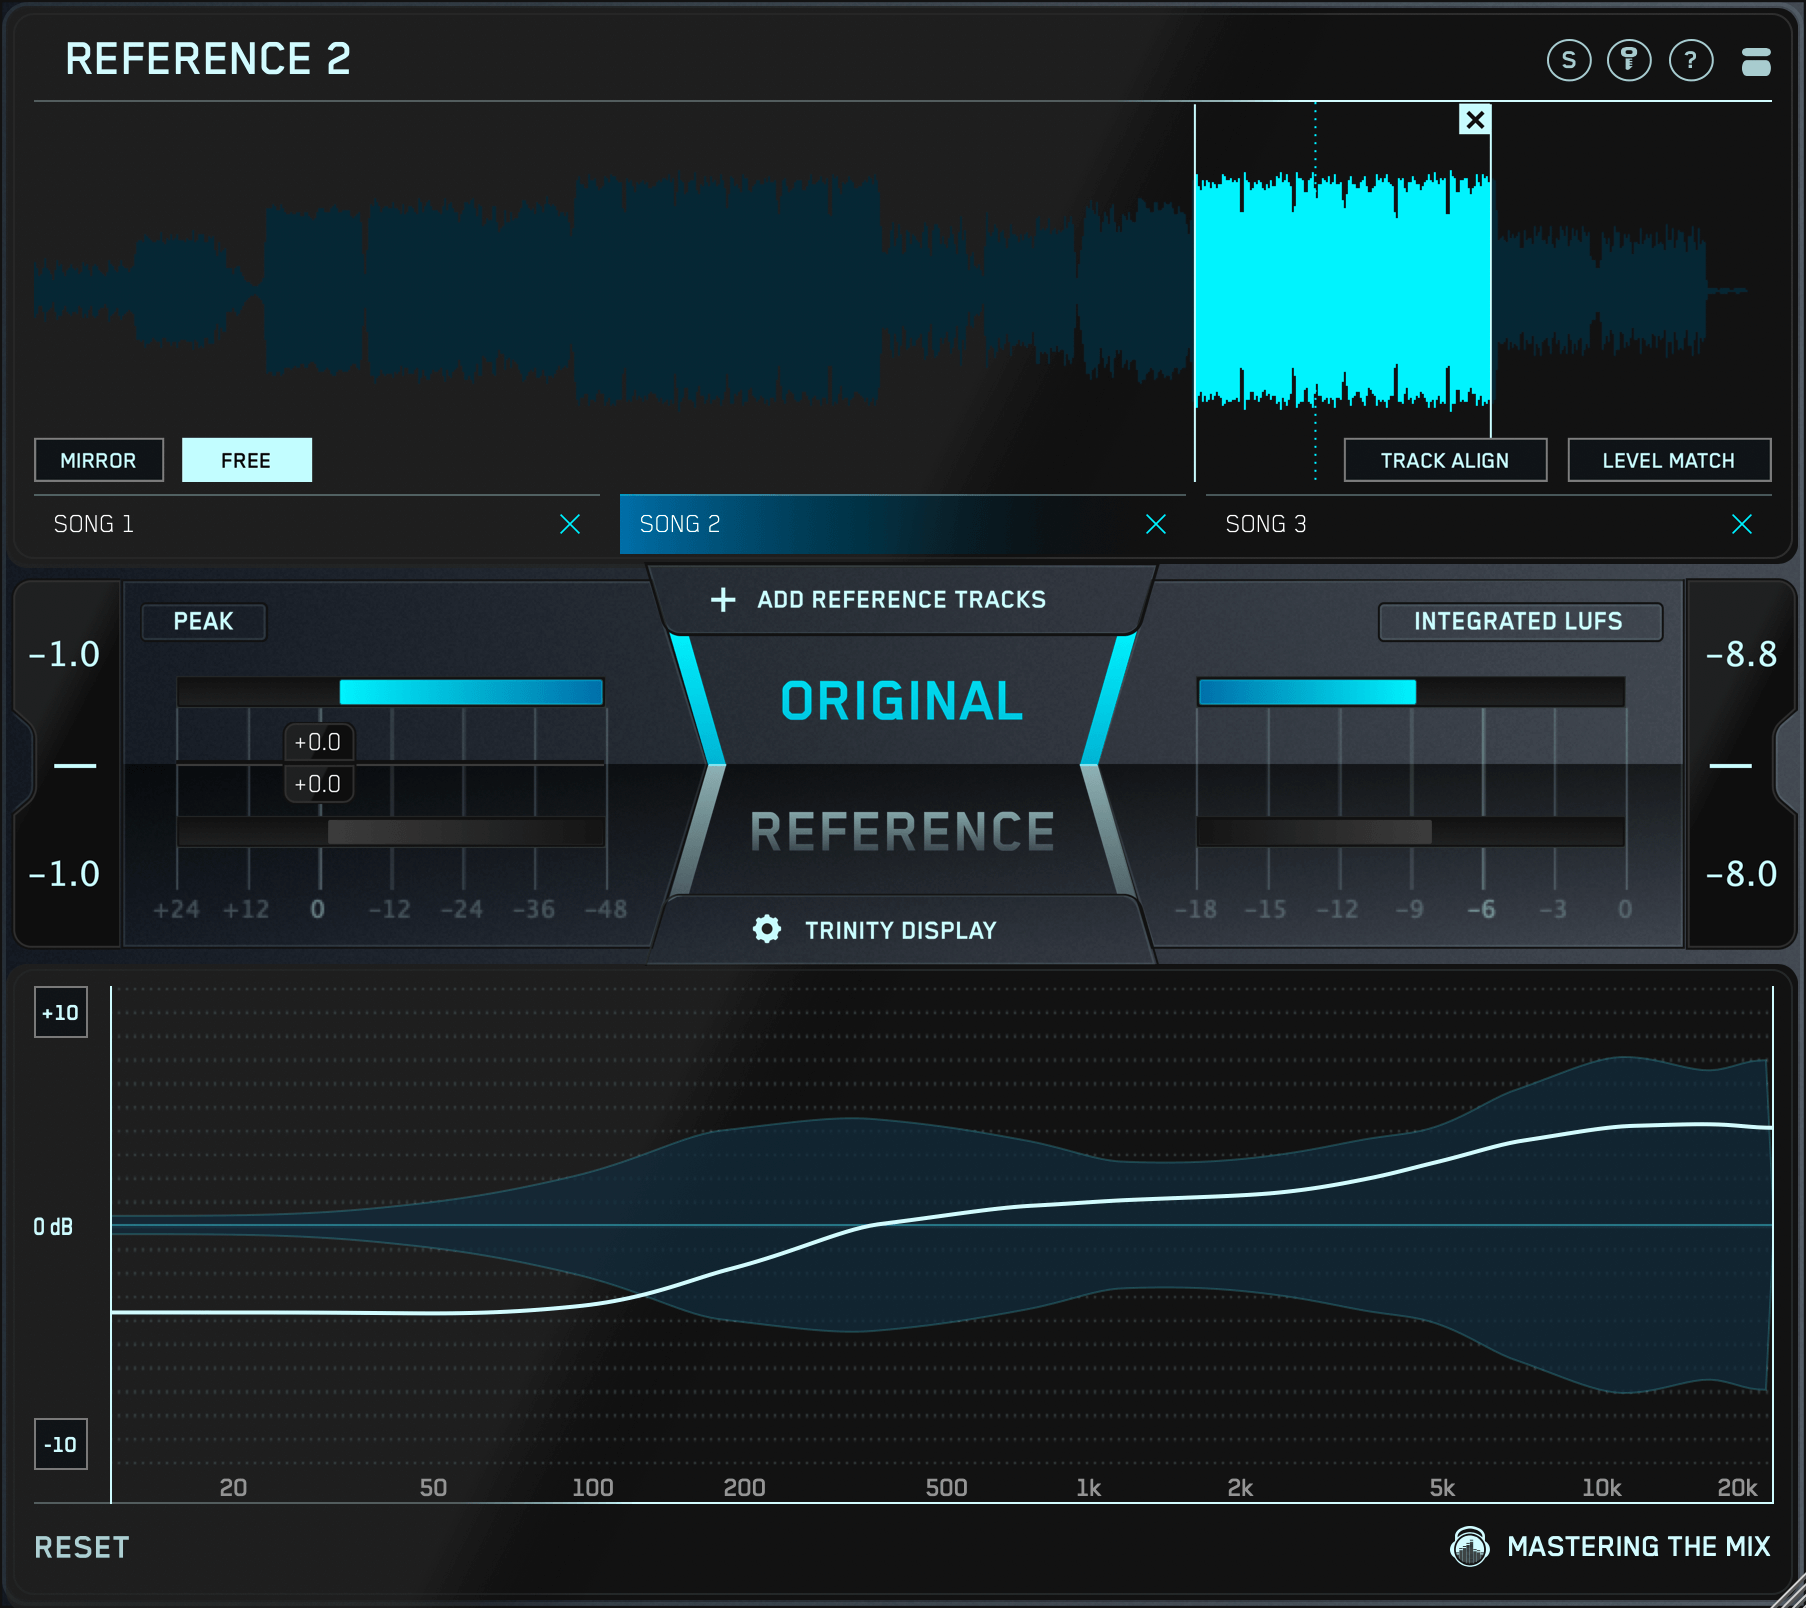
Load an instance of REFERENCE on the master track of your mix. Drag and drop one or more audio files of your favorite tracks for quick comparison. Make sure to engage the Level Match button in the top right corner to match the perceived loudness of each track for a fair comparison.

Toggle between different references using the tabs at the top, and switch between the original and reference tracks to check for differences between the two. You may want to take notes to make sure you remember what to tweak in your mix.
Use the Trinity display at the bottom to see how the frequency response, stereo width and punch of your mix compare to your reference track. Adjust the bands to measure up to five frequency ranges of your choosing.

The shapes at the top display the stereo width of your track compared to the reference track for each frequency range. A thin line denotes a narrow mono signal, while a wider line denotes a wide stereo image. This can be addressed using frequency-specific panning and stereo width tools like Grow. More on that later…
The white line inside of each frequency band denotes the perceived level for that frequency range. If the line is above the halfway point, it means your mix has too much of that particular frequency range. If the line falls below the halfway point, it means your mix is weak in that range. These issues can be addressed using an equalizer.

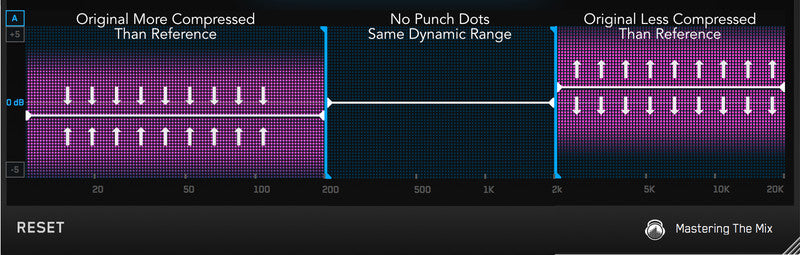
The Trinity display also compares the dynamic range of tracks. If the purple Punch Dots around the centerline move inwards, your track is over-compressed in that frequency range. If the Punch Dots radiate away from the centerline, your mix is more dynamic than the reference. Thankfully, both of these issues can be solved using ANIMATE.
Now that you know the differences between your mix and your reference tracks, it’s time to make a couple of tweaks.
Keep An Eye On Your Levels
One of the most important aspects of mixing is making sure there are no technical issues with your song. LEVELS makes it easy to keep an eye on all the most important elements of your mix. Load an instance of LEVELS just after your limiter and keep it open at all times.

Select the preset that corresponds to your release method (CD, Soundcloud, Spotify, etc). From there, LEVELS will alert you if there are any technical issues with your peak or LUFS levels, stereo field, dynamic range, and even frequency response.
And the best part is, if there are any issues, LEVELS provides detailed instructions on how to correct these problems in your mix. Hover your mouse over the icons to get detailed mix feedback.

Make Room For Bass
When mixing, it’s typically best to work from the bottom up. Load an instance of BASSROOM just before your limiter and select a preset that best suits the genre of the track you’re working on.

Or import your reference tracks to quickly match the low-end of your track to your favorite mixes. Select a bass-heavy passage and press "Create Target" to get started.
Loop your drop or chorus, press play on your session and BASSROOM will compare the tonal balance your track to the reference curve and provide suggestions on where to set each of the sliders. Moving the sliders closer to you will increase the bass response of that frequency for more power while moving it farther away will reduce that range for a cleaner sound.

Time To Get Animated
ANIMATE is a powerful signal processing tool that gives you total control over every element of your sound. With four versatile modules of multiband and mid/side processing, ANIMATE is the perfect solution for adding movement and excitement to your final mix.

Use Expand mode to dial in clean, transparent upward expansion and increase the dynamic range of your track. It makes the loud stuff even louder! Expand is great for breathing life into frequency ranges that are over-compressed.

Punch mode enhances the transients of your track—perfect for making kick drums snap, snare drums smack and vocals punch through the mix. Use this to treat frequency ranges that are more dynamic than your reference mix.
Give your mix a vintage analog vibe by adding thick, rich harmonic distortion using Ignite mode. Great for increasing LUFS levels of your track without the nasty pumping effect of a compressor.

Last but not least, Grow lets you increase the width of the selected frequencies using a unique psychoacoustic effect. Unlike traditional stereo wideners, Grow features a threshold setting for dynamic stereo expansion. Use Grow to add stereo width to frequency ranges that are more narrow than your reference mix.

Double-Check & Quality Control
A few simple tweaks can make a huge difference. Bypass your plug-ins and take a listen to your original version of your song compared to the new final mix.
Once you’ve bounced the session, drop the audio file into EXPOSE to view the overview of the technical details. Select the preset that best describes where you’re uploading your track, (such as streaming, YouTube etc) and you’ll immediately see if EXPOSE has detected any issues that might degrade the listening experience.

Any issues can be fixed in your DAW, but if there are no issues, and you’re happy with the final sound, then you can release your music to the world with confidence that you’re delivering your best.
Here’s a quick recap of what we covered:
- Use REFERENCE to see how your mix stacks up against your favorite records.
- Use LEVELS to keep an eye on your, well… levels.
- Use BASSROOM to make sure your low-end is in-line with other popular tracks in your genre.
- Use ANIMATE to spice up your mix with upward expansion, transient enhancement, harmonic distortion, increased stereo width, and mid/side processing.
- Use EXPOSE as a final quality control measure. It only takes 3 seconds to make sure your final bounce has no issues.
The only thing left to do now is to upload your new track and show the world all your hard work!


