Maintaining proper levels is vital when mixing and mastering your music. Otherwise, your final master will be chock-full of distortion, have zero dynamic range, and be extremely fatiguing to listen to.
So, how do you monitor your levels? That's where metering comes in.
Effective metering provides you with at-a-glance information about your project's loudness, peaks, dynamic range, stereo spread, and more.
Unfortunately, meters can be overwhelming to the uninitiated. And they can be distracting when you're in the creative zone.
That's why we created LEVELS. This indispensable plug-in helps you identify problems with your audio and provides you with tips for solving them.
In this post, we'll walk you through a session, and we'll show you how to use LEVELS to optimize your music for a wide range of playback scenarios.

Headroom and Why It Matters
When discussing levels during mixing and mastering, you'll hear the term "headroom" thrown around a lot. Headroom, in a nutshell, is the difference between your track’s highest peak and 0dBFS (decibels Full Scale).
When you're working with audio, you'll want to avoid exceeding 0dBFS at all costs. Breaking the 0dBFS barrier results in clipping, which injects nasty-sounding digital distortion into your mix or master.
Beyond that, playback mediums and streaming services each have their own unique loudness requirements for achieving optimal sound quality.

LEVELS to the Rescue
So, how do you ensure proper levels? How do you avoid clipping?
And what about all the other problems that inevitably crop up, like lopsided stereo imaging, overcompression, or unwanted low-frequency mud?
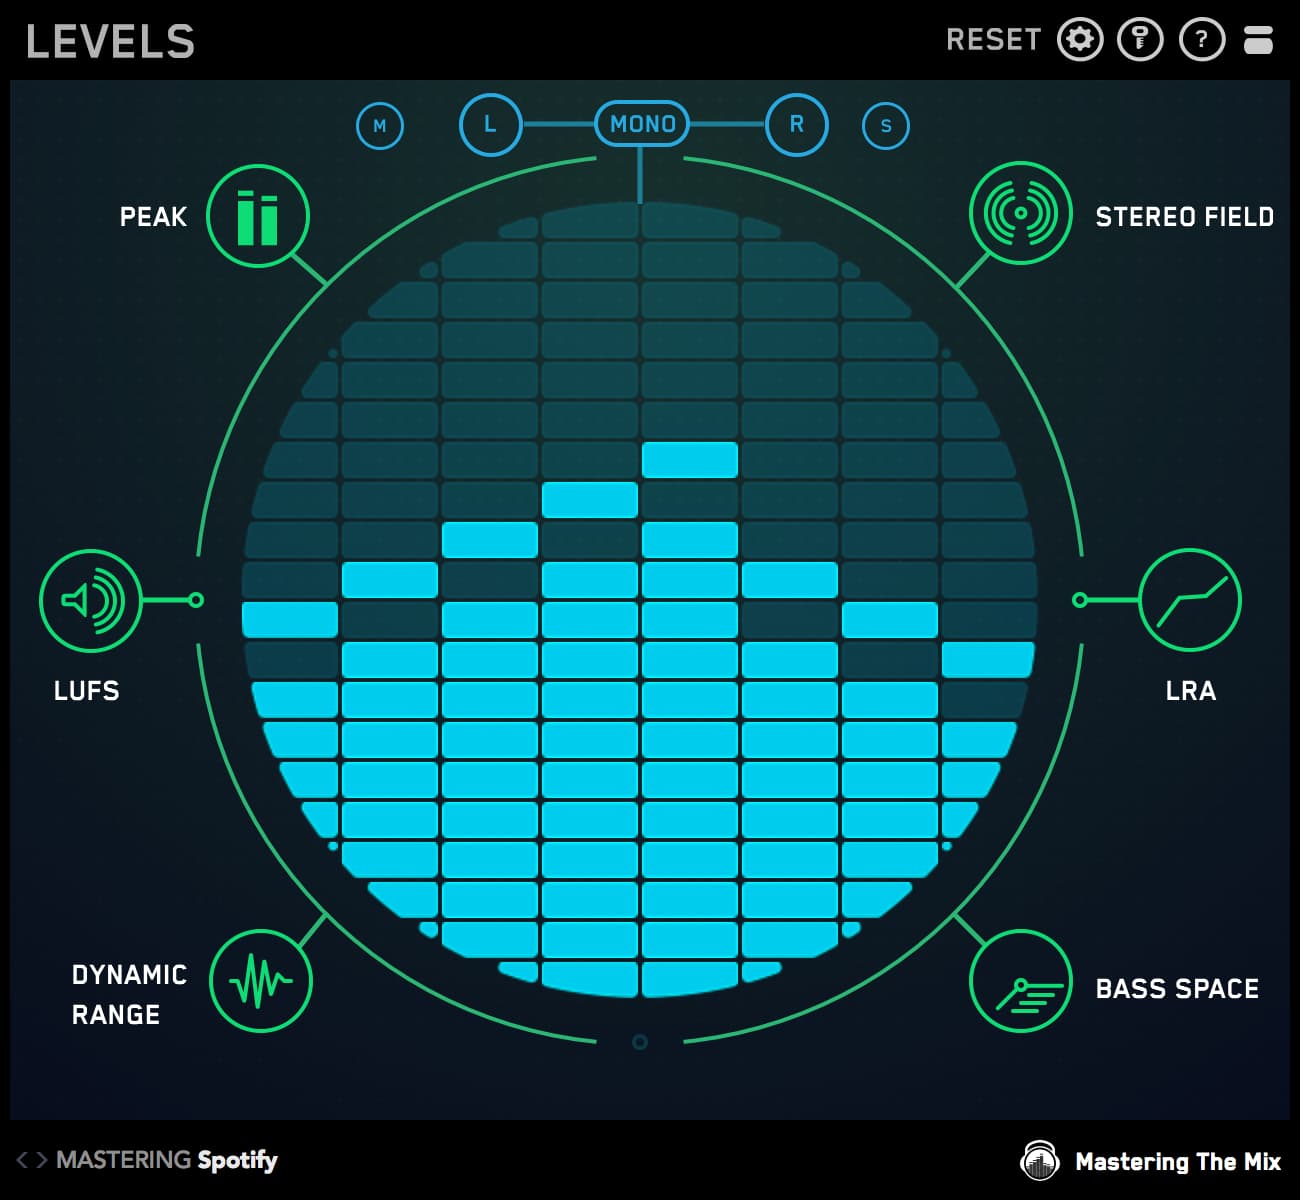
LEVELS makes keeping tabs on your audio easy. The plug-in's home screen includes PEAK, STEREO FIELD, LUFS, LRA, DYNAMIC RANGE, and BASS SPACE sections.
When you play back your audio, sections will glow green if there are no problems. Sections will glow red if there are issues that demand your attention.
Click on a section's icon to open its dedicated display. From there, you'll gain useful insight into your audio, enabling you to fix any issues.
Once you've dealt with the issue, the section's icon will turn green, and you can move onto the next section that requires your intervention.

Watch Out for Stray Peaks
Like we mentioned previously, there's an absolute fixed amount of headroom when working with digital audio — once you hit 0dBFS, you're out of bits. Even a single stray peak can wreak havoc on your mix or master.
The PEAK section of the LEVELS plug-in features a true peak meter that tells you how close your track is to 0dBTP (decibels True Peak), with each bar on the meter representing 1dB.
True peak metering shows you where your audio's waveform will peak in the analog realm. This type of meter is important because signals close to 0dBFS — even those that don't exceed it — can cause digital clipping.
This is because most speakers can't compensate for inter-sample peaks and will distort, even if the D/A converters in your studio have enough headroom to avoid the clipping.
Consequently, your audio may sound fine in the studio, but will sound clipped on consumer playback devices. Beyond that, streaming services routinely transcode your audio, which can increase its peak levels, thereby introducing clipping.
That's why LEVELS supplies you with presets for the full gamut of playback methods, including Apple Music, CD, MFiT, SoundCloud, Spotify, YouTube, and more. These presets will ensure that your audio sounds just as great on popular streaming services as it does in your studio.
To use the true peak meter, select a preset and play back your audio. If the meter stays in the green, you're in great shape; if it breaches the threshold, the PEAK icon will turn red.
If this happens, you'll need to lower your overall levels. An easy way to accomplish this in a mastering scenario is to lower your brickwall limiter's ceiling level so peaks hit further away from 0dBFS.

LUFS, Normalization, and the End of the Loudness War
The loudness war is over, and dynamic range won out. Thus, there is no longer any reason to slam your audio with a brickwall limiter in a desperate attempt to make your song sound louder than everybody else's.
This shift towards quieter, more dynamic audio is the result of the normalization algorithms employed by streaming services. Thanks to normalization, no matter how loud you make your master, the streaming service will just turn it down.
Perceived loudness is measured in LUFS (Loudness Units Full Scale). The LUFS section in LEVELS includes both short-term and integrated LUFS meters, with each bar representing one unit.
The short-term meter measures LUFS over a constantly updating three second window, while the integrated meter shows the accumulating LUFS level of your track.
The LEVELS plug-in's presets have various loudness targets ranging from -6 LUFS to -12 LUFS, according to their intended playback method. For example, Spotify normalizes everything to around -14 LUFS.
So, if you submit a master to Spotify that exceeds -14 LUFS, the service will normalize it. This will likely make your track sound quieter than competing tracks that were submitted with proper LUFS levels.
If your material breaches the LUFS threshold indicated by your selected preset, the LUFS icon will turn red. If this happens, use less aggressive settings on your brickwall limiter to increase your audio's dynamic range.

The Cure for Your Lopsided Master
On the STEREO FIELD section's display, you'll find a vectorscope that displays your audio's placement in the stereo field.
The L/ R (Left/Right) meter at the bottom of the display area indicates how even your left and right outputs are. If the pointer remains close to the center, your music is evenly balanced between the left and right speakers; if it hovers to the far left or right, your stereo field is unbalanced.
If your material veers too far in one direction or the other, the vectorscope will glow red, along with the STEREO FIELD icon.
The STEREO FIELD section also includes a correlation meter on the left side of the display, which shows you the degree of similarity between the left and right channels.
A reading near +1 means your mix is balanced properly; a reading closer to -1 means your mix has phase issues. Phase issues are problematic, as they can cause your mix to fall apart in mono — a huge issue when your song is being played on a single-speaker system, such as a club PA or a consumer device.
If your audio breaches the stereo correlation threshold, the LEVEL plug-in's STEREO FIELD icon will turn red.
The STEREO FIELD section also includes a FILTER control that isolates frequencies, enabling you to view their stereo placement.
This feature is a great way to uncover headroom-eating bass frequencies that are spread too wide, which can cause phase cancellation when listening in mono. Your best bet is to contain low-frequency material within the center of your mix.
While there are some things that can be done to fix stereo image and phase issues at the mastering stage, your best bet would be to go back and fix them in your mix.
Need some mix tips? Check out our Mixing with LEVELS guide.

Dynamic Range
Like we mentioned earlier, dynamic range is back in style. That's why the LEVELS plug-in's DYNAMIC RANGE section contains an oscilloscope to show you how dynamic your audio is.
The plug-in does this by creating a ratio of the short-term LUFS level to peak level of your audio, which gives you a DR (Dynamic Range) reading. The lower the number, the less dynamic range your audio has.
If your music's dynamic range is above the set threshold, the oscilloscope will glow green; if it approaches the threshold, it will turn orange; if it breaches the threshold, it will turn red.
Keep in mind that dynamic range isn't related to how loud your music is. In fact, if you overcompress your audio, the oscilloscope will turn red, even if your music is very quiet.
To resolve dynamic range issues, you'll want to dial back your use of aggressive compression and limiting — especially on your master bus. And if you're using compression ratios greater than 4:1 for correcting track dynamics, you might want to rethink your methodology.
Likewise, look at how hard your brickwall mastering limiter is working. If you're really crushing your audio, back off the input gain and let your music breathe.
You'll be shocked at how much more punch and clarity your audio will have when its dynamic range is dialed in properly.

Take Command of Your Loudness Range
The LRA (Loudness Range) section gives you a statistical measure of your entire track's loudness variation, measured in LU (Loudness Units). This long-term reading exposes the difference in volume between the verse, chorus, and other sections of your song.
The lower the number, the less loudness range your audio has. If you're trying to create a song with lots of tension, you'll want a Loudness Range above 5LU; if you're aiming for a consistent energy throughout, a lower number is fine.
If your audio has a loudness range of less than 3LU for more than 30 seconds then the LRA icon will turn red.
Understanding the Loudness Range reading will help you achieve your musical goals.
If you want your song's chorus to provide an emotional lift, you'll want a higher Loudness Range. If you're going for a relentless, pummeling-type vibe, you'll want a lower value.

Make Space for Your Bass
Unwanted low-frequency elements are perhaps the biggest headroom-stealing issue you'll deal with when working with audio. Outside of your kick and bass, there are few other channels that should contain excessive low-frequency content.
That's why LEVELS includes a BASS SPACE section.
This section identifies if any channels within your mix are outputting unwanted low frequencies. Keep in mind, the BASS SPACE process only works on stems; you can't use it on a stereo master.
To use BASS SPACE, you'll want to mute the kick and bass elements of your session within your DAW.
You get four frequency bars: 40Hz, 80Hz, 120Hz, and 160Hz. The bars will jump into the red if there's too much low-end energy within that frequency.
If that's the case, you'll want to identify the offending track and apply a highpass filter to clean up the unwanted low-frequency mud. That said, be careful not to remove too much low end, or you'll create anemic-sounding tracks.
If applied correctly, you'll find that the highpass filtered tracks will sound clearer and more powerful without the unwanted bass frequencies.

Examine Your Audio from All Sides
LEVELS also includes Mono, Mid, and Sides buttons, enabling you to really dive into your audio.
Ever wonder what your stereo mix would sound like on a mono sound system, as would be the case in a club, bar, or on a consumer playback device? The LEVELS plug-in's MONO button does just that, summing your stereo audio into a single output.
You also get R and L (Right and Left) buttons to limit the output to either the right or left monitor — a must if you really want to hear what your audio sounds like on a single-speaker playback system.
The M (Mid) button isolates the center of your stereo image. This enables you to single out important mix elements, such as vocals, bass, kick, and snare. You can then instantiate an EQ plug-in with mid-side capabilities to dial in your mix's center.
The S (Sides) button isolates the outer edges of your stereo image. You can then use your mid-side-capable EQ to tame harsh cymbals and tighten excessively wide low-frequency material.

Conclusion
Simply put, if you're having issues achieving pro-level masters, or if your music sounds worse on streaming platforms than in your studio, you need LEVELS. With LEVELS in your toolbox, you'll be able to submit your music to any platform, in any format, with zero worries.
Frequently Asked Questions
What is headroom and why does it matter?
Headroom is the difference between your track's highest peak and 0dBFS. Exceeding 0dBFS causes clipping, which injects harsh digital distortion. A true peak meter shows where the waveform peaks in the analogue realm, since signals near 0dBFS can still clip on consumer playback.
What does LUFS measure and what should you target?
LUFS measures perceived loudness. Streaming services normalise everything, so Spotify turns everything down to around -14 LUFS. Pushing a master louder than the target just makes it quieter after normalisation, so there is no benefit to slamming a brickwall limiter.
How do you read the stereo correlation meter?
A correlation reading near plus 1 means the mix is balanced, while a reading closer to minus 1 signals phase issues that can make the mix fall apart in mono. Keeping low-frequency material centred avoids phase cancellation on single-speaker systems.
How does the BASS SPACE section work?
BASS SPACE flags channels outputting unwanted low frequencies and works on stems, not a stereo master. Mute the kick and bass, then watch the 40, 80, 120 and 160Hz bars. If they hit red, high-pass the offending track to clean up low-end mud.


