
Mid/side EQ is one of the most powerful and most misunderstood tools in a mastering engineer’s arsenal. Used right, it can widen your mix, bring vocals to the front, tighten the low end, and reveal sonic detail you didn’t know was missing. But one wrong move can wreck your stereo image or introduce nasty phase issues.
This post breaks down everything you need to know to master mid/side EQ with precision and confidence. Whether you want more width, clarity, or control, you’ll learn how to make smart, subtle EQ moves that lift your master without compromising it.
Use a Transparent Linear Phase EQ
Mid/side EQ opens up a lot of possibilities for shaping your stereo image. If you’re not careful, it can also introduce phase issues that smear transients and blur your mix. That’s where linear phase EQ comes in.
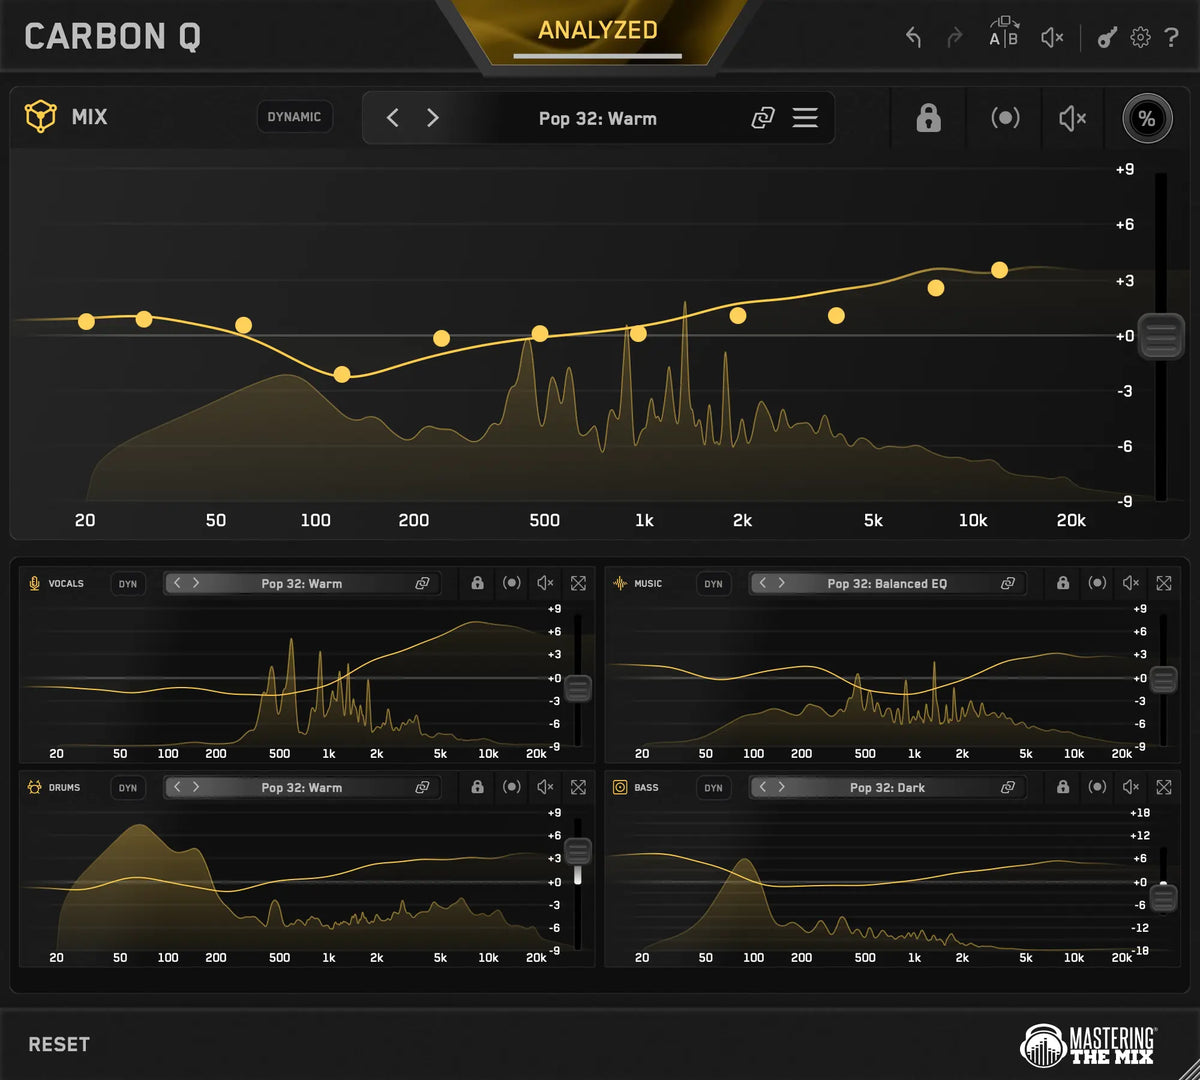
CARBON Q uses our max quality linear phase filters on every band. Boosting or cutting changes the tone without smearing your sound or softening your punch, so your stereo image stays solid even when you’re making moves to the mid or side channel. It gets there with only 41 ms of latency.
On a stereo master, put a single CARBON Q instance on your output and select MIX. Switch it to Mid or Side with the selector at the top right. Both curves stay on screen at the same time, with the one you’re editing highlighted and the other dimmed behind it, so you always know what the other channel is doing.

Be Subtle
Mastering is all about refinement. Keep your mid/side EQ adjustments subtle, generally below 4 dB and with a wide Q. Scroll over a node in CARBON Q to widen its Q.
CARBON Q also level matches every EQ move as you make it, so a boost can’t win you over by simply making the master louder. And the Mix (%) control scales the whole curve between flat and full, so you can pull a move back without redrawing it.

Take Bigger Mid/Side Moves Back to the Mix
If a mid/side fix needs more than a few dB, the mix session is the place for it. Put CARBON Q on your vocals, music, drums and bass buses, last in the insert chain on each, alongside the MIX instance on your output. Right click or shift click the Stereo / Mid / Side selector to set every instance in your session to that mode, and you have mid/side control across the whole mix from a single window.
That lets you make the moves in this post at the source. Clear the low mids from the sides of your music bus without touching the center, or open up the top end of the sides for air without making the vocal harsh.

Add Detail and Clarity to Vocals
Vocals are the emotional core of most tracks, and in mastering you can still give them a final lift. If the vocal feels like it’s getting buried, try this mid/side trick: make a gentle boost around 3.84 kHz in the mid channel. This range adds presence, articulation, and forwardness to the voice without boosting the entire stereo field.
This approach subtly enhances the intelligibility and impact of the vocal while leaving room for other instruments to breathe. Since vocals typically sit right in the center, you're enhancing their clarity without interfering with the spaciousness of stereo elements like synths or reverb tails.
To take this further, add a complementary cut in the low mid range (240 to 480 Hz) on the side channel. This is where muddiness and stereo wash often build up, especially from pads, guitars, or wide reverb. Pulling these frequencies back in the sides cleans up the stereo image and puts more focus on the vocal in the center.
The result is a tighter, more focused mid channel that highlights the vocal, and a wider, more controlled stereo image that supports it without overpowering it.

Tame High-Frequency Instruments
Bright, high frequency elements like hi hats, shakers, and airy synths add sparkle to your mix. When they dominate the mid channel, though, they can mask your vocals and lead instruments. If they sound harsh or distracting in the center, try a subtle cut at 7.68 to 12 kHz in the mid channel.
This gently pulls those high end textures back in the center, creating more room and clarity for the vocal or lead guitar. Because you’re only reducing them in the mid channel, you keep the width and shimmer they give the sides, so the master still sounds open and polished.
The key here is subtlety. Too much cut can make your mix feel dull. Use REFERENCE 3 to A/B against a professional track and make sure you’re keeping the right amount of brilliance and control. Listen for smoothness and vocal clarity, not a complete taming of the highs.

Enhance the Width of Your Master
Want your track to sound big and immersive without losing punch? Mid/side EQ is a clean, controlled way to add perceived width. Start by pulling down the 20 and 30 Hz bands in the side channel. This recenters the low end energy, tightening the bass and freeing up headroom.
Next, add a gentle lift to the 12 kHz band in the side channel. This adds polished air and space to the stereo field, so the top end feels like it wraps around the listener. It works especially well for modern pop, electronic, or cinematic music that calls for a wide soundstage.
Because CARBON Q’s filters are linear phase, these side moves don’t smear your transients. Then check your master with the stereo section in LEVELS to confirm that the extra width translates well across headphones, stereo speakers, and mono systems.
This adds dimension and excitement without losing focus or introducing artifacts. It’s a subtle but effective finishing touch.

Balance Width With Precision Using FUSER
While mid/side EQ is powerful, sometimes you need even more precision, especially when two elements are clashing in a specific frequency range or stereo position. That’s where FUSER comes in (which also has mid/side precision).
FUSER resolves stereo masking and frequency collisions with surgical accuracy. Imagine a wide synth pad competing with your lead vocal in the 2 to 4 kHz range. With FUSER, you can gently duck that synth in just the side channel and only in that frequency zone, leaving everything else untouched.

Its intelligent Conflict Detection highlights overlapping frequencies and stereo imbalances, while the Resolve Conflicts feature gives you a one-click solution to rebalance them transparently. Use it in tandem with your mid/side EQ to refine space, enhance clarity, and keep your mix sounding open and professional from edge to edge.
When you need surgical control over spatial conflicts, FUSER delivers where traditional EQ can’t.

Use Reference Mixes
Want to know if your master has the right stereo width and tonal balance? REFERENCE 3 helps you check what you’re hearing with visual data, and guides you on the best decisions to make.
Load a professionally mastered track in REFERENCE 3, turn on Level Match to remove loudness bias, and switch between your mix and the reference. Then watch the Level Line in the Master Scope. It shows which frequency ranges are louder or quieter in your track compared to the reference. Boost where the line is above 0 dB, cut where it’s below, and bring your tonal balance in line with proven masters.
For mid/side work, the Stereo Width view is where it gets useful. It shows how wide your audio is across the frequency spectrum compared to the reference. If a band rises above zero, the reference is wider there. If it drops below zero, the reference is tighter. Too narrow in the high mids? Try a lift in the side channel. Too wide in the low end? Pull the sides down below 100 Hz to tighten things up.
It’s a fast, focused way to dial in width and clarity.

Bonus: Avoid Phase Issues Before They Happen
One of the sneakiest dangers of mid/side EQ is phase cancellation, especially when you’re boosting the sides or widening high frequencies a lot. These issues may not be obvious at first, but they can collapse your stereo image in mono or cause odd smearing on some playback systems.
LEVELS acts as your early warning system. Its Stereo Field section includes a phase correlation meter that visually alerts you if your stereo image is veering into risky territory. A reading near +1 means your phase is solid; near 0 or below? It's time to investigate.

Before bouncing your master, run a mono check and look at your phase meter. If you see problems, revisit any side channel boosts or widening EQ moves, because they’re often the cause. LEVELS helps you catch these issues before they make it into your master.
Final Thoughts
Mid/side EQ is an essential part of the mastering toolkit. Used with intention and subtlety, it can make a big difference to your track’s spatial clarity and tonal balance.
Tools like CARBON Q, REFERENCE 3, LEVELS, and FUSER can guide your decisions and give you pro level results, even from your bedroom studio.
Frequently Asked Questions
What can mid/side EQ do for a master?
It lets you process the centre and the stereo sides separately, so you can widen the mix, push vocals forward, tighten the low end, and add air, all without affecting the whole stereo field at once. Used well it adds spatial clarity and tonal balance that standard stereo EQ cannot reach.
How much mid/side EQ is too much when mastering?
Keep it subtle, generally under 4 dB with a wide Q. Mastering is about refinement, so small moves do the work. If you find yourself making large EQ changes, that is usually a sign the issue should be fixed back in the mix session rather than patched at the mastering stage.
How do I bring a buried vocal forward with mid/side EQ?
Make a gentle boost around 3 to 5 kHz in the mid channel to add presence and articulation to the voice, which sits in the centre. Pair it with a small cut in the low-mids, roughly 200 to 500 Hz, on the side channels to clear muddiness and wash, focusing more attention on the vocal.
How can I widen a master without causing phase problems?
Roll off the sub in the side channel below around 40 to 60 Hz to recentre the low end, then add a gentle high-shelf boost above 10 to 12 kHz in the sides for air. Use a linear-phase EQ to avoid smearing, and always run a mono check with a phase correlation meter before bouncing.