Before you touch a single EQ knob or tweak your limiter settings, stop and ask yourself—what am I aiming for? Mastering without a clear sonic target is like navigating without a map: you might get somewhere, but probably not where you wanted.
That’s why the smartest engineers don’t begin by mastering—they begin by listening. Not just to their own track, but to great-sounding reference material that sets the bar for tonal balance, punch, and vibe.
Think of this as your musical compass.
In this guide, we’ll walk you through how to tune your ears, establish a sonic vision, and use reference tracks to make sure every move you make brings you closer to a professional-sounding master.

Our plugin REFERENCE 3 automatically matches the perceived loudness of your reference tracks to your mix in real time, removing one of the most deceptive pitfalls in audio: loudness bias. We instinctively perceive louder music as clearer, punchier, and fuller in the low end, even when it’s not better.
This illusion is the silent saboteur behind countless poor mix decisions, and a key reason your track might sound amazing in the studio but fall flat in the car.
Level-matching eliminates that guesswork, so you can compare tonal balance and dynamics objectively and make confident, professional decisions.
Listening to great-sounding tracks at the beginning of your session will give you a good frame of reference for what a pro master should sound like before you start making changes to your master processing.

As you compare your track to your references, focus on how each frequency range—low, mid, and high—sits in the mix. Is the low-end tight and controlled? Do the mids feel balanced or boxy? Are the highs crisp or dull? Take notes on what stands out.
This process isn’t just about spotting flaws; it’s about defining your sonic goal. Once you know what needs to change, you’ve built a clear roadmap for mastering, helping you work with intention instead of guesswork.
Using Reference Tracks
Once you’ve identified the key differences between your track and your references, it’s time to bridge the gap. That’s where REFERENCE 3 comes in.
This plugin makes A/B comparisons effortless. You can instantly switch between your mix and any reference track, with level matching handled automatically.
Just load REFERENCE 3 as the final plugin on your master chain and drag in your favorite tracks. From there, Smart Reference Tracks automatically suggests the best-matching references from your library, and auto-looping locks onto the loudest section for you. Whether you’re on pro monitors or headphones, REFERENCE 3 helps you make objective, informed decisions that translate across every playback system.
 Before making any mix decisions when using reference tracks, it’s crucial that you match the perceived loudness of your reference track to your mix.
Your mix will be much quieter than the mastered reference tracks. The way we humans perceive sound gives us the illusion that louder music sounds richer in the low-end with more clarity in the high end.
This makes it virtually impossible to fairly compare the tonal balance of two songs at different volumes.
I'm reiterating this because skipping this step can lead to disastrous EQ curves that butcher the sound of the music.

When choosing a reference track, try to choose a track in the same genre that you’re working in. Also, try to find a track with similar instrumentation and sounds to your production. There will be differences, of course, but choosing a reference track that is a great representation of your sonic goal will help you make the best decisions for your track.
Click here to see our extensive list of reference track suggestions for various genres.
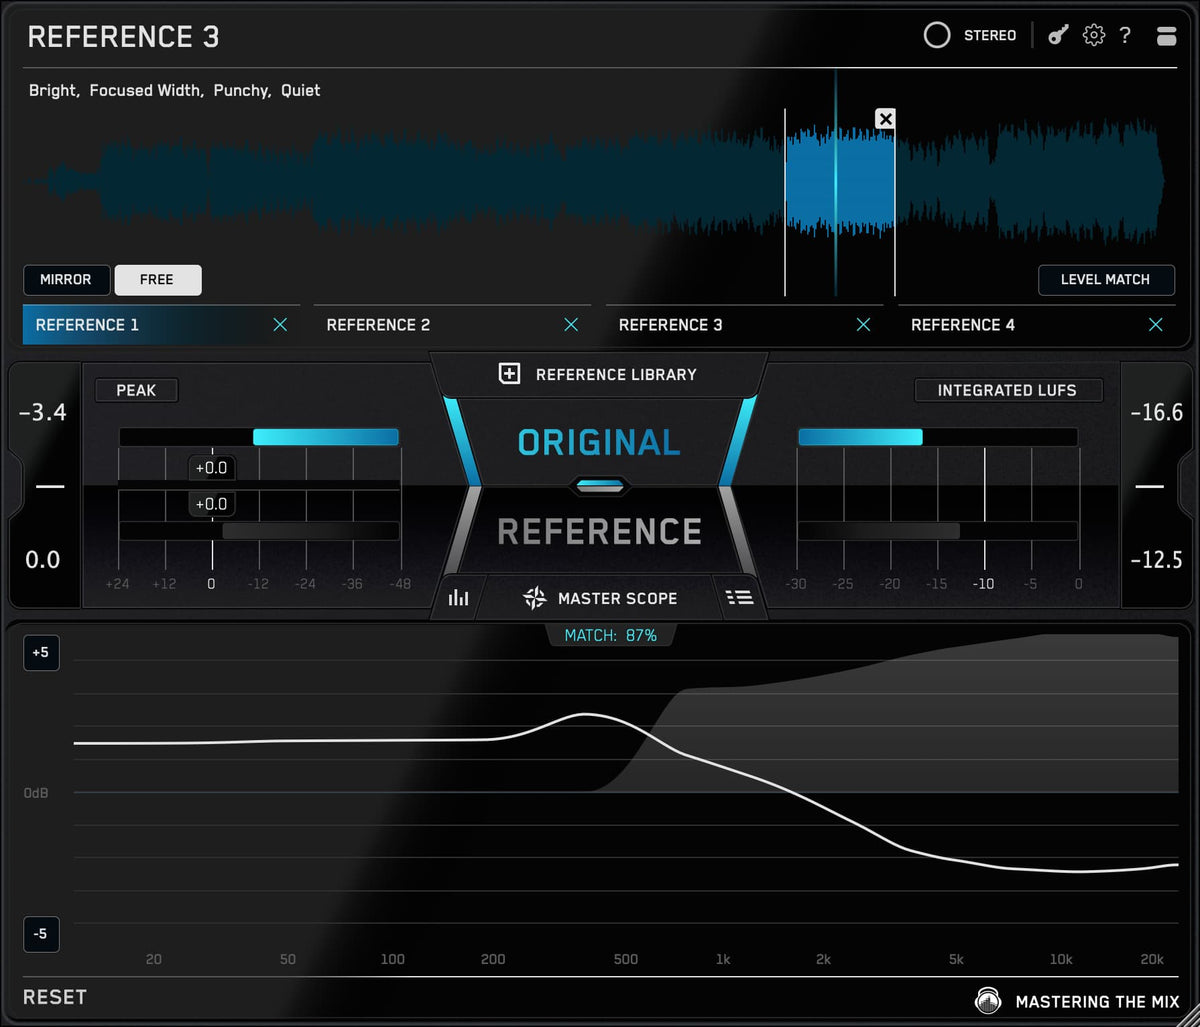
Once you’ve selected one or a handful of great reference tracks, the Mix Descriptors in REFERENCE 3 show you how each reference’s tonal balance, stereo width, dynamics, and loudness compare to most professional releases, so you can see at a glance how your track stacks up against your reference.
How To EQ Your Master To Sound Like Your Reference Track
When adjusting the EQ of your production, loop the section of the song that covers the widest range of frequencies, often the drop/chorus. If you work on the verse (where the drums might be quieter or the bass might not be present), you might overcompensate and boost the low-end too much.

Keep referring back to your reference tracks when adjusting the EQ to help you set the perfect tonal balance. Mastering should be approached with precision. Each EQ adjustment will have a sweet spot that you may miss if you’re 1dB off.
The Masterscope in REFERENCE 3 shows you the exact EQ and stereo width adjustments to apply to your mix to get your music sounding like your reference track. It also highlights phase issues and overcompression, taking out the guesswork and helping you dial in a pro-sound.

If the level line is within 3dB, this shows a very similar tonal balance. Anything above 6dB indicates a considerable difference in tonal balance. REFERENCE 3 also gives you a Match % score for tonal balance, stereo, dynamics, and loudness, so you can quantify exactly how close you are to your reference and track your progress as you mix.
Fine-Tuning The Low-End During Mastering
The low-frequency range is tricky to get perfect. Too much of a boost in the low-end and the master will sound muddy and lack clarity. Too much attenuation of the low-end and the master will sound weak and thin.

Our plugin BASSROOM is an EQ designed to fix the low-frequency balance of your overall track. BASSROOM analyses your production and shows you the EQ settings needed to get a powerful and well-balanced sound.
Load up BASSROOM on your master channel before your limiter. Select a preset or import your own reference track. Match the bands to the EQ target suggestions, then tweak to suit your preference.
The preset and reference analysis targets are 100% unique to your music. BASSROOM analyses your audio to determine the EQ changes needed to match the tonal balance goal. It uses a revolutionary algorithm that is based on how the human ear perceives sonic energy. The unique filters in BASSROOM are optimized to shape low frequencies during mastering. You won’t find another plugin that can adjust bass more transparently, retaining the punch and clarity of your music.

When adjusting the EQ on the master channel, you would generally want to go for broad Q bandwidths and EQ adjustments no greater than around 4dB. If the adjustments are greater than this, then you may get more transparent results by going back to fix things in the original mix before mastering. Rules can always be broken and it’s the results that count. If a master needs to have a 6dB high-end boost to sound great, then go for it.
Our plugin MIXROOM is perfect for dialing in a great sounding master in the mid and high frequencies. It works in a similar way to BASSROOM, where you can select a preset or load in your own reference track to generate tonal balance targets. You can also adjust the mid-side settings for each band, giving you total control over how you shape the frequencies across the stereo field.
 When making EQ adjustments, be sure to adjust the output gain of the EQ to try and match the output loudness to the input loudness. This will help you objectively decide whether your EQ decisions are improving or deteriorating your sound when you bypass the plugin. Both MIXROOM and BASSROOM have a level match pointer on the output gain to help you do this instantly.
Conclusion
Reference tracks WILL help you make the best possible decisions for your music. The best engineers in the world use reference tracks, even festival headliners like Nicky Romero (see Nicky using our plugin REFERENCE 3 in his awesome studio below).
Click here to download the free trial of our plugins, Reference Mixroom and Bassroom, and hear how they can help you get your music sounding more like your favorite tracks.
Frequently Asked Questions
Why use reference tracks when mastering?
Mastering without a sonic target is like navigating without a map. Listening to great-sounding reference material first sets the bar for tonal balance, punch and vibe, so every move you make brings you closer to a professional master.
Why must you level match a reference track?
Your unmastered mix is much quieter than a mastered reference, and we perceive louder music as clearer and fuller in the low end. Without level matching this loudness bias leads to disastrous EQ curves, so match perceived loudness before comparing.
Which section should you loop when EQing to a reference?
Loop the section covering the widest range of frequencies, usually the drop or chorus. Working on the verse, where drums may be quieter or the bass absent, risks overcompensating and boosting the low end too much.
How big should mastering EQ moves be?
Generally use broad Q bandwidths and adjustments no greater than around 4dB. If you need more than that, it is usually better to fix the original mix before mastering, though rules can be broken if a bigger move sounds great.


