In the world of audio production, mastering is the final and critical step that ensures a track sounds its best across various playback systems. However, often music producers are challenged with tracks that are less than perfect. Whether it’s due to earlier recording issues, environmental noises, or mixing inconsistencies, these problematic tracks demand a specialized approach in mastering - a process we can call 'Mastering Restoration and Repair'.
This process is not just about applying a finishing polish but requires a deep dive into the very anatomy of the track. It's about identifying and rectifying issues that might have been overlooked or introduced during the recording and mixing phases. From clipping and unwanted noise to imbalances in frequency and dynamics, a range of problems can mar an otherwise great piece of music.

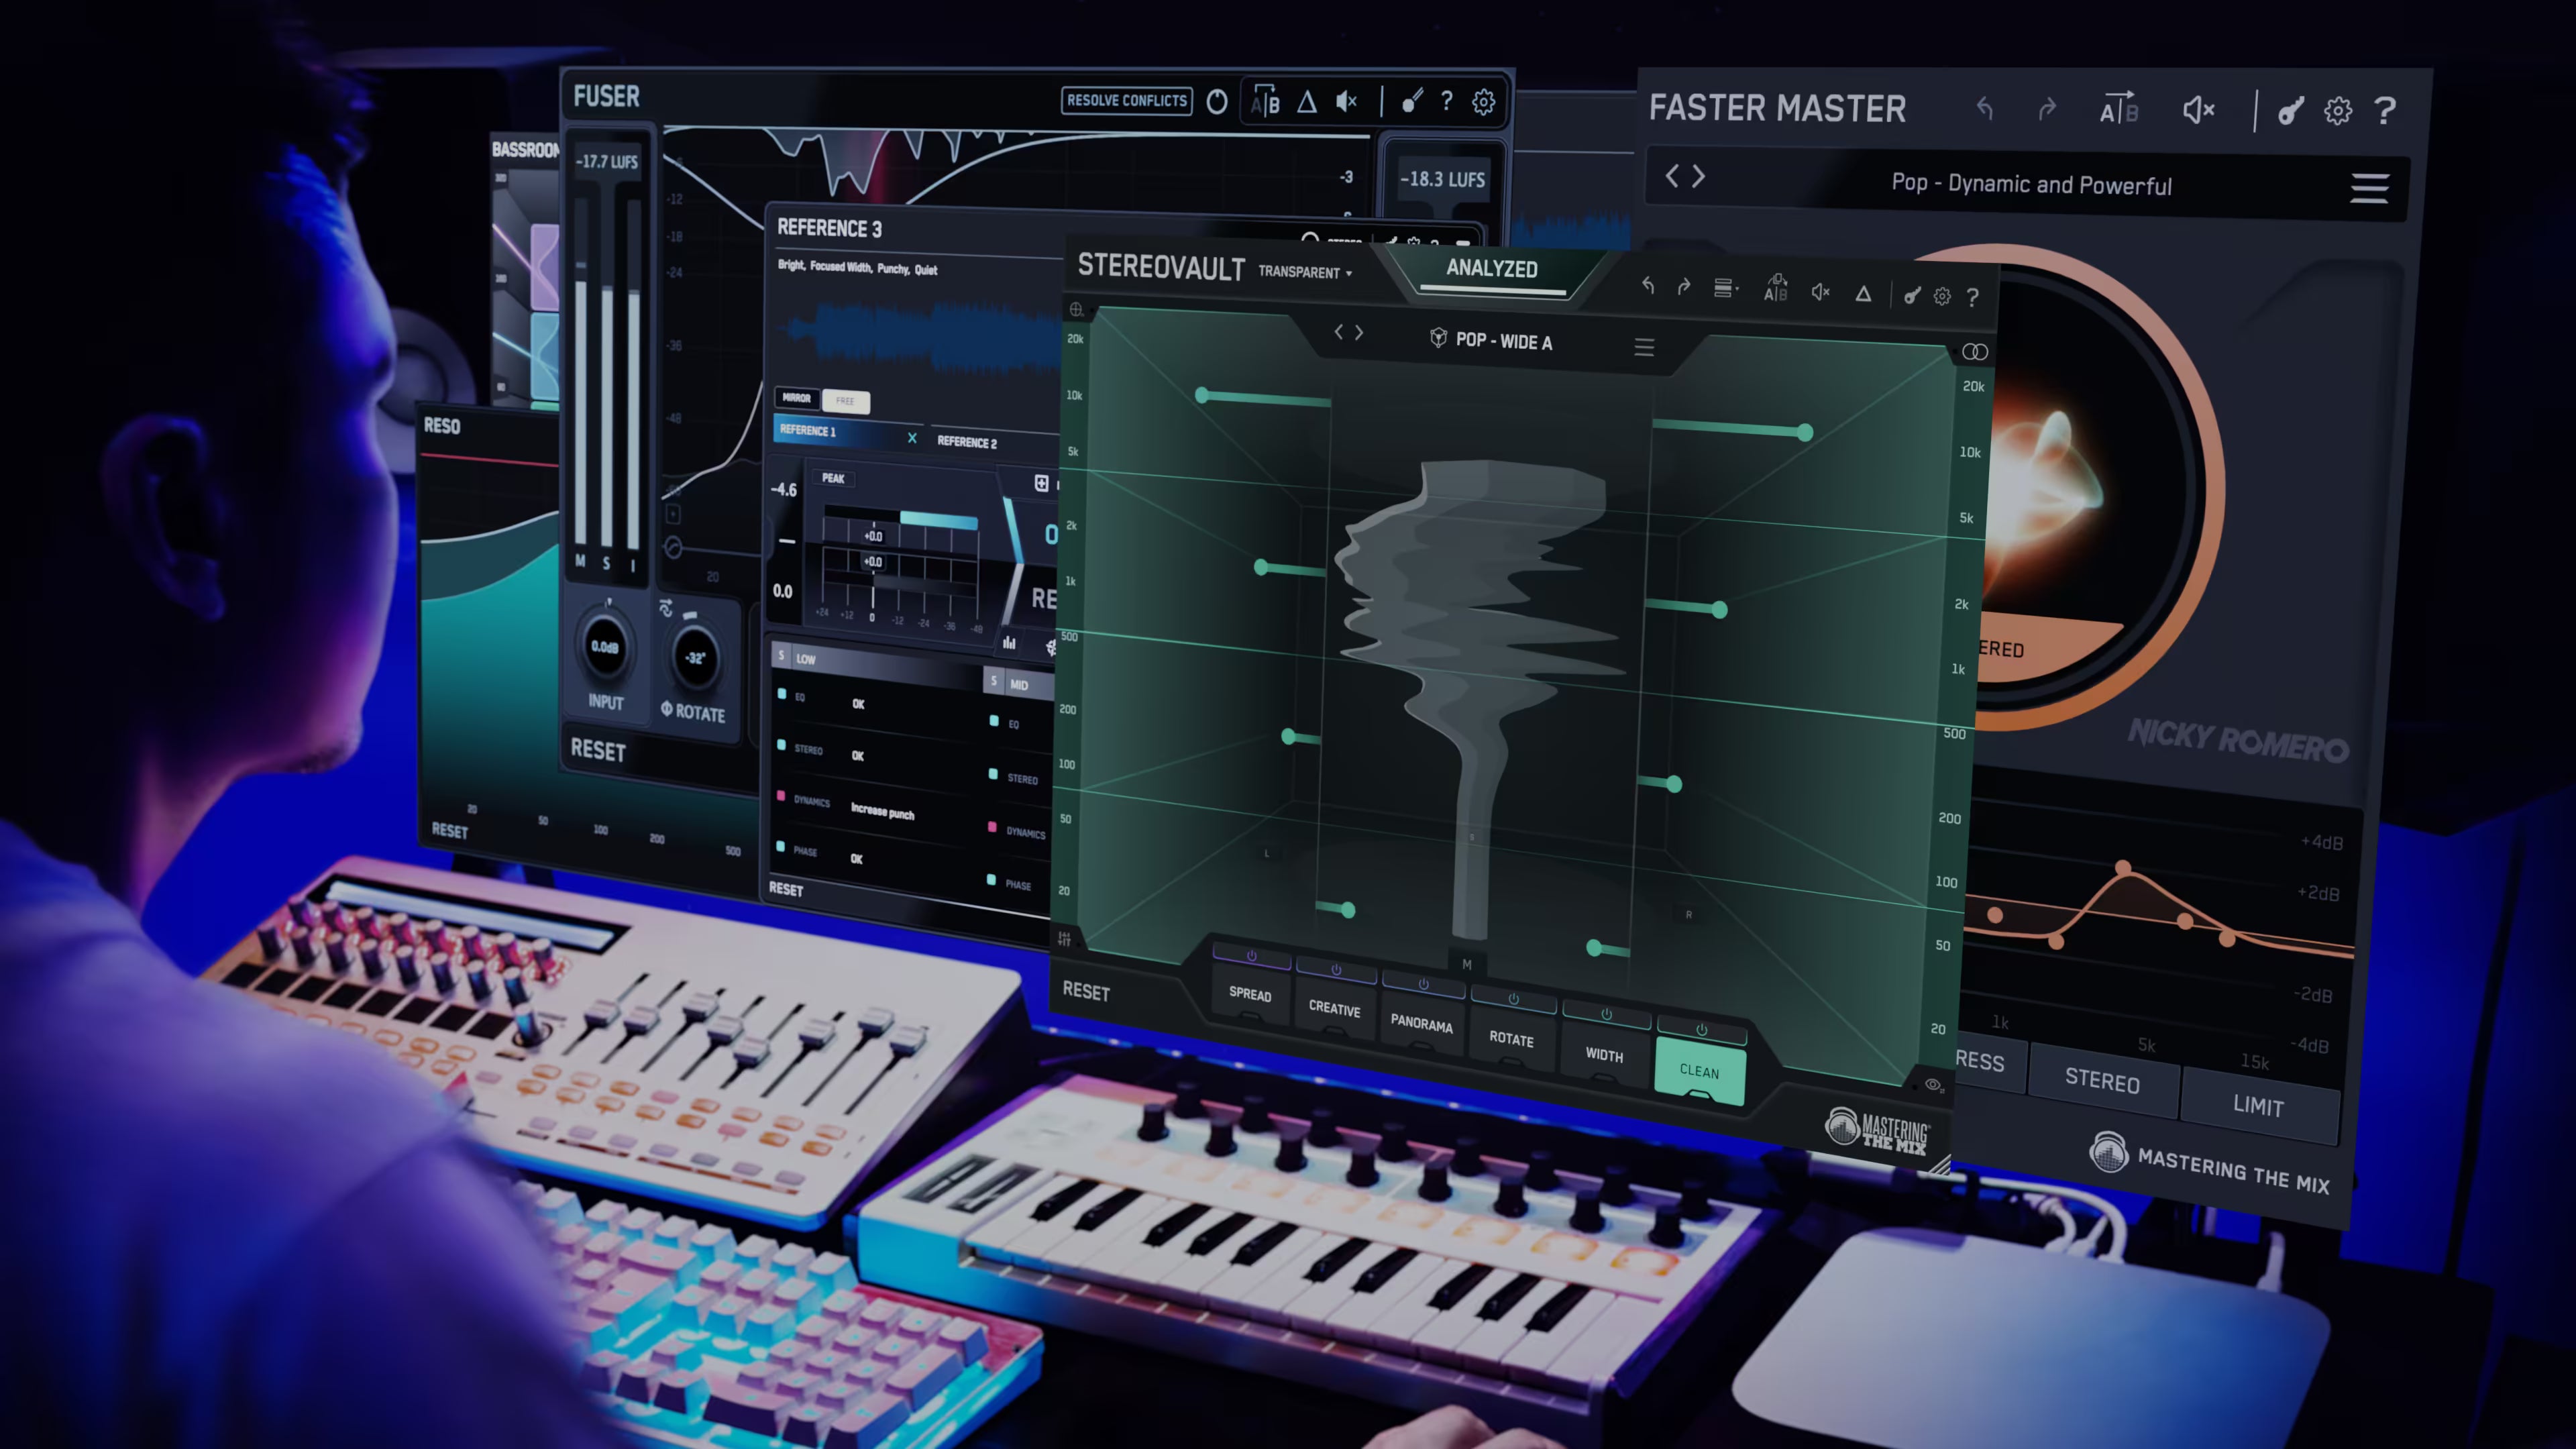
As we delve into this critical aspect of music production, it's crucial to understand that the tools and techniques employed in restoration and repair are both an art and a science. They require not only a keen ear but also a mastery of sophisticated audio repair tools. In this journey, products from Mastering The Mix emerge as invaluable allies. With their precise capabilities and intuitive interfaces, these tools empower music producers to transform problematic tracks into polished, professional-sounding pieces.
In this comprehensive guide, we’ll explore various techniques and tools integral to mastering restoration and repair. We’ll discuss how to address common audio issues, delve into advanced restoration techniques, and utilize EQ and compression not just as creative tools but as surgical instruments for audio repair. Additionally, we’ll walk through a real-world case study, demonstrating these techniques in action.
Mastering restoration and repair is about giving a new lease of life to your tracks. It’s about ensuring that your music not only meets industry standards but also resonates with your artistic vision. So, let’s embark on this journey to transform your tracks from flawed to flawless.

Understanding Common Audio Problems
In the realm of music production, the path to a perfect track is often littered with a variety of audio problems. Understanding these issues is the first step in mastering restoration and repair. Let's delve into some of the most common audio problems that can plague a track, turning a potentially great mix into a problematic one.
Clipping
Clipping occurs when the audio signal exceeds the maximum level that a device or software can handle, resulting in distortion. This often happens during recording or mixing when levels are pushed too high. In the mastering phase, it’s crucial to identify and rectify clipping, as it can cause harshness and ruin the listening experience.

Noise
Noise can come in various forms – hums from electrical equipment, hiss from recording gear, or ambient sounds captured during recording. Removing or reducing these noises is essential for a clean and professional sound. Noise reduction techniques, however, must be carefully applied to avoid losing vital aspects of the track.

Tonal Imbalance
A tonal imbalance can leave a track sounding either too bass-heavy or too treble-focused, or it may lack clarity in the mid-range. This imbalance can make the track sound off on different playback systems. Mastering involves correcting these imbalances for a well-rounded and consistent sound across all devices.
Dynamic Inconsistencies
Tracks with uneven dynamics can have parts that are too loud or too soft, affecting the overall impact and emotion of the music. Mastering restoration seeks to even out these dynamics without squashing the life out of the track.
Mastering The Mix offers tools that are particularly adept at addressing these issues. For instance, our LEVELS plugin can help identify clipping and dynamic range problems, while REFERENCE 3 can be instrumental in pinpointing tonal imbalances by comparing your track with professionally mastered music — with Mix Descriptors and Masterscope showing exactly where your tonal balance, stereo width, dynamics, and loudness deviate from the reference.
Addressing these common audio problems is not just about fixing mistakes; it’s about enhancing and refining the track to meet its full potential. It's a delicate balance between art and technical precision, where each decision can have a profound impact on the final output.
In the following sections, we will explore how to tackle these issues using advanced techniques and specialized tools, ensuring that your music not only sounds good but resonates with the quality and clarity it deserves.

Advanced Techniques for Audio Repair
Mastering the art of audio restoration and repair is akin to being a surgeon in the operating room of music production. It's not just about identifying the issues but also applying precise and sophisticated techniques to rectify them without compromising the track's integrity. Let’s explore some of these advanced techniques that can turn a problematic track into a masterpiece.
Spectral Repair
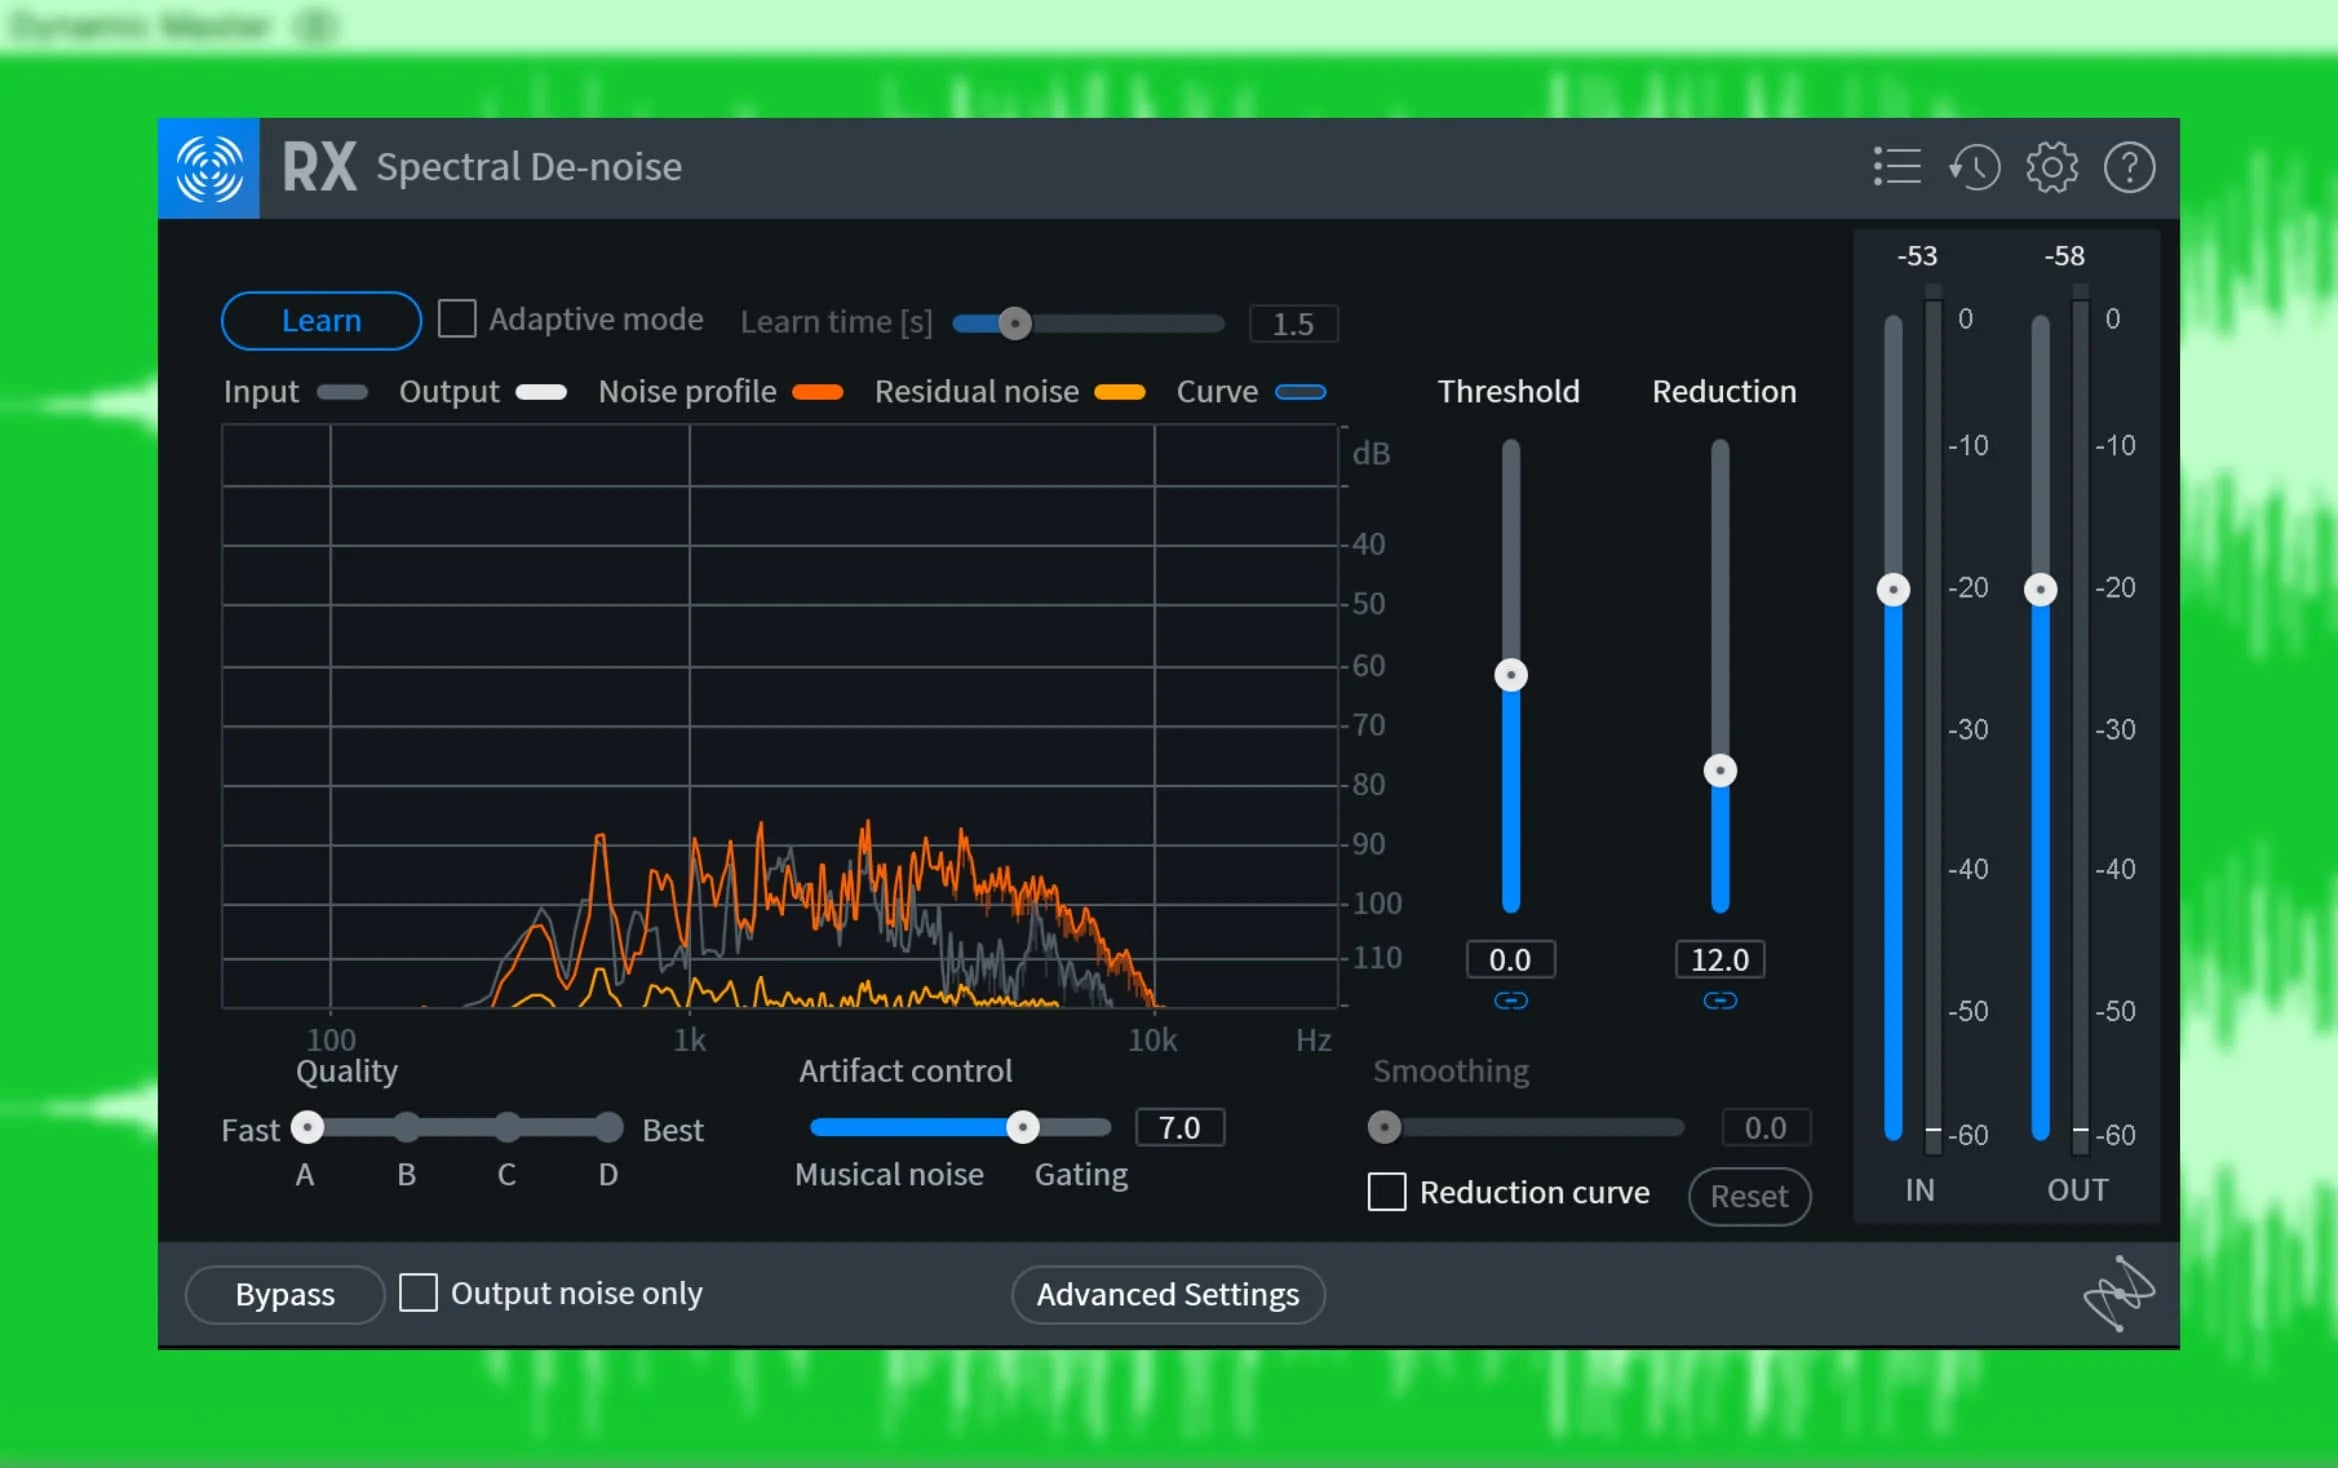
One of the most powerful tools in audio restoration is spectral repair. This technique involves analyzing the audio in a spectral view, which provides a visual representation of the sound across frequency and time. Spectral repair allows you to pinpoint specific unwanted sounds like a click, pop, or an isolated noise and surgically remove or reduce them. This technique is invaluable for cleaning up recordings where isolated incidents of noise occur.

De-noising
De-noising is a staple in the audio repair toolkit. Advanced de-noising tools allow you to reduce or eliminate background noise, such as hiss, hum, or ambient noise, without affecting the quality of the main audio. The key here is subtlety – removing just enough noise to clean up the track without stripping away its character or introducing artifacts.
Time and Pitch Correction (if you have the stems)
Sometimes, issues with a track can be related to timing or pitch. Advanced tools can correct slight timing issues or pitch variations in a way that sounds natural and seamless. This is particularly useful in vocal tracks where maintaining the natural quality of the voice is paramount.

Advanced Equalization
Beyond basic EQ, mastering restoration might require more intricate equalization techniques. Dynamic EQ, for example, can be used to address problems that occur only at certain moments in the track, applying EQ changes dynamically based on the input signal.

Utilizing Mastering The Mix Tools
Mastering The Mix provides a suite of tools that are perfect for these tasks. For instance, the REFERENCE 3 plugin can be invaluable for comparing your track to a high-quality reference, ensuring your spectral balance is on point. MIXROOM and BASSROOM plugins offer intelligent suggestions for EQ adjustments, helping to tackle tonal imbalances and ensuring your lows and highs are perfectly tuned.

Advanced audio restoration is a blend of technical skill and artistic judgment. It requires an understanding of the tools at your disposal and a keen ear for what makes a track not just technically sound, but emotionally resonant. In the next sections, we will dive deeper into using EQ and compression for restoration, followed by a practical case study showcasing these techniques in action.
Adjusting Individual Instruments In The Mix
Mastering can be complex when it comes to adjusting individual instruments, as the adjustments you make often affect the entire mix. For instance, if you're enhancing the snare with a 5kHz EQ boost, this will simultaneously brighten the vocal track. If the vocal was well-balanced before, this change could make it excessively bright.
To navigate these intricate situations, focusing your EQ adjustments on the mid, side, left, or right channels is essential.
Mid-Side Audio Technique
This approach requires pinpointing the stereo field location of the specific issue. Imagine you aim to enrich a thin-sounding vocal:
- Initiate a ‘Mid’ EQ Band: Begin by forming a mid-focused EQ band.
- Isolate and Tune the Band: Solo the band, then fine-tune its Q and frequency to find the vocal's low-end.
- Apply and Assess the Boost: Enhance the EQ while listening to the entire mix. Use a reference track, with tools like Mastering The Mix’s REFERENCE 3, to ensure the vocal’s body matches well.

This method is also effective for modifying specific instruments. The extent of your adjustment depends on how dominant other instruments are within the same frequency range. For example, you could augment the mid-channel between 500Hz-3kHz to boost the vocals, provided the snare and synths in that range aren't too dominant. Typically, you can adjust the vocal level in a master by about ±3dB before it begins to sound unnatural. Use a reference track to ensure you don't overdo it.
Adjusting Hi-Hat Levels
Hi-hats often present unique challenges in mastering, but they can also be more straightforward to adjust due to three reasons:
- Limited Competition: There are usually no competing instruments in the hi-hat range.
- Distinctive Nature: Hi-hats are generally punchy and brief, allowing for dynamic control without altering the tonality or duration of other sounds in that frequency range.
- Stereo Placement: They are often placed in either the mid or side channels.
With these characteristics, a multiband compressor can effectively isolate and address any issues with hi-hats.
Scenarios and Solutions:
- Scenario 1: Hi-hats Spread Wide that are too loud: Apply multi-band compression on the side channel, ensuring the compressor resets swiftly after each reduction.
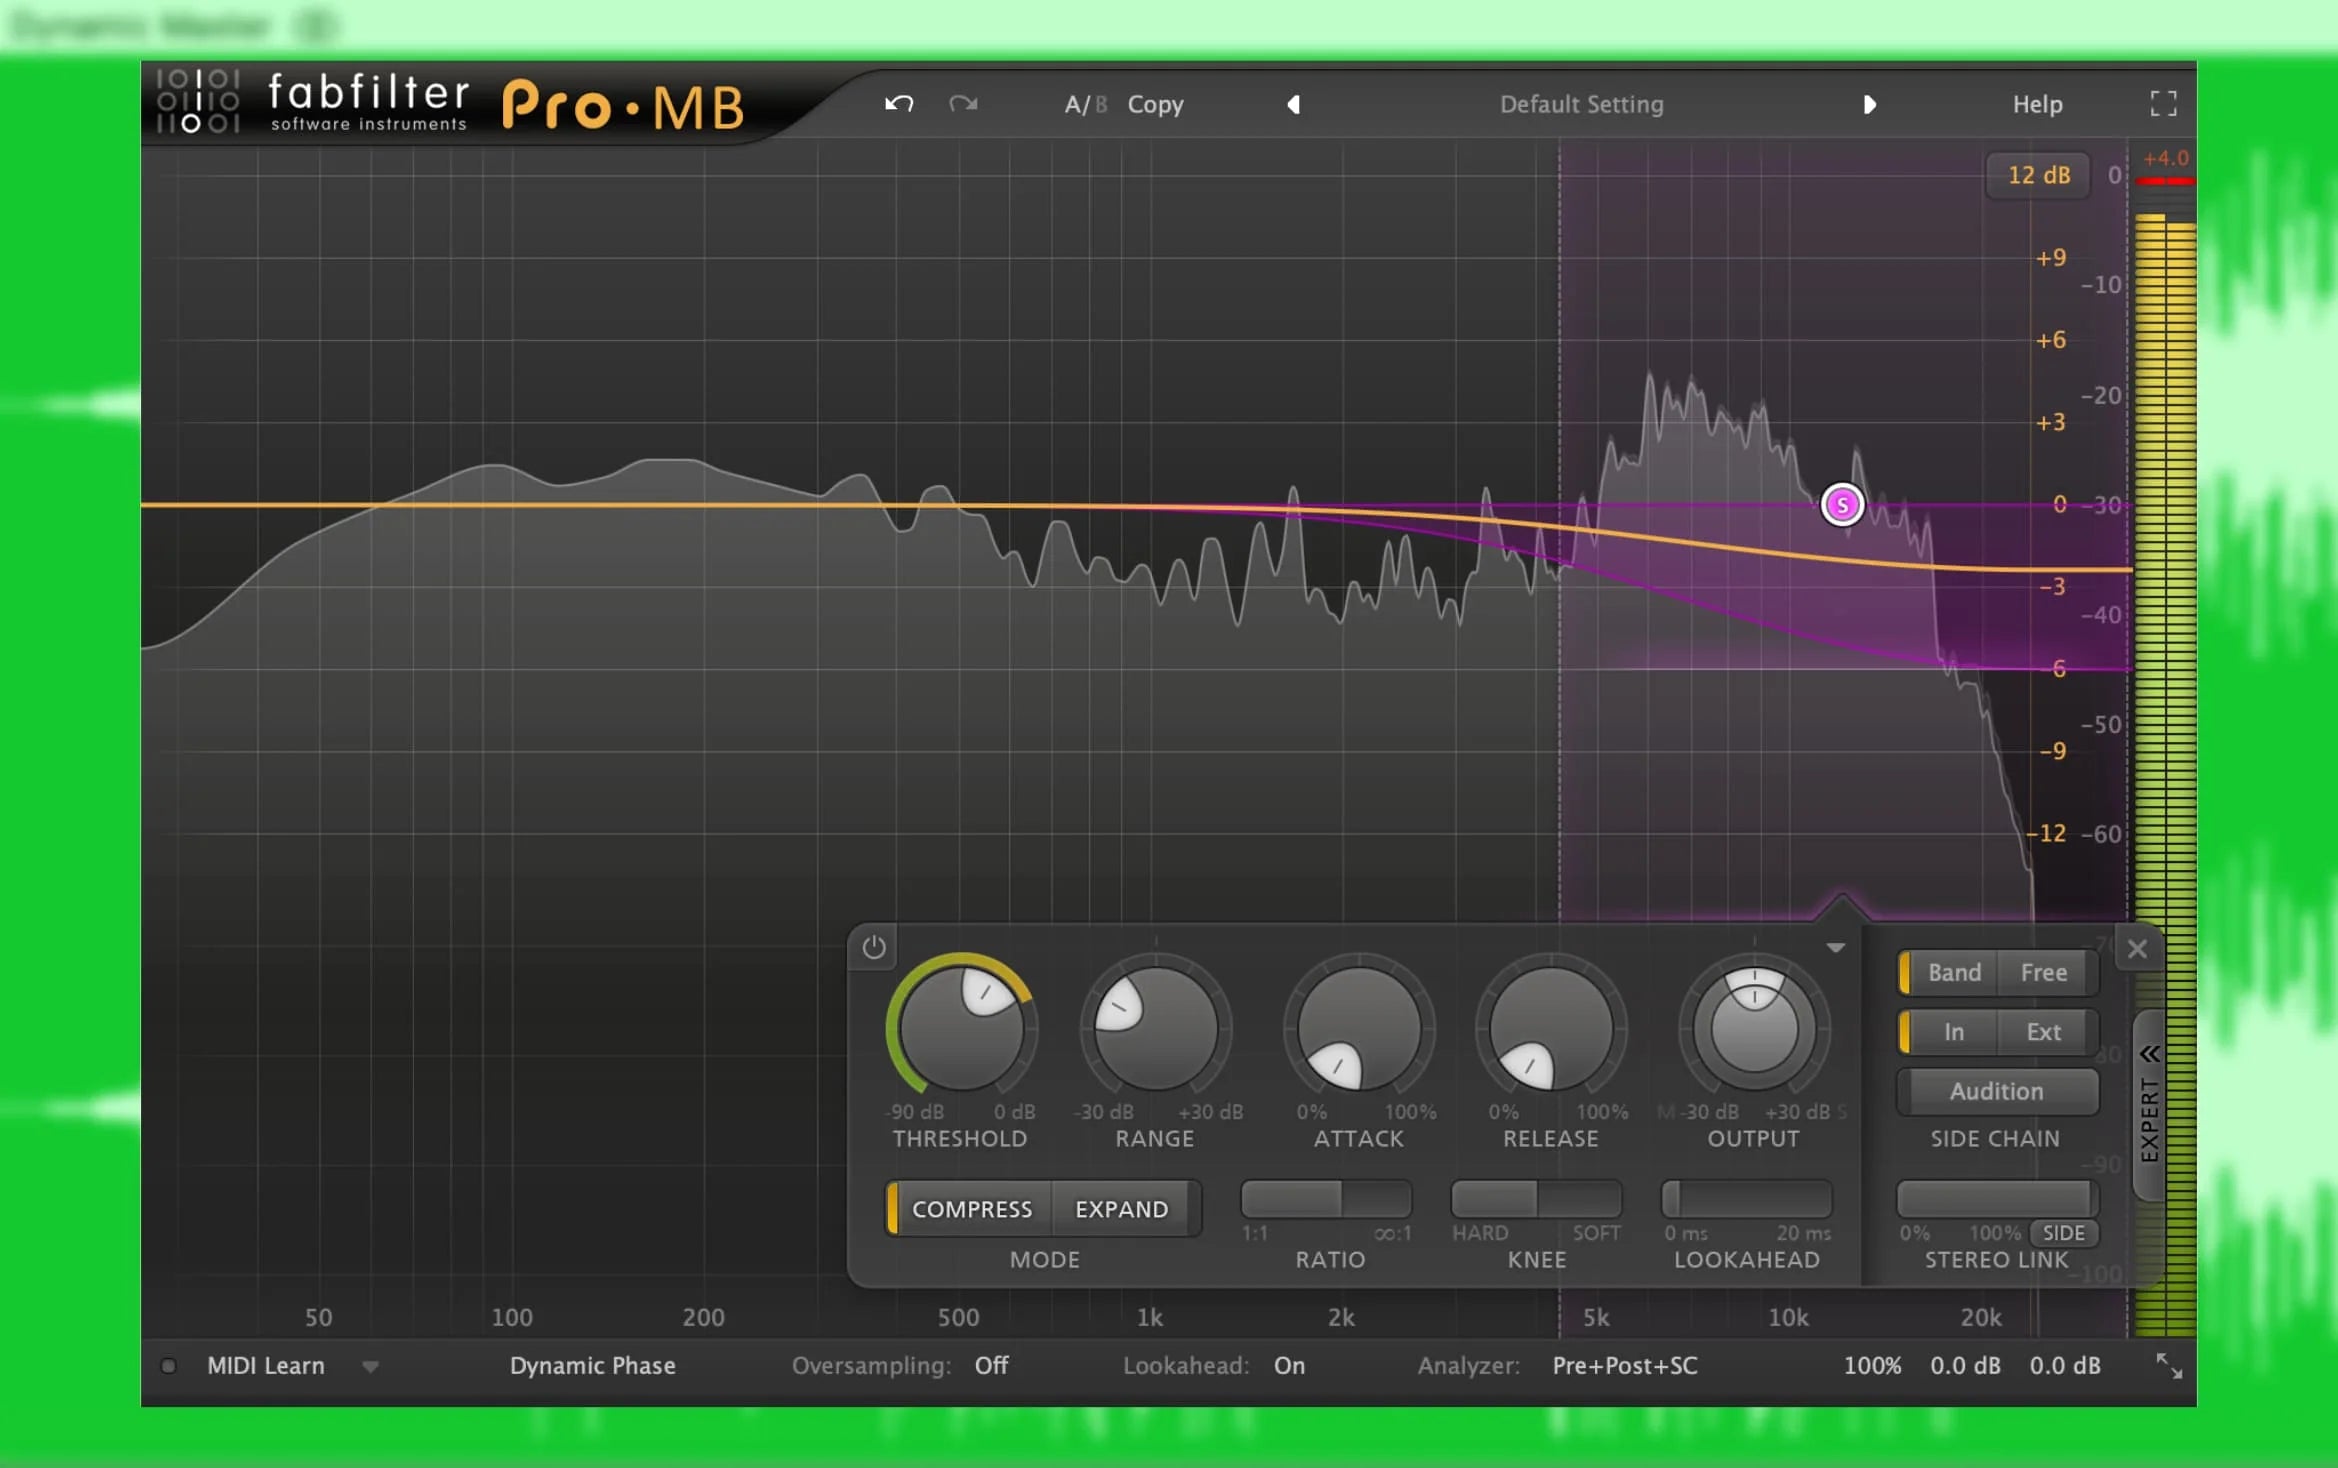
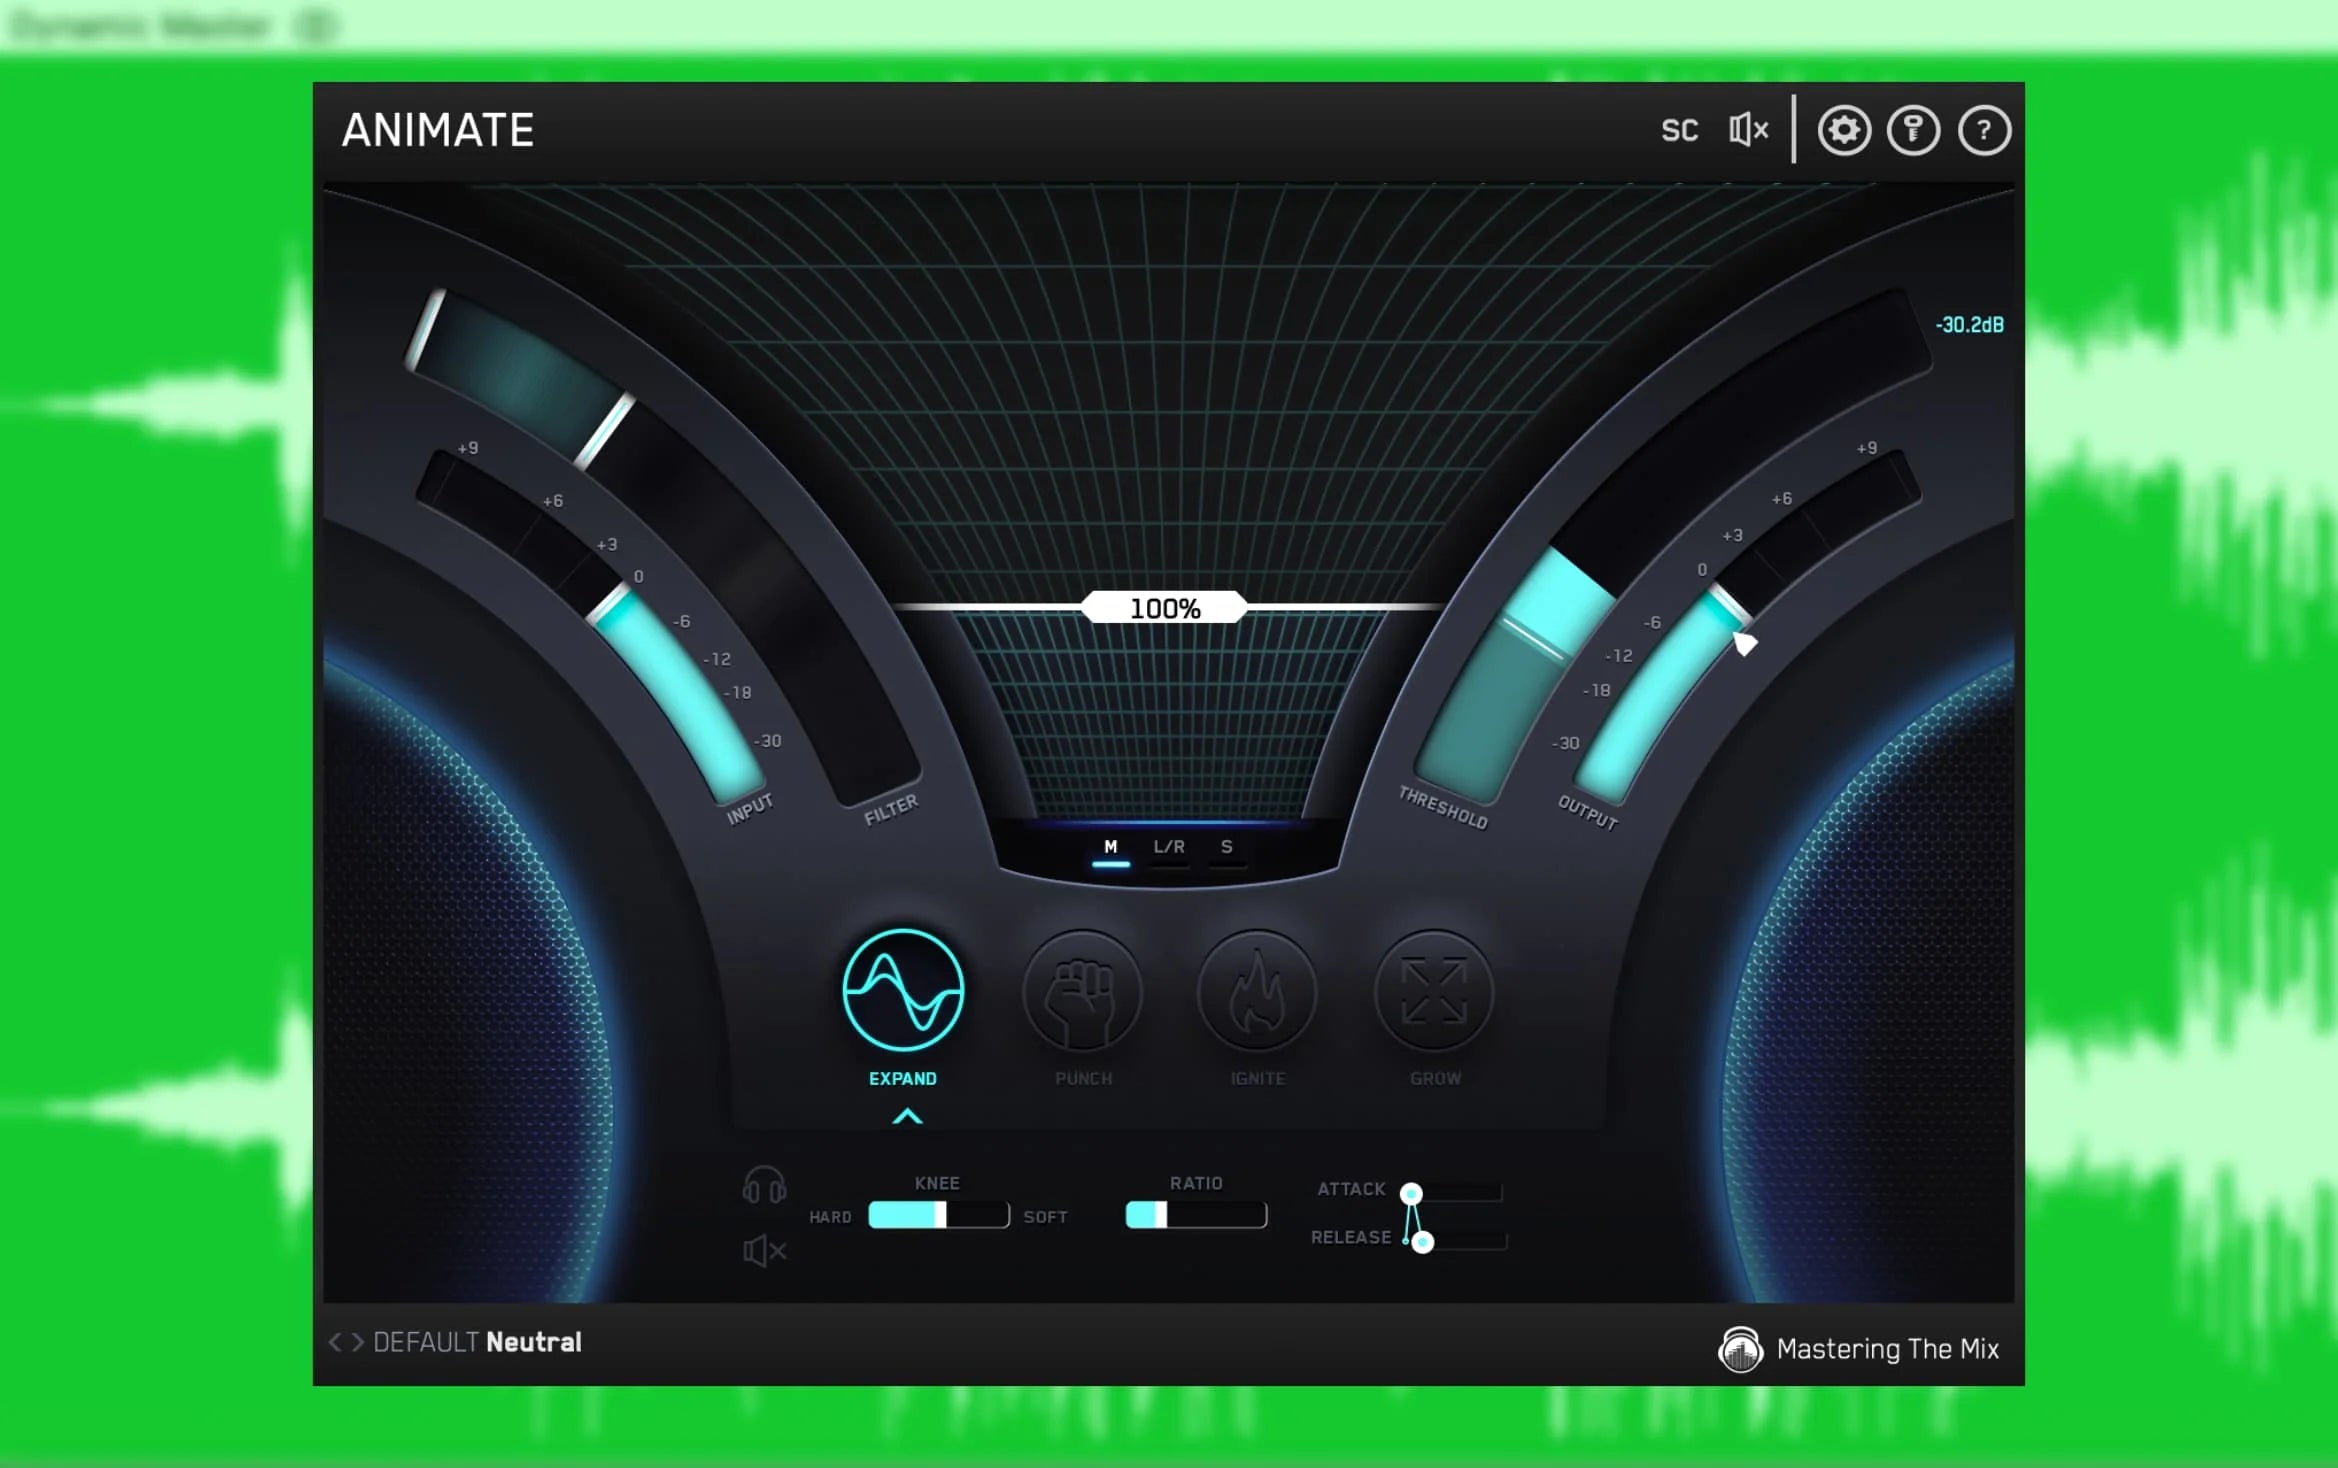
- Scenario 2: Quiet, Centered Hi-hats: Implement upward expansion in the mid-channel to subtly elevate the hi-hats in the mix. ANIMATE (the plugin below) shows the exact parameters to get this set up.
These techniques demonstrate the finesse required in mastering, where precise adjustments can significantly enhance the overall sound quality.
Case Study: Tackling a Problematic Track
Mastering restoration and repair often involve tackling tracks that come with a unique set of challenges. In this case study, we’ll walk through a real-world example of transforming a problematic track into a polished piece, highlighting the application of mastering techniques and the use of Mastering The Mix tools.
The Problematic Track
Let's image a track has the following issues:
- Clipping and Distortion: The track suffered from occasional clipping, leading to distortion in the louder sections.
- Uneven Dynamics: Some parts of the track were significantly louder than others, causing an imbalance in the listening experience.
- Tonal Imbalance: The track was bass-heavy, with muffled mids and subdued highs, making it sound unbalanced on different playback systems.

Step-by-Step Restoration
-
Initial Assessment: The first step is to analyze the track using Mastering The Mix’s LEVELS plugin to identify technical issues like clipping and dynamic range problems.
-
Spectral Repair: Using spectral editing tools, specific instances of clipping can be visually identified and surgically reduced, preserving the integrity of the audio.
-
Dynamic Range Correction: Compression can be applied, but very subtly. A low ratio with a high threshold can be used to gently even out the dynamic range, making sure the track’s energy remains intact.
-
EQ Adjustments: The EQ process can begin with broad adjustments using BASSROOM to balance the low end. Then, MIXROOM can be employed for more precise adjustments in the mids and highs, ensuring clarity and presence.
-
Final Touches: After the primary issues are addressed, you can use LIMITER to ensure optimal loudness without introducing any new clipping.
-
Reference and Finalization: Finally, compare the track to a high-quality reference track using REFERENCE 3, ensuring the restored track meets industry standards. The Match % score quantifies how close you are, and the Mix Instructor's plain-text directions across three frequency bands guide your final tweaks.

The Outcome
- The clipping was eliminated, and the distortion was significantly reduced.
- The dynamics were more consistent, creating a more engaging listening experience.
- The tonal balance was corrected, resulting in a clearer and more vibrant sound across various playback systems.
This case study demonstrates the transformative power of mastering restoration and repair. By meticulously applying the right tools and techniques, a track fraught with issues can be revived, showcasing the expertise and precision that goes into professional mastering.
Best Practices and Tips for Mastering Restoration
Mastering restoration and repair is a nuanced process that requires a fine balance between technical proficiency and creative intuition. To ensure your tracks not only sound professional but also retain their artistic essence, here are some best practices and tips to follow.
Emphasize Listening
- Critical Listening: Spend time critically listening to the track in different environments and on various systems. This will help you identify inconsistencies and areas that need work.
- Reference Tracks: Use high-quality reference tracks to ensure your restoration efforts are aligned with industry standards.

Maintain Dynamics
- Avoid Over-Compression: While it’s tempting to squash dynamics for loudness, this can lead to a lifeless track. Aim for a balanced dynamic range that preserves the track's energy and emotion.
- Use Compression Wisely: Apply compression judiciously, focusing on enhancing rather than altering the track's natural dynamics.
Tonal Balance
- EQ with Purpose: Use EQ to correct problems and enhance elements, but avoid making drastic changes that could alter the track's character.
- Harmonious Balance: Strive for a tonal balance that translates well across all listening environments, from headphones to large speaker systems.
Restoration with Care
- Surgical Precision: When removing noises or correcting issues, work with precision to avoid affecting the desirable qualities of the track.
- Tools and Plugins: Leverage advanced tools like Mastering The Mix’s REFERENCE 3, LEVELS, MIXROOM, and BASSROOM for accurate and efficient restoration.
Final Checks
- Quality Control: Use tools like Mastering The Mix’s EXPOSE 2 for final quality control checks, ensuring your track meets technical standards without any overlooked flaws.
- Feedback and Revisions: Be open to feedback and prepared to make revisions. Sometimes, a fresh perspective can reveal aspects you might have missed.

Mastering restoration and repair is as much about preserving the soul of the music as it is about technical fixes. By adhering to these best practices, you ensure that your tracks are not just technically sound but also emotionally resonant and true to your artistic vision
The Art and Precision of Mastering Restoration
Mastering restoration and repair is an intricate dance between the technical and the creative, a process where precision meets artistry. As we conclude this guide, it’s important to remember that the journey of mastering is as much about preserving the essence of the music as it is about enhancing its quality.
Embracing the Challenge
Mastering, especially in the context of restoration and repair, is not just about applying filters and effects. It’s about understanding the soul of the music, its intended impact, and how best to bring out its innate beauty. Each track comes with its unique set of challenges, and as a mastering engineer, your role is to navigate these challenges with a blend of skill, patience, and creativity.
The Tools of the Trade
Tools like those offered by Mastering The Mix are not just utilities but are extensions of your creative intent. They empower you to make informed decisions, bring precision to your work, and achieve results that resonate with listeners across the spectrum.
The Reward of Mastery
The reward of mastering restoration and repair is more than just a well-balanced track. It’s the satisfaction of breathing new life into music, of transforming a problematic recording into a piece that artists are proud to share, and audiences are moved to listen to. It’s about leaving your mark on the music in the most subtle yet profound way.
As you continue on your mastering journey, remember that each project is an opportunity to hone your skills, to experiment, to listen, and to learn. The path to mastering excellence is a continuous one, filled with discovery, challenges, and immense gratification.
Frequently Asked Questions
What problems does mastering restoration fix?
Restoration tackles issues introduced during recording or mixing, including clipping and distortion, unwanted noise like hiss and hum, tonal imbalance where a track is too bass-heavy or treble-focused, and dynamic inconsistencies where some parts are far louder than others. The aim is a clean, balanced, consistent result.
How can you adjust one instrument during stereo mastering?
Since you only have the stereo file, use mid, side, left or right EQ to target where the element sits. To lift a thin vocal, create a mid-focused band, solo it to tune the frequency and Q, then boost while listening to the whole mix. You can usually move a vocal by about plus or minus 3dB before it sounds unnatural.
Why are hi-hats often easier to adjust in a master?
Hi-hats usually have no competing instruments in their range, are punchy and brief so dynamic control does not alter other sounds, and tend to sit in the mid or side channels. This makes a multiband compressor effective, for example compressing the side channel to tame wide, loud hi-hats.
How should compression be used when repairing a track?
Apply it very subtly. A low ratio with a high threshold gently evens out uneven dynamics while keeping the track's energy intact. The aim is to enhance rather than alter the natural dynamics, avoiding the over-compression that squashes the life out of the music.


