LEVELS | Audio Metering That Catches What You Miss
If your mix doesn’t translate, nothing else matters. LEVELS gives you the tools to catch technical issues before they ruin your sound, with presets for every major playback system.
If you don't LOVE our plugins, you don't pay. It's that simple.
Pro Reviews

Focus...
Dr. Dre, John Legend, Eminem, J Lo
No matter who you are, or where you are in your music career LEVELS is a vital tool for every Producer/ Engineer.

Sound On Sound
Industry Leading Publication
LEVELS is a refreshing alternative, presenting the metering tools that are needed in today’s loudness-normalized world in an affordable, easy-to-use package.
Dj Swivel
BTS, Chainsmokers, Grammy Winning
LEVELS gives me confidence that my mix will translate well wherever it's heard.
Overview Video
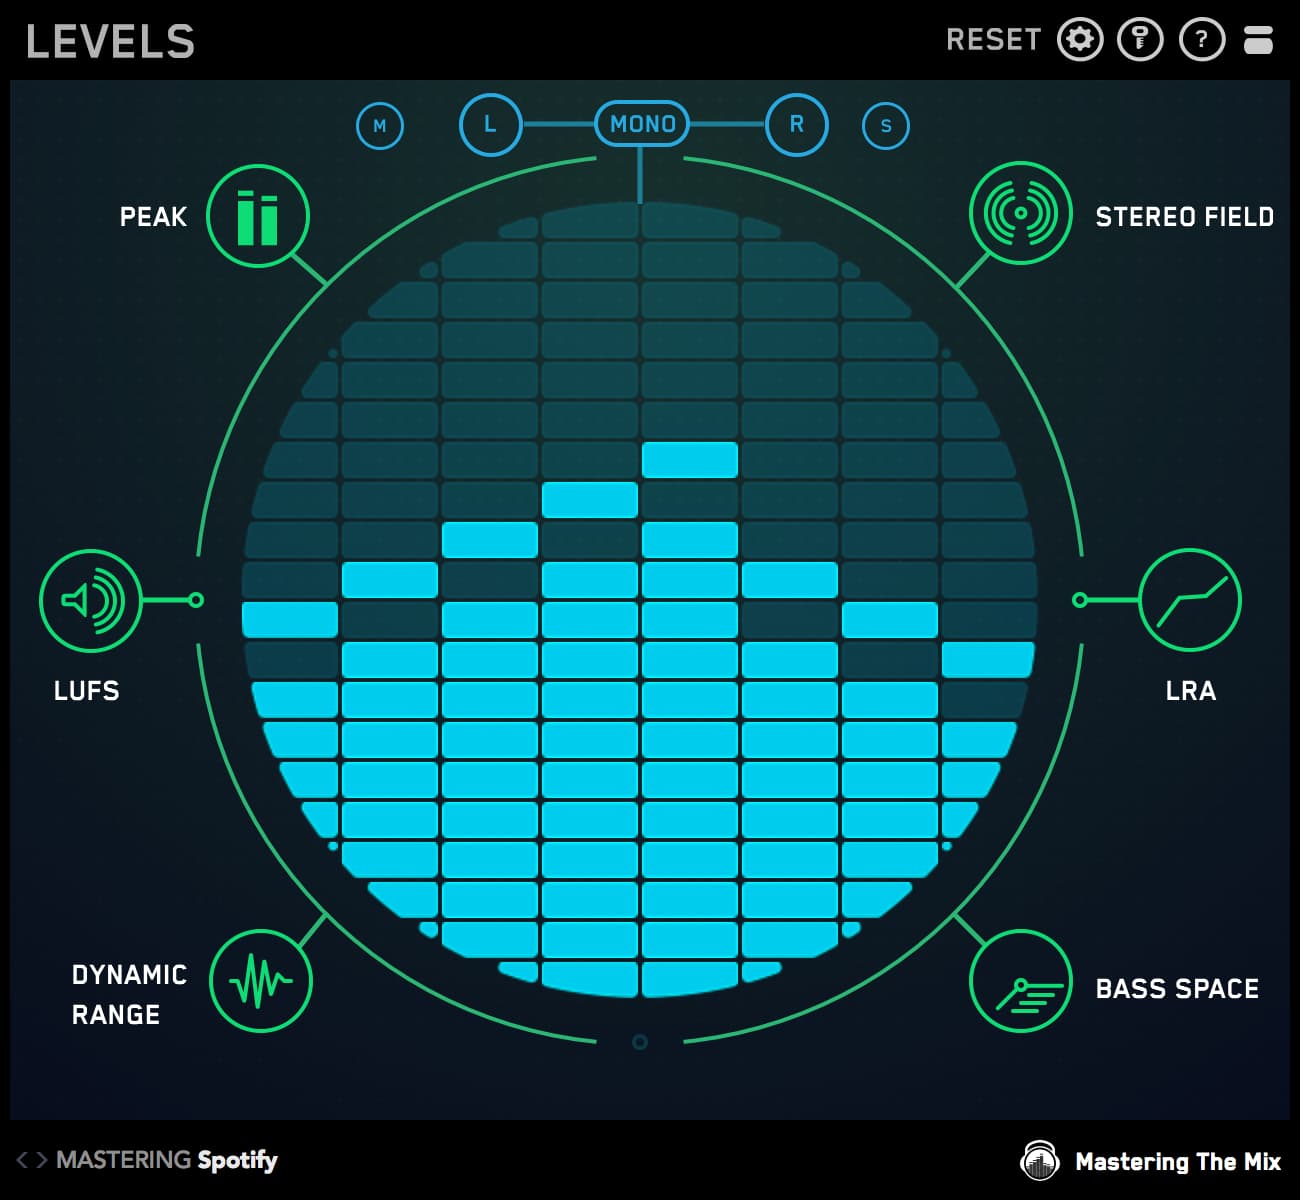
True Peak
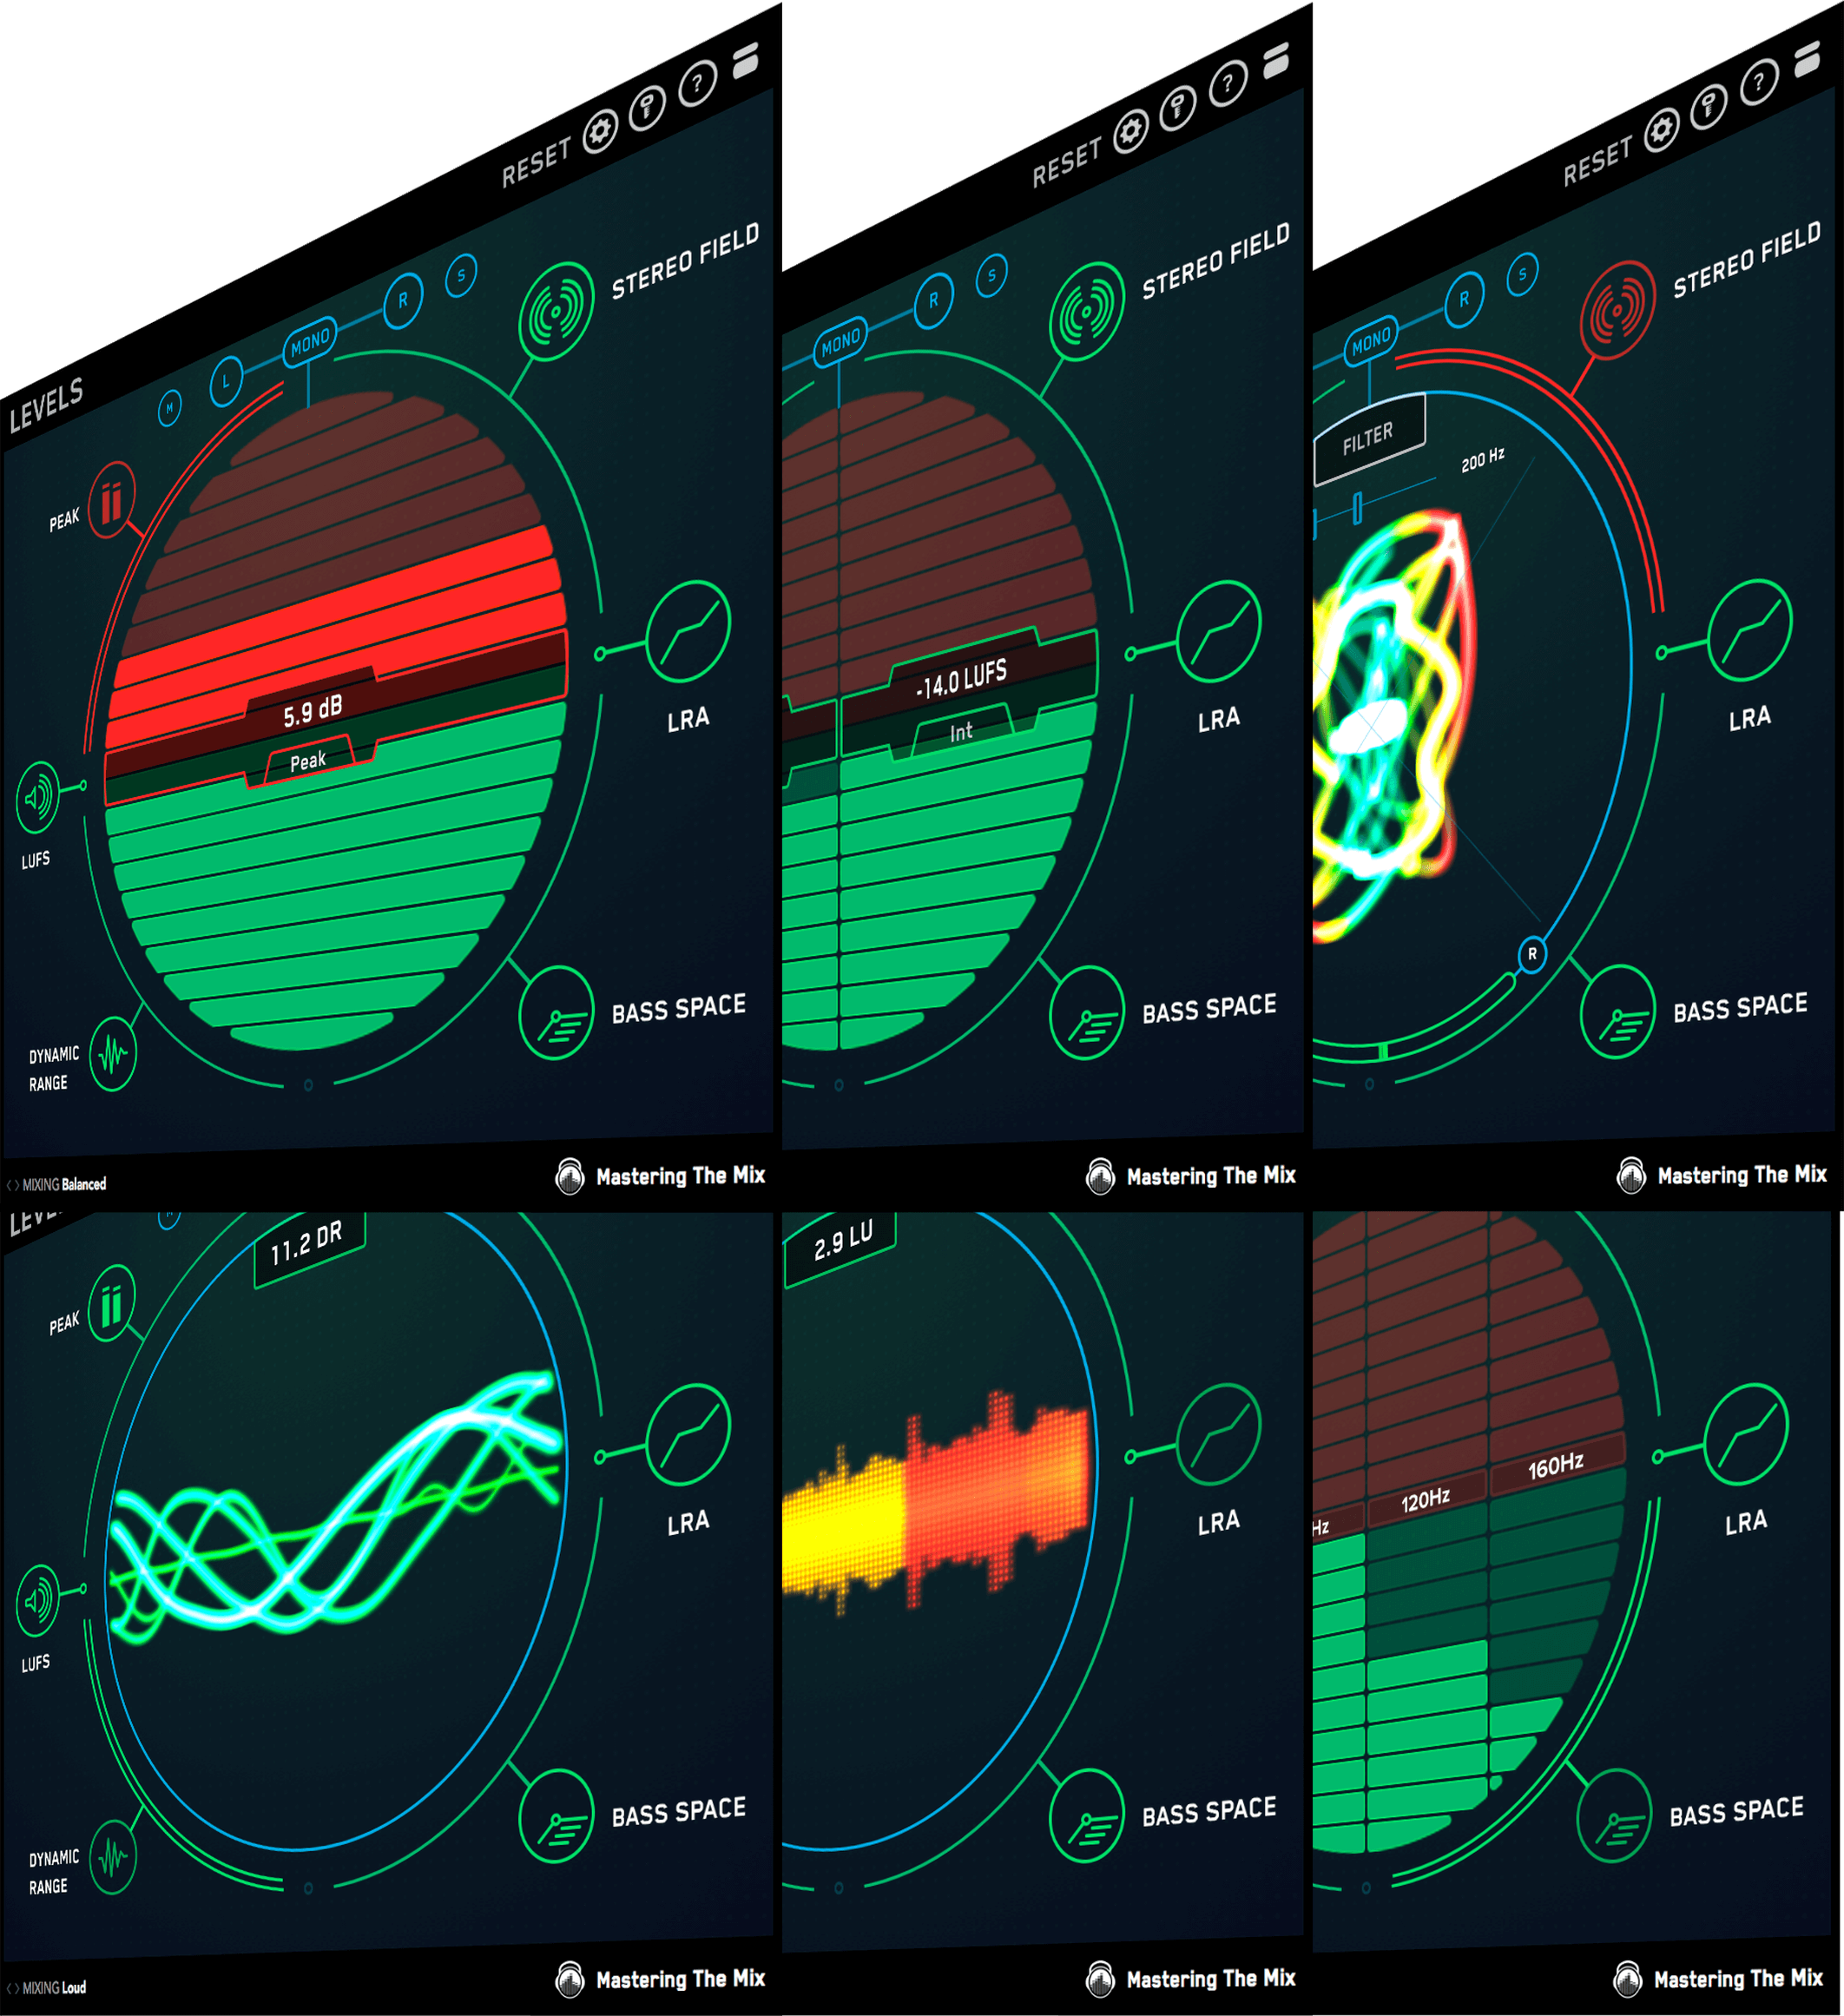
The central display has a true peak meter which gives you a reading of how close your track is to 0dBTP [decibels true peak]. Each bar represents 1dB [decibel] and each preset has a threshold that we recommend you don’t breach to get the best listening experience from that playback method (i.e Spotify). The goal is to keep your audio below the threshold and in the lower green half. If your audio breaches the threshold, the meter will start moving into the upper red half and it will turn the PEAK icon red as seen in the image above.
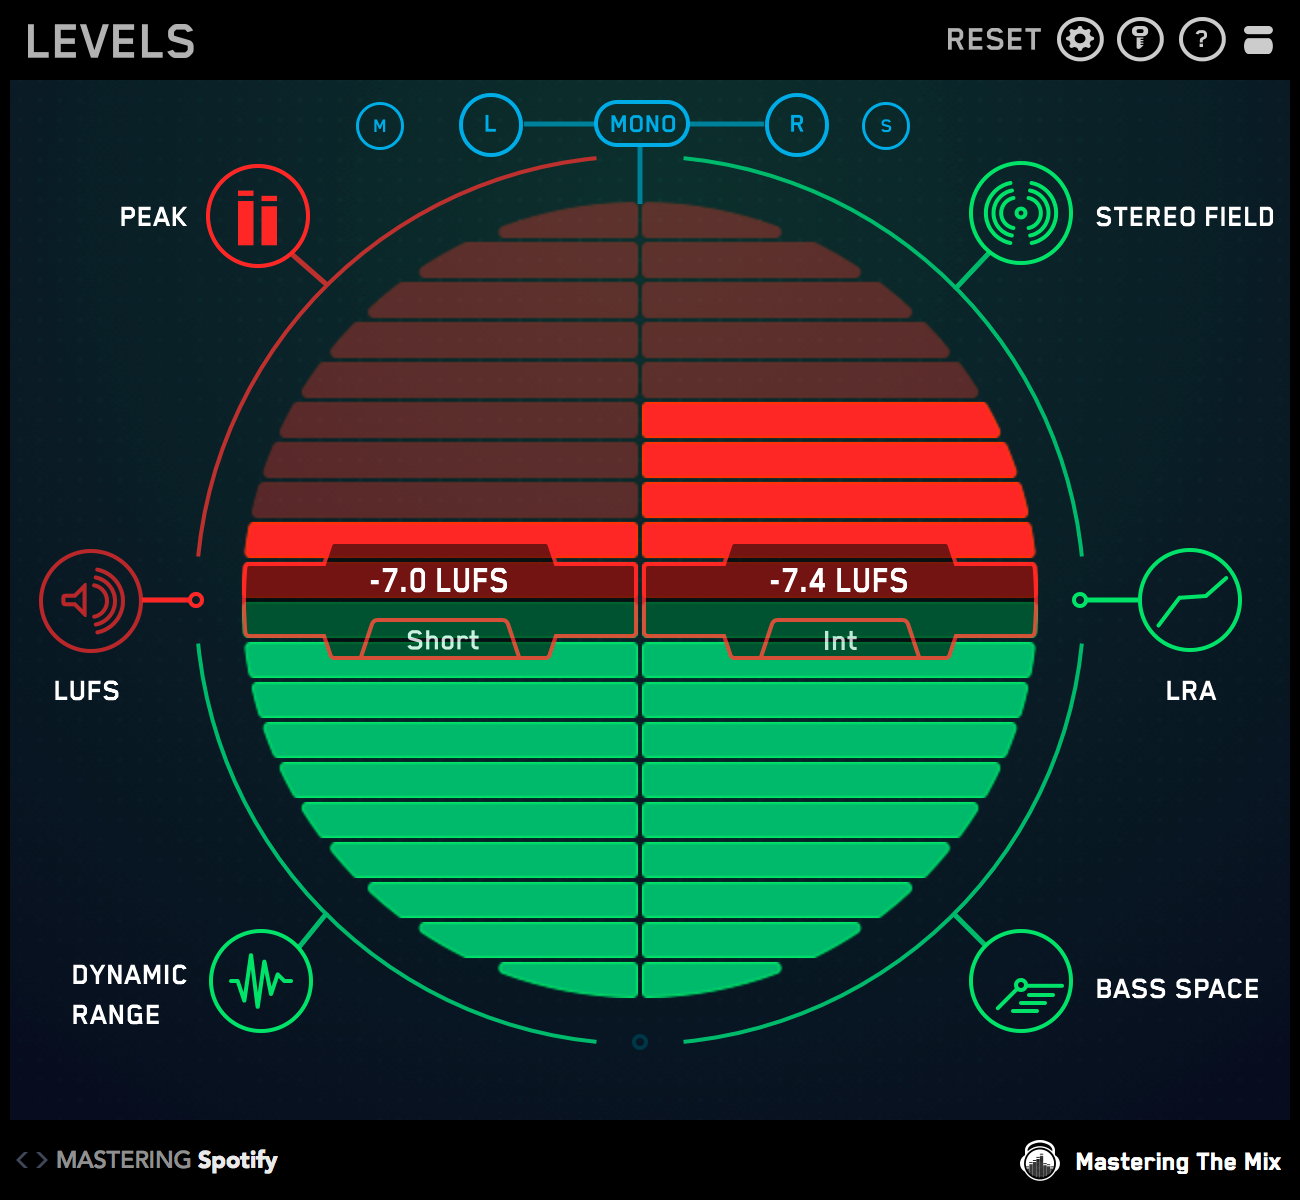
LUFS
The LUFS measurement scale is extremely accurate at displaying the perceived loudness of audio material. It’s a useful insight to have whilst both mixing and mastering. Navigate to these LUFS meters by clicking the LUFS icon. There is a short-term LUFS meter on the left and an integrated LUFS meter on the right. Similarly to the true peak meter, each bar represents 1 unit.
The mastering presets have various loudness targets. They range from a maximum of -6 to -12 LUFS. These aren’t necessarily targets, more like thresholds that if breached could have a negative effect on your music.
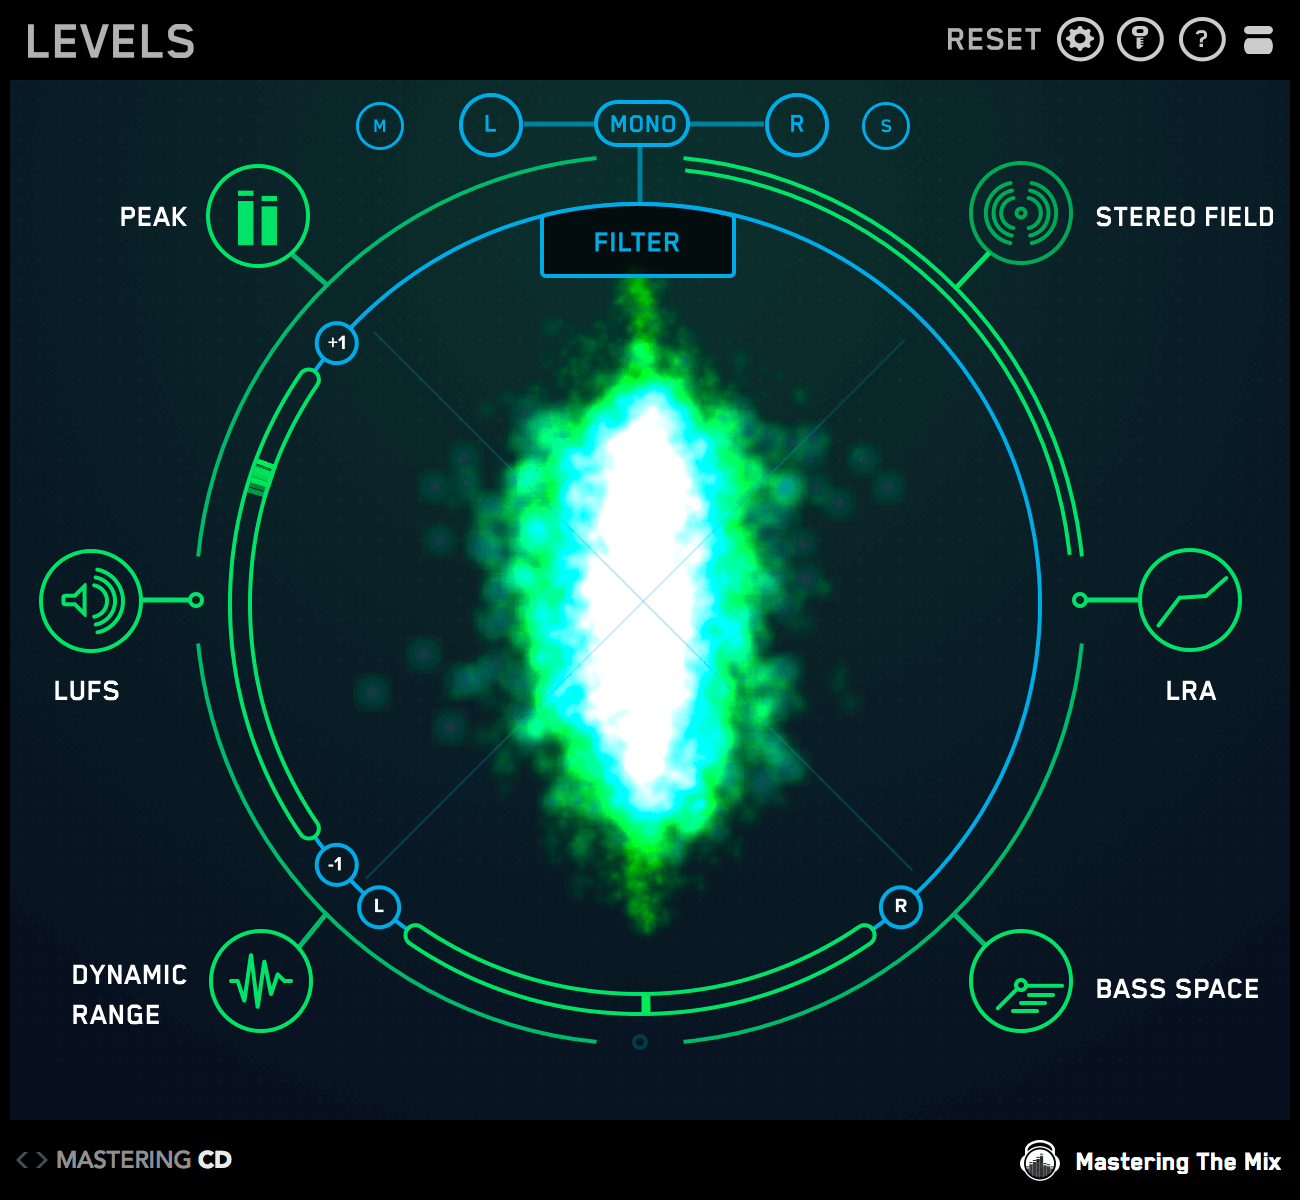
Stereo Field
The vectorscope displays your audios placement in the stereo field. When the image is spread out across the circle, your master is wide. When the image is simply one thin line down the middle, your master is mono. The L-R [Left Right] meter at the bottom of the central display area shows how even the left and right outputs are. If the pointer is central, then your music is evenly balanced between the two speakers. If you have an unbalanced output the pointer will hover either too far left or right and will glow red, this will also turn the STEREO FIELD icon red.
The correlation meter on the left side of the circle shows the degree of similarity between the left and right channels. A reading near +1 indicates a well-balanced mix. If the pointer hovers passed the central point towards -1 it indicates that the mix has phase issues. This can cause the mix to fall apart when played back in mono. A breach of the stereo correlation threshold will also cause the STEREO FIELD icon to turn red.
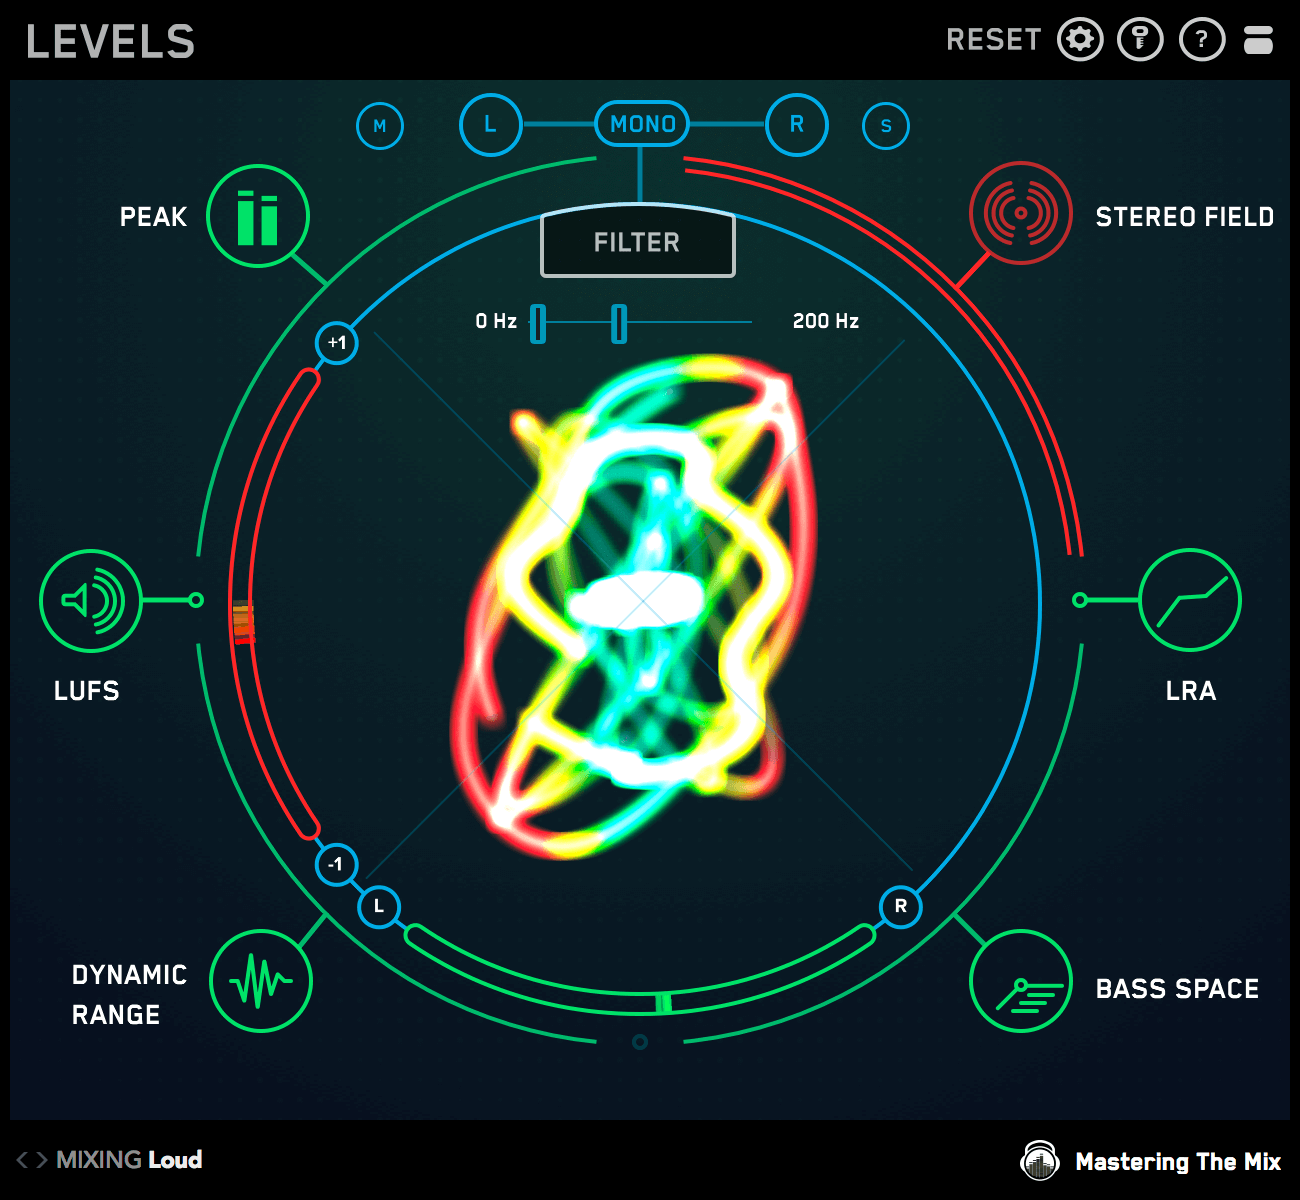
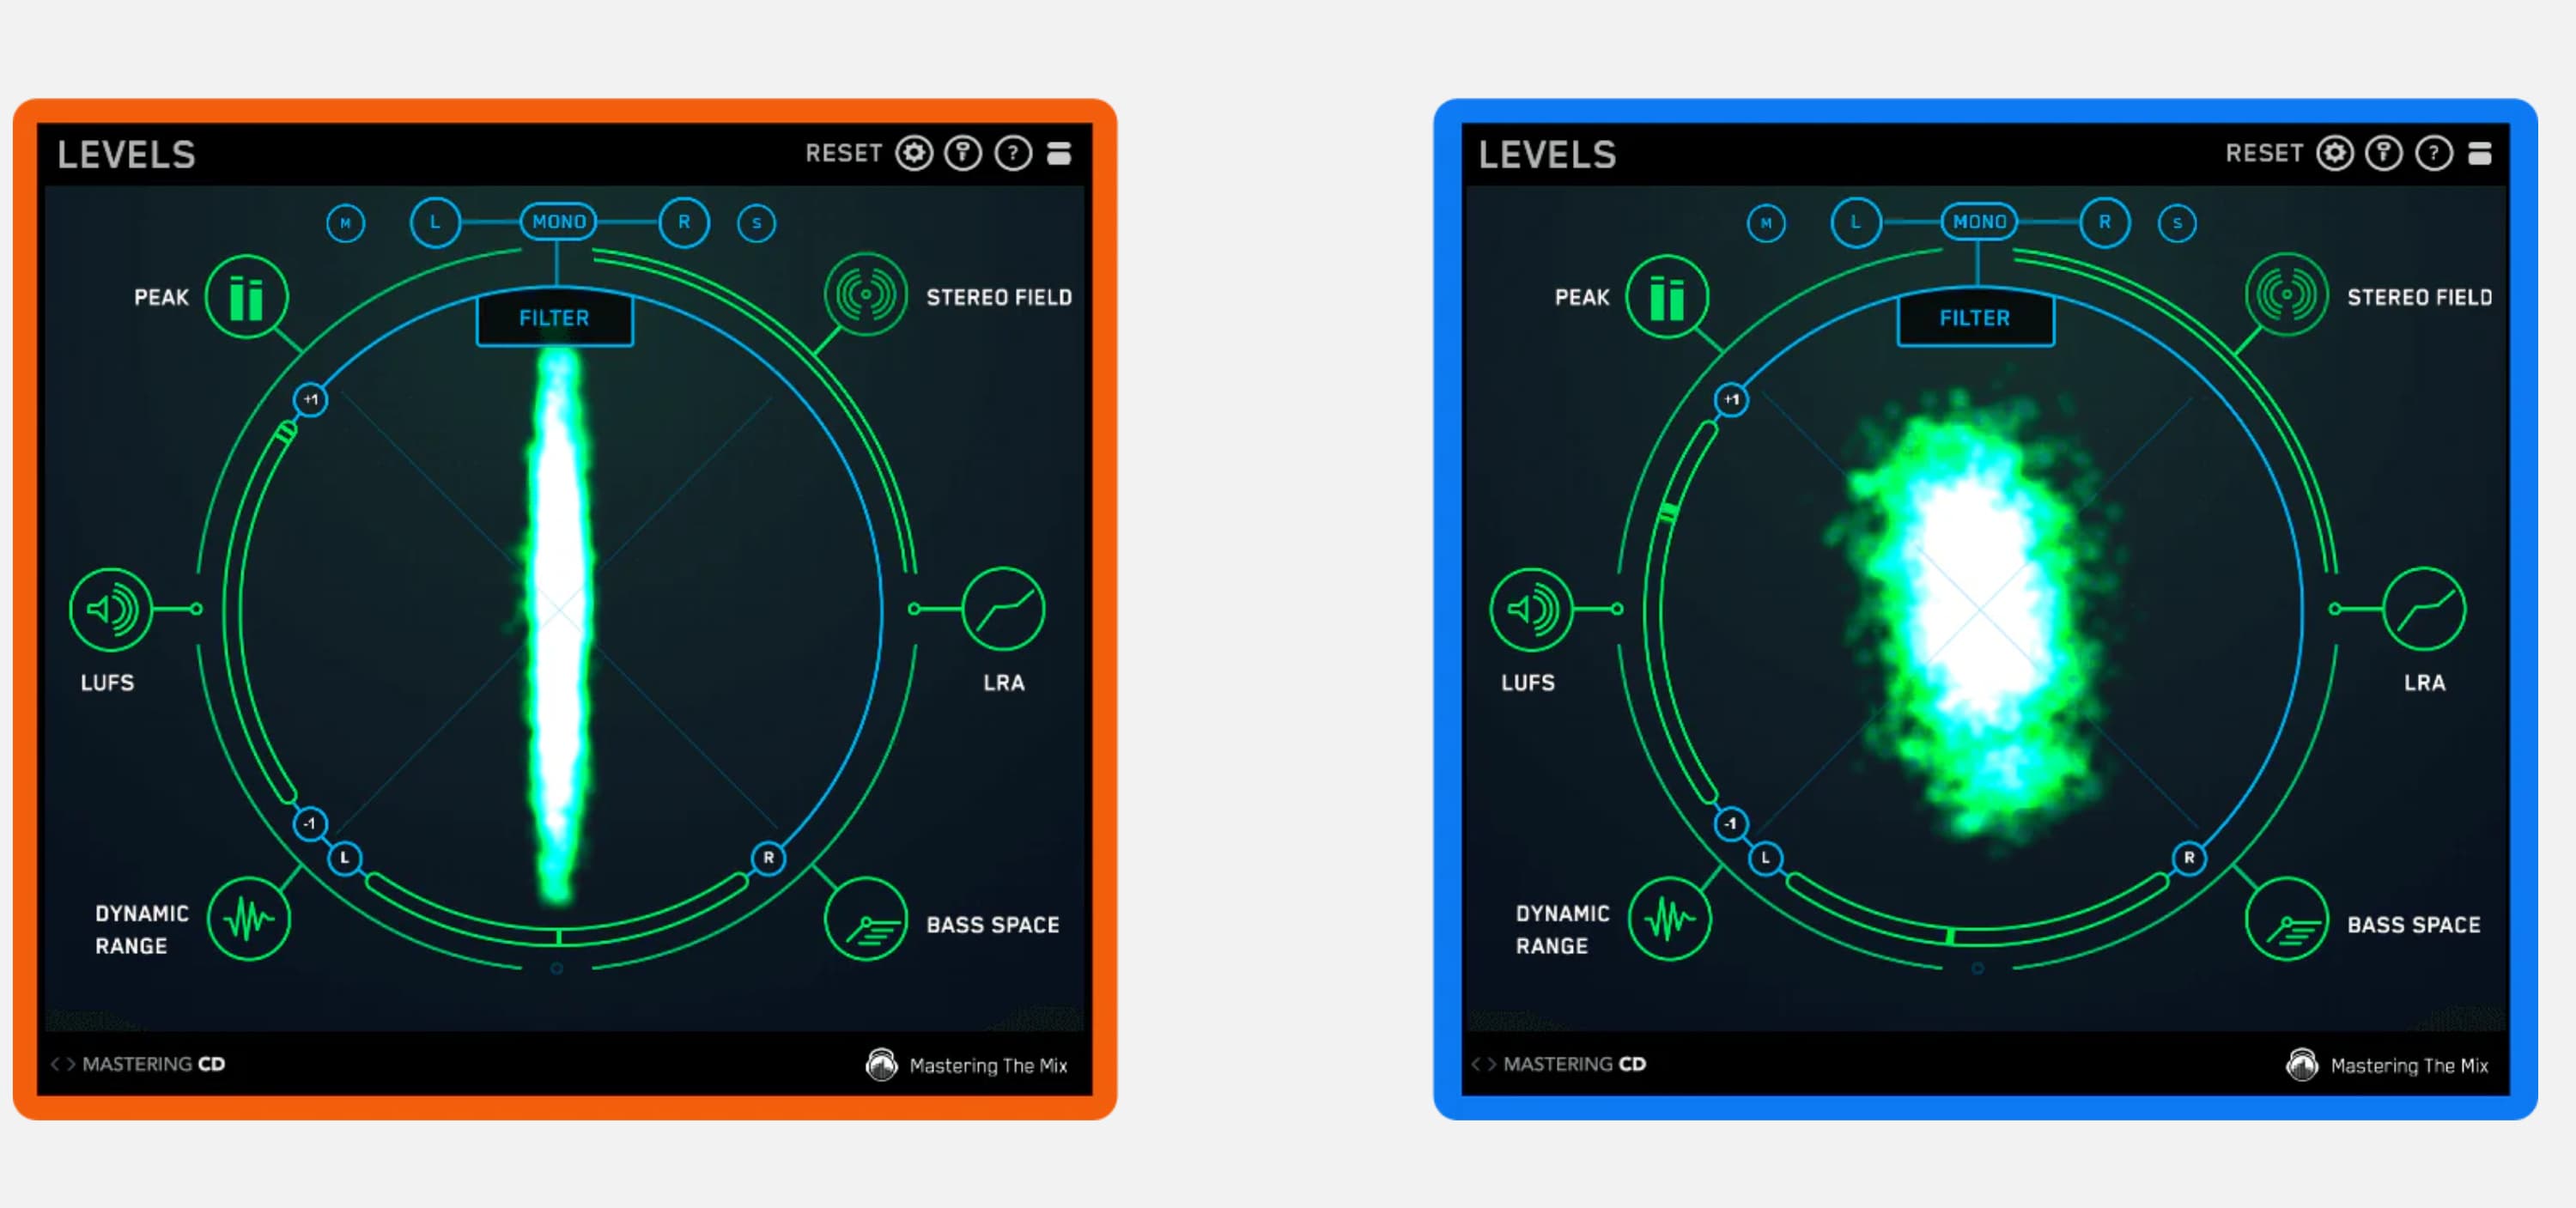
Stereo Filter
The FILTER in the Stereo Field section allows you to isolate certain frequencies in the master to view their stereo placement. This is useful to see which frequencies are placed more centrally in the mix and which frequencies are placed wider.
Having low frequencies placed very wide in your master can have negative effects on your master. Wide bass frequencies might suffer from phase cancellation when played in mono, making your master sound weak. Bass also takes up a lot of space, so by keeping it mostly mono, you can utilize the rest of the stereo spectrum for other elements in your mix. When you engage the FILTER (by clicking the ‘FILTER’ button), and you set the high-cut to 250Hz or less, you can see the low frequencies that are too wide glowing yellow and red in the vectorscope. The goal is to keep the low frequencies in the more central green area. This will lead to a more powerful and balanced master. If you have wide low frequencies, you could try using a stereo placement plugin to place the low frequencies of your master in mono.

Dynamic Range
The oscilloscope in the central display circle will react to the audio material passing through LEVELS. The visuals will immediately show you how dynamic your music is. If your music has a dynamic range above the set threshold, the oscilloscope will glow green. If your music approaches the threshold it will begin to turn orange. If your music breaches the threshold, the oscilloscope will turn red.
LEVELS creates a ratio of the ‘short-term LUFS’ to ‘peak level’ of your track and gives you a DR [Dynamic Range] reading. The lower the number, the less dynamic range your track has. The dynamic range is not relative to the loudness of your music, so if your music is over compressed the oscilloscope will turn red regardless of how quiet the track might be.
A small dynamic range can come about from over compression and limiting. This can suck the life out of your music. It can also reduce the clarity and punch of the transients in your music. So to get a great final mix, you'll need to make sure that the dynamic range is on point.
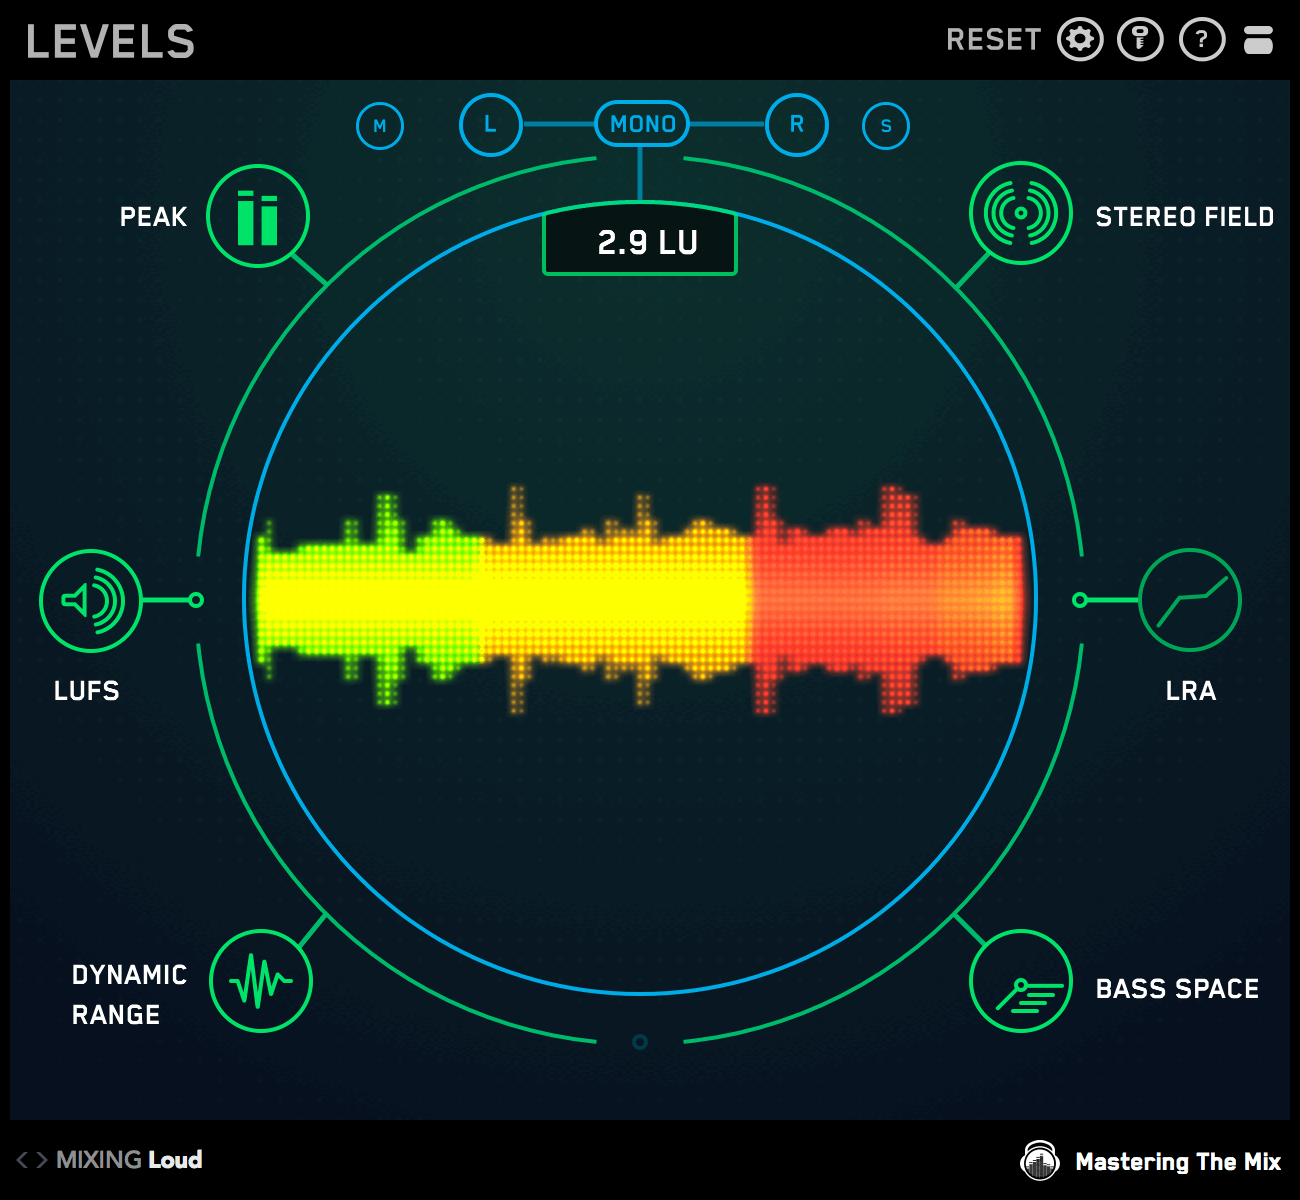
Loudness Range
Loudness Range [Measured in LU (loudness Units)] will tell you the statistical measure of loudness variation of your entire track. This long-term reading will give you an idea of the difference in volume between the verse, chorus and other sections of your track. If your track has a loudness range of less than 3LU for more than 30 seconds than the section icon will turn red.
If there is a big difference in loudness between the various sections of your track then your loudness range will be a higher number.
If the loudness of the various sections in your track are very similar or equal, the loudness range will be smaller.
A loudness range between 6 LU to 12 LU shows that a track has a considerable difference in loudness between the various sections.
Bass Space
BASS SPACE identifies if any channels within your mix are outputting unwanted low frequencies. You will only be able to use Bass Space on a stem master (music bounced into groups with kick and bass separated), not on a stereo master (just one audio file).
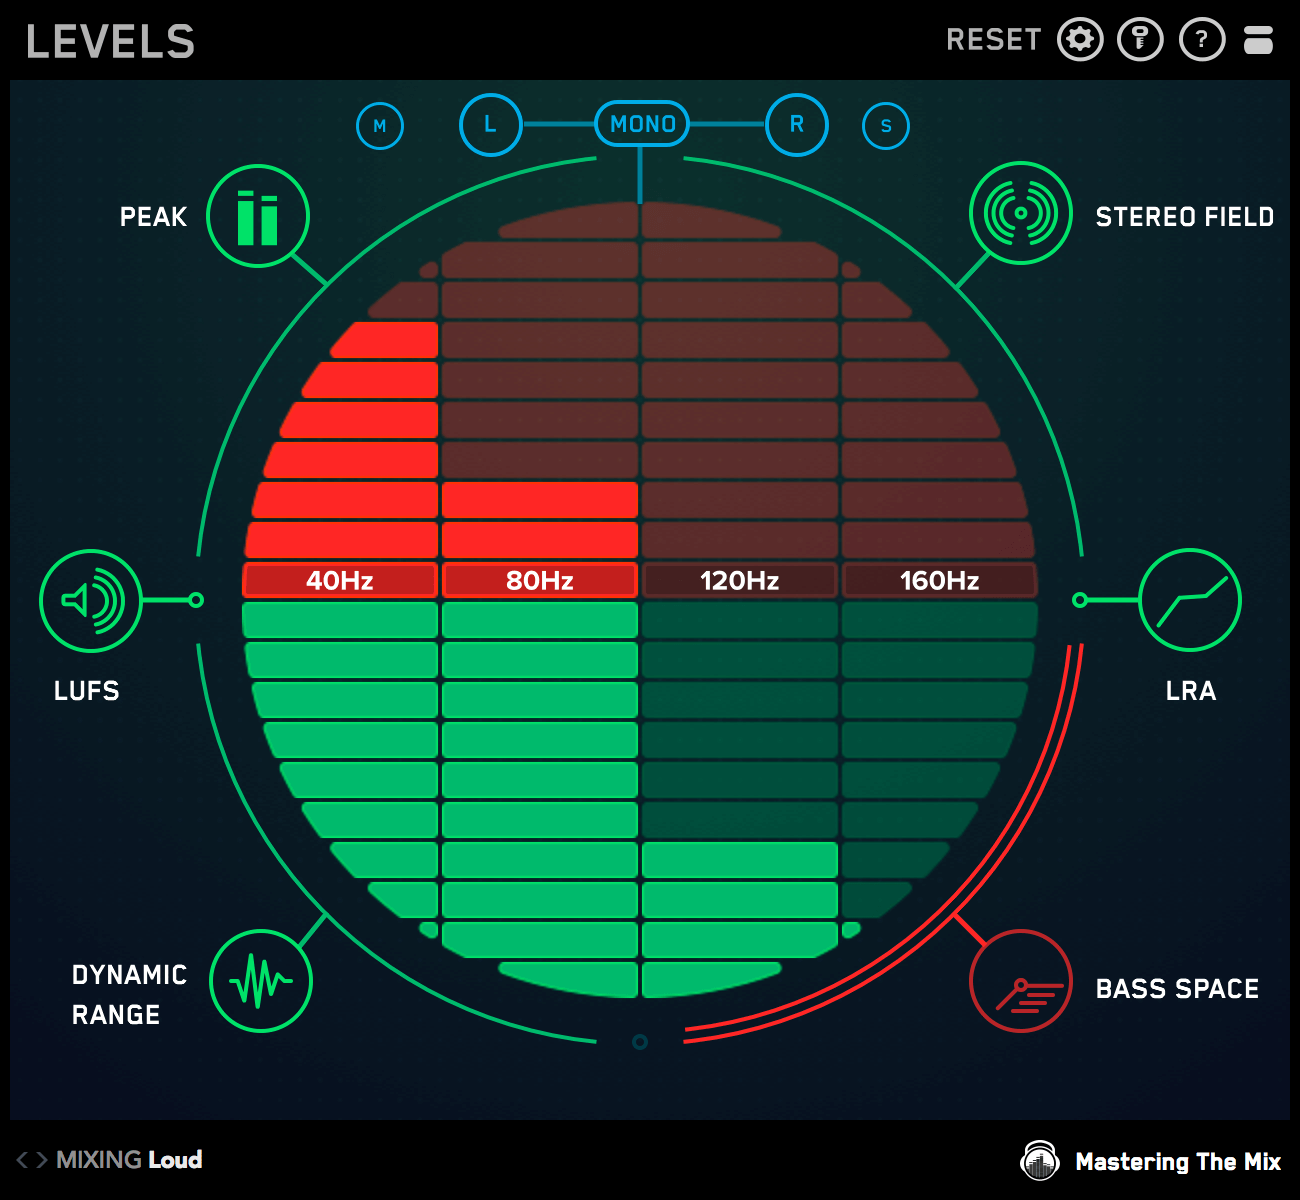
For your kick and bass elements to sound powerful and clear, they need as much space as possible. To use BASS SPACE first mute your kick and bass elements within your DAW. The frequency bars in the central display area will give you a reading at 40Hz, 80Hz 120Hz and 160Hz. They will jump into the upper red half of the circle if there is too much low-end energy. If this is the case you need to identify which channels are outputting the excess low frequencies. Mute the individual channels one at a time until the bars drop into the green to find the culprit and then use a high pass filter to clean up this excess low-end rumble to maximise the clarity and power of your track. Be careful to not remove the material you actually want to hear in your mix.
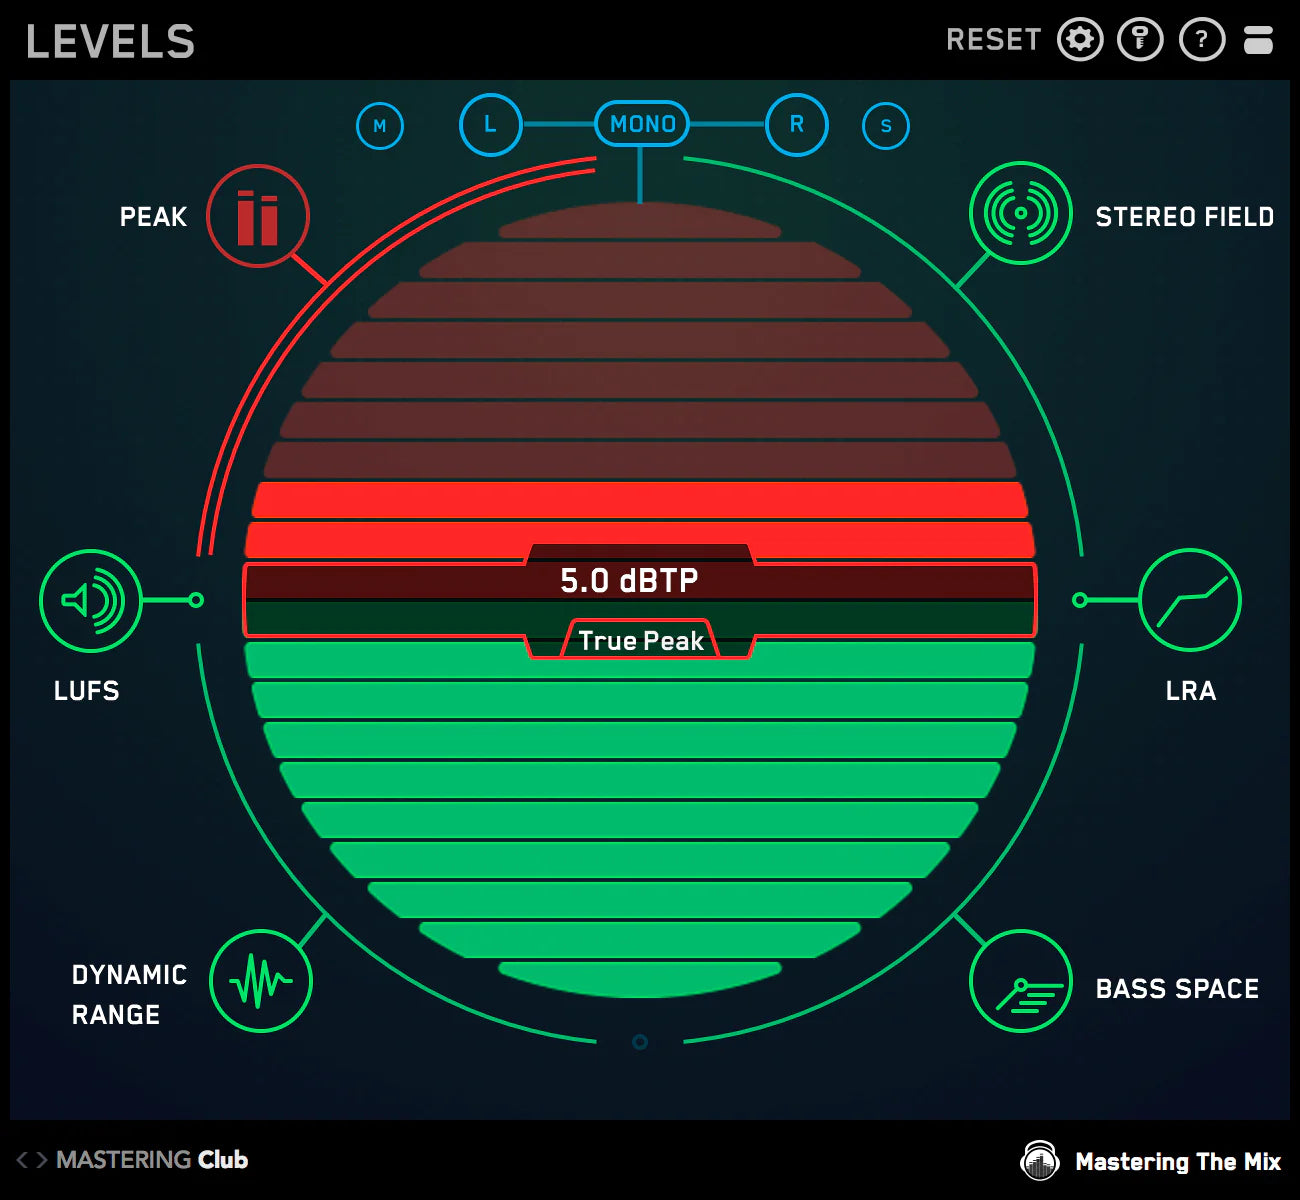
True Peak
The central display has a true peak meter which gives you a reading of how close your track is to 0dBTP [decibels true peak]. Each bar represents 1dB [decibel] and each preset has a threshold that we recommend you don’t breach to get the best listening experience from that playback method (i.e Spotify). The goal is to keep your audio below the threshold and in the lower green half. If your audio breaches the threshold, the meter will start moving into the upper red half and it will turn the PEAK icon red as seen in the image above.
LUFS
The LUFS measurement scale is extremely accurate at displaying the perceived loudness of audio material. It’s a useful insight to have whilst both mixing and mastering. Navigate to these LUFS meters by clicking the LUFS icon. There is a short-term LUFS meter on the left and an integrated LUFS meter on the right. Similarly to the true peak meter, each bar represents 1 unit.
The mastering presets have various loudness targets. They range from a maximum of -6 to -12 LUFS. These aren’t necessarily targets, more like thresholds that if breached could have a negative effect on your music.
Stereo Field
The vectorscope displays your audios placement in the stereo field. When the image is spread out across the circle, your master is wide. When the image is simply one thin line down the middle, your master is mono. The L-R [Left Right] meter at the bottom of the central display area shows how even the left and right outputs are. If the pointer is central, then your music is evenly balanced between the two speakers. If you have an unbalanced output the pointer will hover either too far left or right and will glow red, this will also turn the STEREO FIELD icon red.
The correlation meter on the left side of the circle shows the degree of similarity between the left and right channels. A reading near +1 indicates a well-balanced mix. If the pointer hovers passed the central point towards -1 it indicates that the mix has phase issues. This can cause the mix to fall apart when played back in mono. A breach of the stereo correlation threshold will also cause the STEREO FIELD icon to turn red.
Stereo Filter
The FILTER in the Stereo Field section allows you to isolate certain frequencies in the master to view their stereo placement. This is useful to see which frequencies are placed more centrally in the mix and which frequencies are placed wider.
Having low frequencies placed very wide in your master can have negative effects on your master. Wide bass frequencies might suffer from phase cancellation when played in mono, making your master sound weak. Bass also takes up a lot of space, so by keeping it mostly mono, you can utilize the rest of the stereo spectrum for other elements in your mix. When you engage the FILTER (by clicking the ‘FILTER’ button), and you set the high-cut to 250Hz or less, you can see the low frequencies that are too wide glowing yellow and red in the vectorscope. The goal is to keep the low frequencies in the more central green area. This will lead to a more powerful and balanced master. If you have wide low frequencies, you could try using a stereo placement plugin to place the low frequencies of your master in mono.
Dynamic Range
The oscilloscope in the central display circle will react to the audio material passing through LEVELS. The visuals will immediately show you how dynamic your music is. If your music has a dynamic range above the set threshold, the oscilloscope will glow green. If your music approaches the threshold it will begin to turn orange. If your music breaches the threshold, the oscilloscope will turn red.
LEVELS creates a ratio of the ‘short-term LUFS’ to ‘peak level’ of your track and gives you a DR [Dynamic Range] reading. The lower the number, the less dynamic range your track has. The dynamic range is not relative to the loudness of your music, so if your music is over compressed the oscilloscope will turn red regardless of how quiet the track might be.
A small dynamic range can come about from over compression and limiting. This can suck the life out of your music. It can also reduce the clarity and punch of the transients in your music. So to get a great final mix, you'll need to make sure that the dynamic range is on point.
Loudness Range
Loudness Range [Measured in LU (loudness Units)] will tell you the statistical measure of loudness variation of your entire track. This long-term reading will give you an idea of the difference in volume between the verse, chorus and other sections of your track. If your track has a loudness range of less than 3LU for more than 30 seconds than the section icon will turn red.
If there is a big difference in loudness between the various sections of your track then your loudness range will be a higher number.
If the loudness of the various sections in your track are very similar or equal, the loudness range will be smaller.
A loudness range between 6 LU to 12 LU shows that a track has a considerable difference in loudness between the various sections.
Bass Space
BASS SPACE identifies if any channels within your mix are outputting unwanted low frequencies. You will only be able to use Bass Space on a stem master (music bounced into groups with kick and bass separated), not on a stereo master (just one audio file).
For your kick and bass elements to sound powerful and clear, they need as much space as possible. To use BASS SPACE first mute your kick and bass elements within your DAW. The frequency bars in the central display area will give you a reading at 40Hz, 80Hz 120Hz and 160Hz. They will jump into the upper red half of the circle if there is too much low-end energy. If this is the case you need to identify which channels are outputting the excess low frequencies. Mute the individual channels one at a time until the bars drop into the green to find the culprit and then use a high pass filter to clean up this excess low-end rumble to maximise the clarity and power of your track. Be careful to not remove the material you actually want to hear in your mix.
Watch The Walkthrough Video
Mac System Requirements
OS X 10.15 or higher. 64-bit AU, VST 3 or AAX host.
Apple Silicon Native.
Windows System Requirements
Windows 10 or higher. 64-bit VST 3 or 64-bit AAX host.
Mac System Requirements
OS X 10.15 or higher. 64-bit AU, VST 3 or AAX host.
Apple Silicon Native.
Windows System Requirements
Windows 10 or higher. 64-bit VST 3 or 64-bit AAX host.
Don't Miss Our Best Sellers...
These plugins have helped countless producers create the best sounding mixes of their career. It's so straight forward to get incredible results that we know they can do the same for you too.

