Want your mix to wrap around the listener like a perfectly tailored soundscape? The key isn’t just panning things left and right—it’s sculpting a full, rich stereo image that feels immersive and alive.
In this guide, you’ll learn how to master stereo imaging: how to place sounds with purpose, how to use width-enhancing tools without ruining mono compatibility, and how to create depth, height, and width that glue your mix together. We’ll also show you how STEREOVAULT takes a lot of the guesswork out of the process by analysing your audio, suggesting smart starting points, and level matching every move you make.

What Is Stereo Imaging in Music Production?
Stereo image is the perceived spatial location of sound sources within a track. It's essentially the "room" in which your track is playing. Some rooms sound small and deadened. Other rooms sound large and reverberant.
Each instrument takes up space in the room, depending on the panning position, frequency response and overall level. The size of the room is defined by the amount of reverb or delay on each track, which helps your ear identify how close to the "walls" of the room each instrument is.
However, music exists in a three-dimensional space (four, if you count time), which means multiple factors contribute to the stereo image of a track.
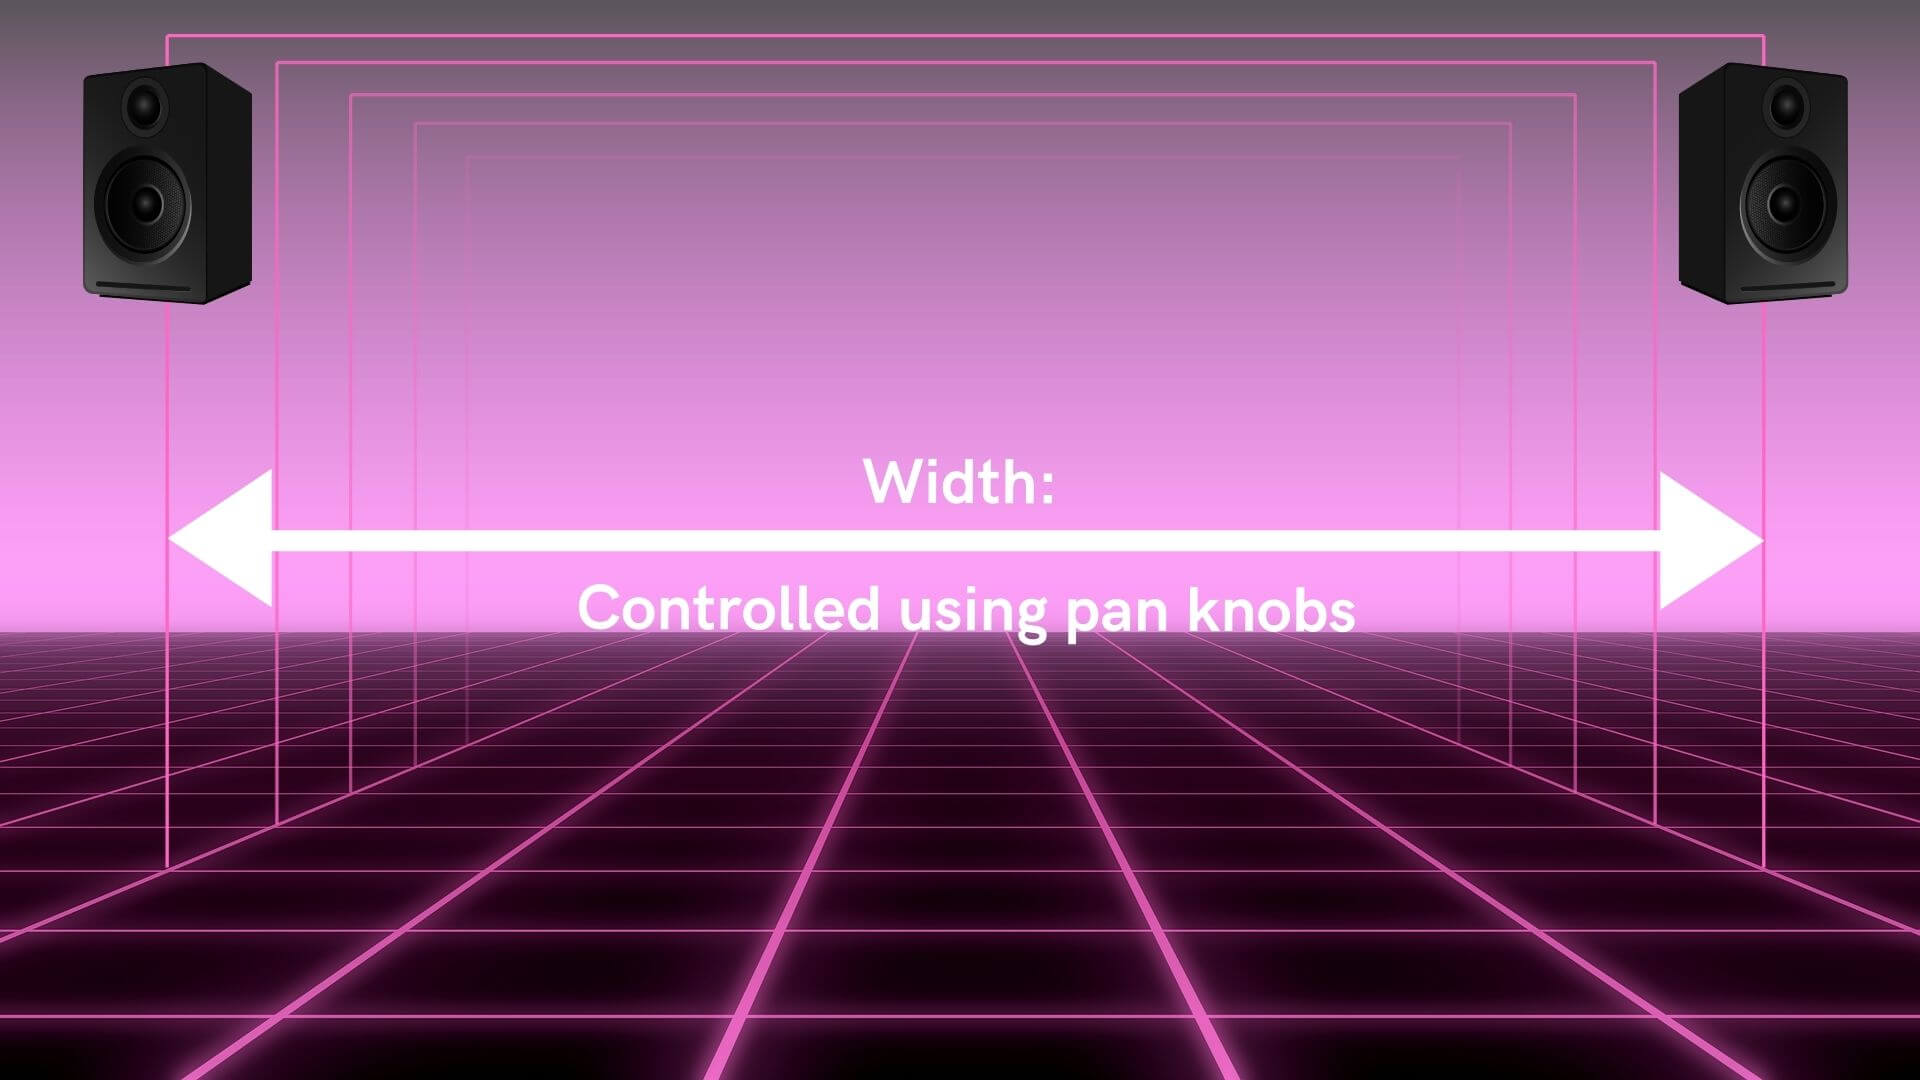
Width is the perceived distance between sounds in the left and right speakers. It is the easiest dimension to manipulate and is controlled using the pan knobs on each track, plus dedicated stereo tools like STEREOVAULT for shaping width band by band. This represents the "left and right walls" of the mix.
Depth is the perceived distance between the listener and the "back wall" of the mix. It is controlled using volume levels, reverb, and other time-based effects.

Height is the perceived distance from the top to the bottom of the track. It represents the "floor and ceiling" of the mix, with bass frequencies perceived as closer to the floor, and high-pitched frequencies perceived as closer to the ceiling.
A well-balanced stereo image makes your track feel spacious and full across the entire soundstage—from low to high, front to back, and left to right.

When sculpting the stereo image of a track, try to visualize each instrument in a three-dimensional space. A stereo instrument might stretch all the way from the left side of the room to the right side, while a mono instrument will sit neatly in the center.
A bass instrument will sit closer to the floor, while a high-pitched instrument will be closer to the ceiling.
A dry track with no reverb will sound like it’s at the front of the room, while a heavily reverberant percussion instrument will sit farther away at the back of the room.

David Gibson does a great job of explaining this concept in his book, The Art of Mixing—although the audio and visual references are a bit dated. Visualizing a variety of different mixes in unique genres helped me to understand the relationship between each instrument and how to place each of them within the stereo image.
Tools for Sculpting a Wide Stereo Image
Now that you understand how stereo imaging works, let's explore the tools and techniques you can use to craft a mix that sounds wide, balanced, and immersive.
Panning Your Mix
Panning is your most powerful tool for sculpting the stereo image. It allows you to place instruments from left to right, effectively determining where the left and right walls of your mix are, and how close each instrument is to them.
Traditionally, the kick, snare, bass and vocal tracks are panned directly in the center, as it is the focal point of your mix.
The kick and snare provide the beat of the song, so it's important to keep them centered. Due to the way our ears perceive sound, it’s difficult to detect where bass frequencies are coming from. That's why we typically leave any bass-heavy tracks panned in the center. Finally, the lead vocal is the most important element of the mix, and needs to be front and center to keep the listener's attention.
Once your center is solid, the rest of the stereo field becomes your creative playground. As a general rule, it's best to keep low-frequency instruments (like kick and bass) panned closer to the center, and high-frequency instruments (like guitars, keyboards and overheads) panned to the sides.
One exception to this rule is the drum kit. It might be easier to think of the drum kit as one stereo instrument, rather than multiple individual tracks. For instance, the kick and snare are both panned center, but the hi-hat and toms are often panned to opposite sides.

Pan knobs offer infinite positions—but sometimes, fewer choices create better results. That’s the idea behind “LCR” panning: placing elements hard Left, Center, or Right to maximize contrast and stereo width. With LCR panning, you only pan instruments to the left, center or right channels, providing plenty of space between instruments and helping to create a wide-sounding mix.
Many engineers use a modified form of LCR panning, with the most important tracks panned to the center and sides of the mix, and less-used instruments panned throughout the stereo field to add a sense of separation. This can be incredibly helpful when working with particularly busy tracks.
If a single pan knob ever feels too blunt for the job, STEREOVAULT’s Panorama tab gives you frequency-specific panning. Instead of moving an entire sound left or right, you can pan just the low-mids of a guitar to one side while keeping its top end planted in the centre, or use Skew to reposition the stereo information in a more creative way.

Choose the Right Panning Perspective
One thing to consider when panning instruments around your mix is which perspective to use. Generally speaking, there are three options:
Performer's perspective pans instruments based on where they would be placed on stage when performing live from the performer's perspective. This is most commonly used when panning drums to determine where to place the hi-hat and toms. With this approach, the hi-hat would be panned to the left, assuming the drummer is using a right-handed kit.

Audience perspective pans instruments based on where they would be placed on stage if you were watching the performance from the crowd. With this approach, the hi-hat would be panned to the right.

The third option is to place instruments around the stereo field however you see fit, regardless of how they might be laid out on stage.
Why You Should Mix in Mono (Especially When Panning)
One more note on panning—while it may seem counterintuitive, it's best to decide on pan placement while monitoring your mix in mono. One of the hardest parts of dialing in a wide stereo image is frequency balance issues. Mixing in mono helps you balance frequencies and avoid masking.

Obviously, you won't be able to hear instruments move around the stereo field as you pan them while monitoring in mono, but you can hear a difference in the track. The pan position of each instrument affects the sound quality and balance of the overall mix.
Just remember, if it sounds good in mono, it will sound great in stereo! Now that we've covered the basics of sculpting your stereo field, let's take a look at some tips and tricks to help you dial in wider, more immersive mixes.
Get The Right Stereo Width with STEREOVAULT
One of the trickiest things about stereo work is that it’s genuinely hard to judge by ear alone. Wider almost always sounds louder, and louder almost always sounds “better”—even when it isn’t. So you push the width up, the meters jump, your brain says yes, and you walk away with a mix that feels exciting in the room but falls apart on earbuds, in the car, or on a phone speaker.

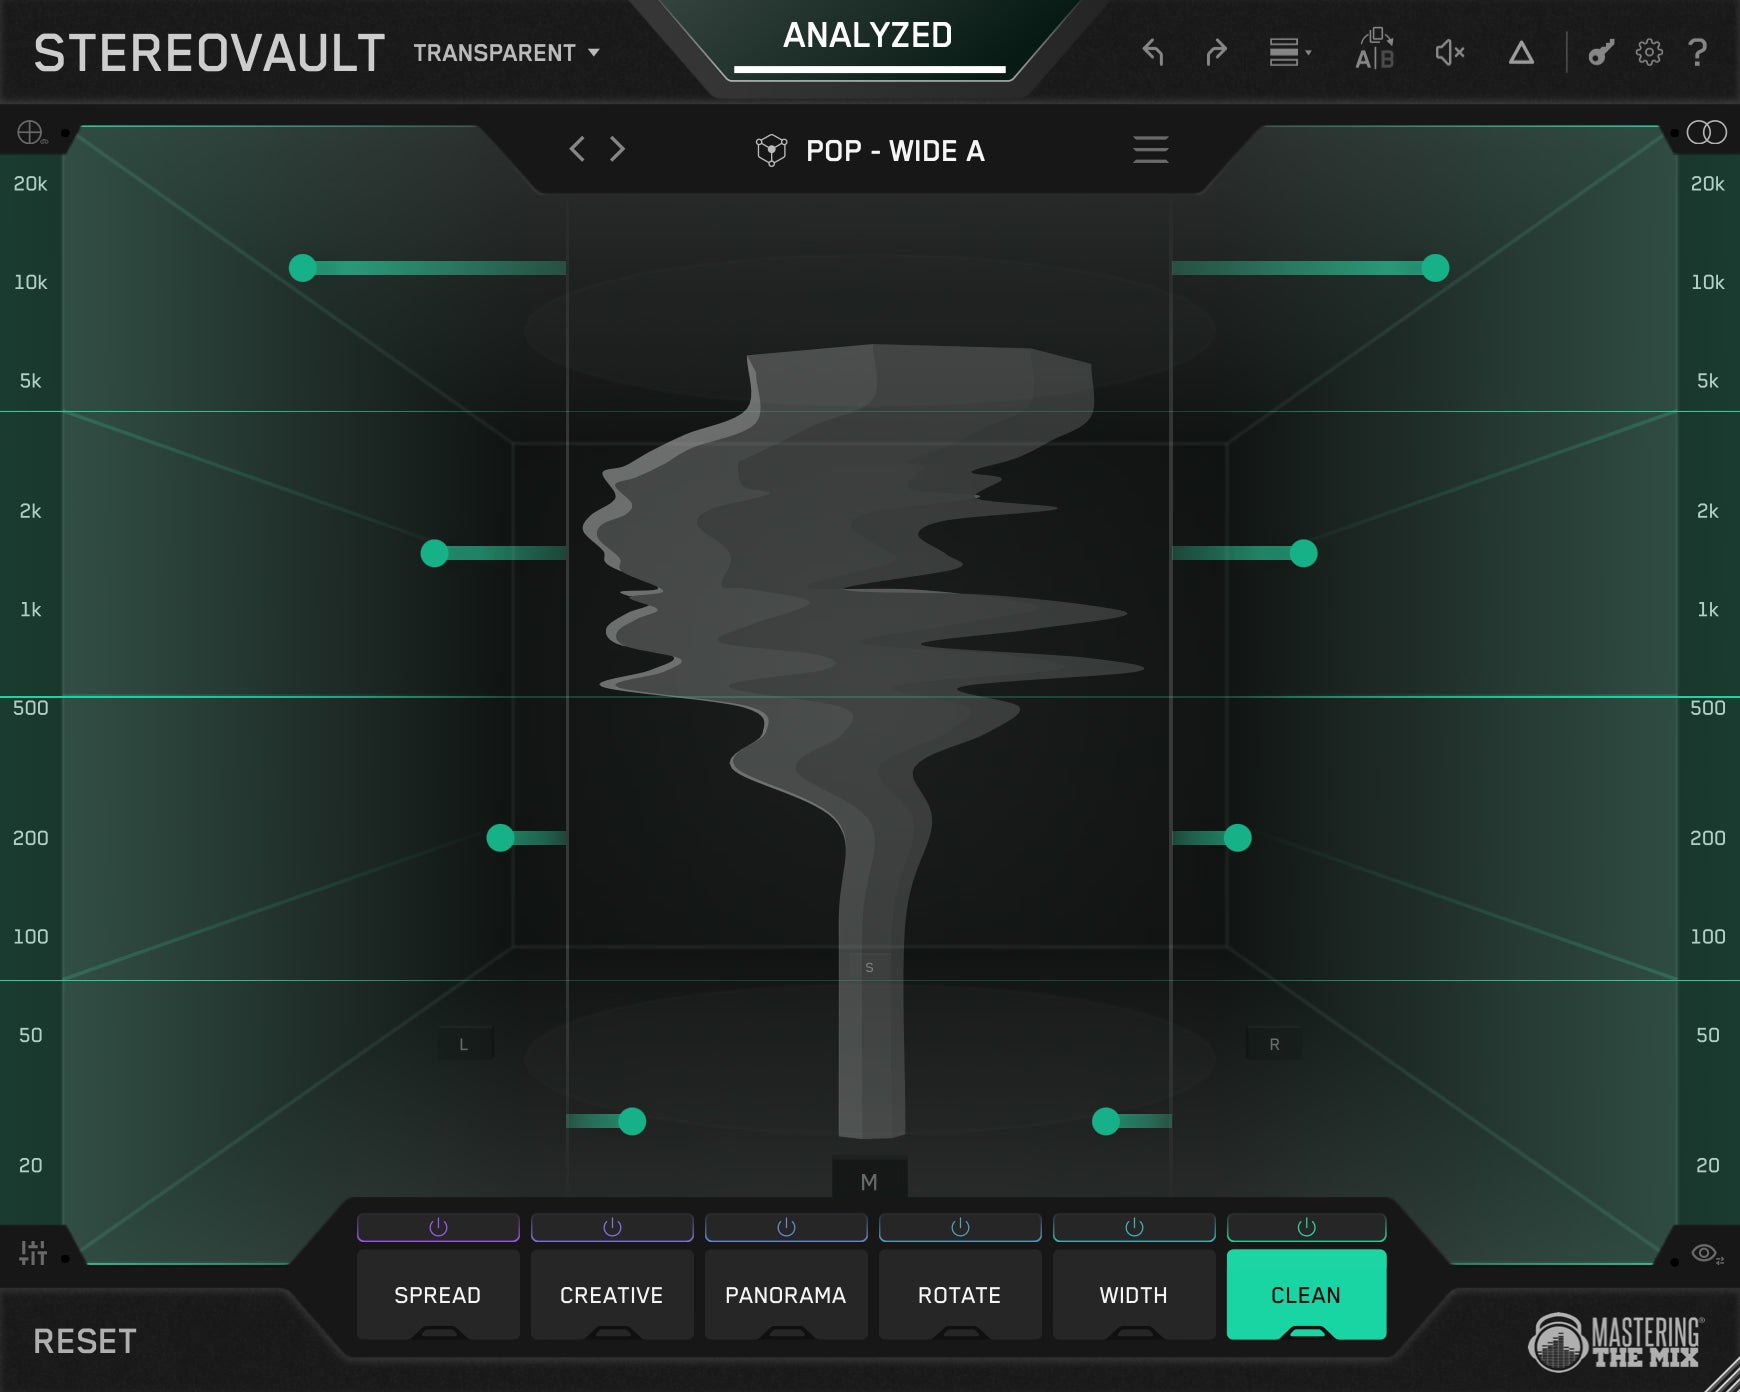
STEREOVAULT is built to solve exactly this. It analyses your audio, suggests a smart preset based on the source type and genre, then level matches every adjustment you make so you’re hearing the actual stereo change rather than a volume jump. When the width sounds better with STEREOVAULT, it really is better.

Hit Analyze while your loudest section plays, choose your source (drums, bass, vocals, full mix, etc.) and your genre, and STEREOVAULT will give you an informed starting point. From there you can flick between Focused, Balanced, Wide, and Super Wide to taste, then dive into six processing tabs—Width, Spread, Rotate, Clean, Creative and Panorama—to shape the stereo image with surgical precision across up to six frequency bands.

You can switch between Transparent Mode (fixed crossovers, mastering-grade) for clean, artifact-free changes on the mix bus, and Flexible Mode for more creative shaping on individual stems and buses.

Widen Your Mix with the Haas Effect
One quick and easy way to make your tracks sound wider is to duplicate a track and pan them hard left and right. Of course, listening to the same exact signal come out of the left and right speakers is essentially the same as listening in mono. But, by applying time-based processing like a delay to one of the tracks, you can create a psychoacoustic effect that causes the listener to think they are two different signals, making the track sound significantly wider. This is known as the Haas Effect or the precedence effect.

You don’t need to mess about duplicating tracks and inserting delays manually. STEREOVAULT’s Creative tab has a built-in Haas mode that creates width using short time delays between channels for a vivid sense of direction and space. Drop it on a band that targets just the upper frequencies of a synth lead or a guitar and you’ll add sparkle and movement up top while leaving the fundamental locked, centred and punchy.

For frequencies that need to be wide but feel boring or static, try Flux—modulated allpass filters that create a slow, evolving stereo movement that makes pads and atmospheres feel like they’re breathing. Stretch uses complementary comb filtering with a Roland-style chorus character for bold, shimmery presence. And Space adds a short Dattorro reverb tail for three-dimensional depth without the long, washy decay.
Because every adjustment is level matched, you don’t end up cheating yourself with louder = wider. And because the processing is band-limited, you can keep the low end tight and centred while the upper frequencies open out.
Tighten The Sub Bass Without Killing The Punch
Stereo energy below 100 Hz is one of the most common reasons mixes fall apart on smaller speakers. Phase cancellation eats your kick. Wide low end makes the whole track feel loose. And on a club system, it can collapse the punch entirely.
Rather than reaching for a generic stereo enhancer (which usually pushes the sub even wider), drop STEREOVAULT on your bass bus, switch to Transparent Mode, and head to the Clean tab. The Clean tab is a transparent Side EQ—create a band on the lowest frequencies and pull the side energy down. The low end tightens, the kick and bass punch harder, and mono playback stays solid. You can choose a steeper slope for a focused cut, or a gentler one for a more gradual taper.

Use Microshifting for Subtle Width
For an even more pronounced stereo widening effect, use a pitch shifter to adjust the pitch of each track by a few cents. The difference in tonality should be just enough to catch the listener's ear without sounding dissonant.
Another option is to add a chorus effect to both tracks, which effectively combines delay and pitch shifting to make it sound like multiple instruments are playing at once. Just add enough chorus to help create separation between the tracks - too much and it sounds like your mix is underwater.

If you want a microshift-style effect with no phase headaches and no risk of squashing the low end, STEREOVAULT’s Vintage mode (in the Width tab) uses an Orban-style pseudo-stereo technique that splits frequency content between channels. It generates real width from narrow or mono material and folds back to mono perfectly—no thinning, no weird cancellation. It’s especially powerful on flat, lifeless bass mids: tight subs underneath, real character and excitement through the mid-bass.

Doubletracking: The Most Natural Stereo Widening Technique
You won't always have the opportunity to double-track a performance, but when you can, it almost always provides the great separation and a wide stereo image. Doubletracking is when you record a second, identical performance and layer it on top of the original, often panned hard left and right.
Techniques like the Haas Effect and micro shifting help separate the duplicate recording from the original by altering the timing, but doubletracking actually uses a second recording to capture even more differences, creating more separation.
Of course, you should still try to re-record the doubled take as close to the original as possible. Naturally, you'll capture a slightly different timing, intonation and pitch, helping to create a more pronounced separation between the original. The part still needs to be on time and in tune, after all.
If you can’t double-track the part, STEREOVAULT’s Pristine mode is a great way to fake that doubled-vocal feel. Pristine adjusts the Mid/Side balance and injects clean side energy for a polished, controlled width. It’s ideal on a vocal group bus when you want the lead to feel wider and more expensive without weird artefacts smearing it. Keep the lower mids restrained so the body of the vocal stays centred, then let Pristine open up the upper mids and air on top.

Use Rotate To Create Space In The Upper Mids
Here’s a problem EQ and panning can’t always solve: a busy mix where the vocal, guitars, keys and snare are all stacked in the 1–4 kHz range. Everything is technically in the right place, but the upper mids feel crowded and two-dimensional.
STEREOVAULT’s Rotate tab tackles this differently. Unlike panning, which just changes level between left and right, Rotate tilts where the energy actually sits within the stereo field—and it can rotate Mid or Side channels independently. On your rhythm guitar bus, create a band over 1–5 kHz, set Rotate to Side mode, and apply a small amount of rotation. The side information of the guitars in that range shifts position, opening up space in the centre for the vocal without changing levels at all.

Do the same on your keys bus, rotating in the opposite direction. Suddenly each element sits in a slightly different position through that critical frequency range, and the mix breathes. Small amounts work best—a few degrees of rotation is usually all you need.
Use The Visualiser To Confirm Your Decisions
Stereo is hard to judge by ear alone, especially in an untreated room. STEREOVAULT’s real-time visualiser shows the stereo width of your audio across the full frequency spectrum—lows at the bottom, highs at the top, and the horizontal spread shows how wide things are at each point.

If the low end is still too wide, you’ll see it. If the top end is narrower than you thought, you’ll see that too. There’s a 3D mode for an immersive view of Mid and Side energy distribution, and a stereo phase display to catch any phase issues before they become problems on a final master. It’s also worth checking your final mix in LEVELS for an extra layer of confidence on phase and balance.

Conclusion
Creating a wide, immersive stereo image isn’t just about panning instruments—it’s about crafting a three-dimensional space where every element has room to breathe. By using techniques like LCR panning, the Haas Effect, microshifting, doubletracking, frequency-specific panning and Mid/Side rotation, you can bring clarity, depth, and excitement to your mix.
Don’t forget to check your mono compatibility and use tools like reverb, EQ, and stereo imaging plugins with intention. STEREOVAULT is built to make every one of those moves more deliberate—smart presets that analyse your audio and give you an informed starting point, level matching that keeps your decisions honest, six processing tabs covering width, spread, rotation, cleaning, creative effects and frequency-specific panning, and a real-time visualiser that shows you exactly what your stereo image is doing.
When done right, a well-balanced stereo field doesn’t just sound good—it feels good, pulling listeners into your track and keeping them hooked from the first note to the last.
Experiment, trust your ears (and the visualiser), and let your mix come alive in full-dimensional glory.


