
No matter how amazing your song sounds in your studio, what truly matters is how it holds up in the real world. If it doesn’t sound just as incredible on your listeners’ playback devices, they’ll quickly hit the “skip” button.
Even more importantly, your music needs to compete with the sound quality of every other track on your listeners’ playlists. A poorly EQ’d mix, excessive compression, clipping, or phase issues can leave your track falling short.
In this post, we'll explore our EXPOSE 2 application and how it can ensure the best-sounding master possible—regardless of playback medium. We’ll show you how EXPOSE 2 ensures your music sounds its best on any platform or device, delivering an exceptional listening experience for your audience. With EXPOSE 2, you can release your tracks with total confidence.

EXPOSE 2
EXPOSE 2 is a standalone application that identifies technical issues with your track. It's jam-packed with useful presets, and its drag-and-drop functionality makes it a breeze to use. 
Beyond that, EXPOSE 2 empowers you to fine-tune your results based on your distribution method. Whether you’re aiming for a track that punches hard on ultra-loud club systems or a polished master optimized for streaming platforms or physical media, EXPOSE 2 has you covered.
It doesn’t stop there — you can compare your song directly to a reference track of your choice to ensure it stands up to industry standards. Alternatively, take advantage of our genre-specific presets, meticulously crafted using sonic profiles from commercially released music, to achieve a professional sound tailored to your style.
Open the App and Select a Preset
The first thing you'll need to do is fire up the EXPOSE 2 application. EXPOSE 2 is a standalone app — no DAW or host is required.
Track measurements will appear almost immediately, giving you information about your track's loudness, peak levels, stereo and phase, and dynamic range.
 Next, you'll select a preset.
 EXPOSE 2's presets are grouped into Mixing, Mastering, Broadcast, and User-defined categories, and are aimed at a variety of applications. You can aim for a Balanced, Loud, Dynamic, or Punchy mix; while masters are tailored to various delivery mediums, such as Apple Music, Spotify, SoundCloud, YouTube, CD, and Vinyl
You also get a range of presets that conform to a wide range of broadcast loudness standards, including AES, ATSC, Disney, HBO, and Netflix.
Each of EXPOSE 2's presets has a range of accepted readings. If your audio falls outside this range, the section icon will turn red.

The standout feature of EXPOSE 2 is its advanced analysis feedback. This powerful tool provides precise, actionable insights to help you adjust your audio and achieve your specific technical goals with confidence.
 Whether you need to adjust your limiter input or output, resolve phase issues, or tweak your track's dynamics for the greatest impact, EXPOSE 2's analysis feedback will prove incredibly useful — it's like having a professional mastering engineer tap you on the shoulder and give you helpful advice!
What Do the Analysis Readouts Mean?
Loudness
EXPOSE 2's Loudness section measures the Integrated and Short-term loudness of your track.

The Integrated setting is an accumulating calculation of the overall loudness of your entire track. The closer to zero your track is, the louder it is. This reading is most relevant to streaming services, as many including Spotify and YouTube will play your audio back at -14LUFS. Check out our guide to mastering for streaming platforms for more information on this.
 The Short-term setting measures audio loudness over a moving 3-second window. This setting shows you the loudest reading within your track. It can identify any over-compressed parts of your song.
Try to avoid going over -6LUFS short-term, as this can affect the overall punch and presence of your track.
 If you inflate the loudness of your track with compression and limiting (at the expense of dynamic range), your track will sound worse than the quieter tracks when streaming services rob the extra-hot tracks of their volume advantage.
 Peak
Peak
EXPOSE 2's Peak section measures both True Peak, measured in dBTP (decibels true peak), and the sample peak, measured in dB.
 The True Peak meter in EXPOSE 2 reveals the maximum peak of your audio waveform as it will be perceived in the analog domain. This is crucial because signals approaching 0dBFS risk causing harsh digital clipping.
While high-end D/A converters may provide some headroom to mitigate these issues, most speakers cannot compensate for inter-sample peaks, leading to unwanted distortion and compromising the listening experience.

In other words, your song may sound fine in the studio but will sound clipped on consumer playback devices. Clipping results in ear fatigue, which ultimately makes your music unpleasant to listen to for extended periods of time.
EXPOSE 2's analysis feedback will help you adjust your limiter's output to optimize your audio's peaks, thereby safeguarding against unpleasant clipping.
Stereo Field
EXPOSE 2's Stereo Field section provides you with two heat maps: Left/Right Stereo Balance and Phase Correlation.
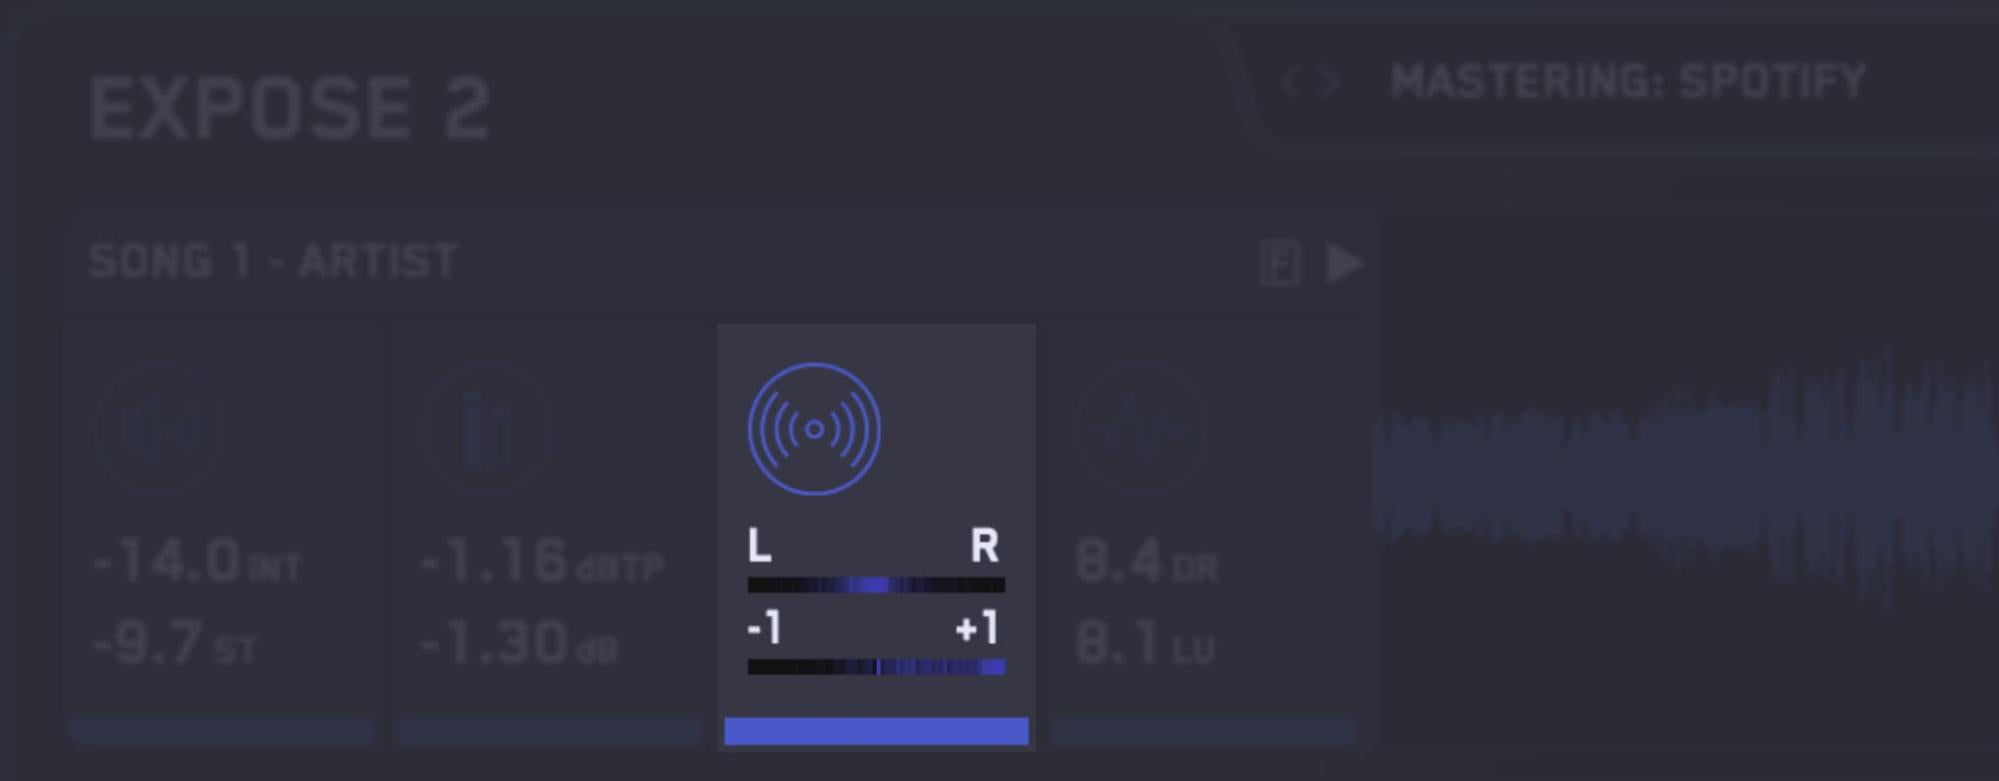
Left/Right Stereo Balance displays where your track is positioned between the left and right channels. This shows you if you have a lopsided mix — one that leans excessively to one side or the other.
 Phase Correlation displays the degree of similarity between the left and right channels.
Readings near +1 indicate that your track isn't suffering from phase issues. If the map shows activity that passes the central point towards -1, your mix has phase issues.
 Phase problems yield a weak, thin-sounding result. To resolve these issues, you may need to remove a microphone track from a multi-mic'd source, eliminate near-identical sources, alter synth patches, nudge a track a few milliseconds, or deploy a phase-alignment plug-in.
Dynamics
EXPOSE 2's Dynamics section supplies insight into the short-term dynamics of your tracks, displayed as DR (Dynamic Range). It also provides your track's Loudness Range, measured in LU (Loudness Units).

The DR reading reveals the short-term punchiness of your song. The lower the number, the less dynamic range your track has.
 The Loudness Range reading gives you a statistical measure of your entire track's loudness variation. This long-term reading exposes the difference in volume between the verse, chorus, and other sections of your song.
 Similar to the Dynamic Range (DR) reading, a lower Loudness Range (LU) indicates less variation in your track’s loudness.
If your goal is to create a song with dynamic tension and emotional contrast, aim for a Loudness Range above 5 LU. On the other hand, if you’re striving for consistent energy throughout the track, a lower value is perfectly acceptable.
Understanding the Loudness Range is key to achieving your musical vision. For example, if you want the chorus to deliver a powerful emotional lift, a range above 6 LU will provide the impact you’re looking for. Conversely, if you’re aiming for an intense, relentless vibe, a tighter Loudness Range will maintain that pummeling energy.
Understand Your Tonal Balance with Compare EQ
Few things wreck a master worse than badly applied EQ. Poor EQ choices are the number one reason why your music doesn't translate well to other playback systems.
That's where EXPOSE 2's Compare EQ function comes in. It allows you to analyze your track against a genre-specific preset, meticulously crafted from the sonic profiles of commercially released tracks, ensuring your mix aligns with industry standards.
 If your music is muddy, dull, thin, or harsh, Compare EQ will give you the cold, hard truth. Few things are more useful in audio production than a second set of well-trained ears and EXPOSE 2 gives you just that.
For the best results, you can compare your song to your reference track of choice. If there's a professionally produced song that you'd like to emulate, EXPOSE 2 will help you get solidly into that ballpark.
 To use Compare EQ, start by selecting a genre-specific preset or importing your own reference track. The presets cover a wide range of styles, from classic rock, alternative rock, and metal to niche genres like reggaeton, grime, K-pop, moombahton, and many others.
For optimal results, import a commercially released track that closely matches your song’s genre, instrumentation, and overall vibe — one that serves as a sonic benchmark you’d like to emulate.
Once you’ve chosen a preset or loaded your reference track, EXPOSE 2’s advanced algorithm analyzes the tonal balance of the loudest sections of the track, providing the most accurate representation of its frequency spectrum.
The software then compares your track’s EQ curve to the preset or reference, offering clear guidance for alignment. Positive readings indicate your track has more energy in certain frequency ranges, while negative readings highlight areas with less perceived volume.
With this feedback, you’ll have the tools to fine-tune your mix and achieve a polished, professional sound.
 If your track is within ±3dB across the whole frequency spectrum, then your tonal balance is very comparable. Anything outside that range will require EQ tweaking to obtain a comparable sound to the preset or reference track.
Best of all, EXPOSE 2 enables you to compare the EQ balance of stereo, mid, or side channels. This will help you ensure a wide mix with a rock-solid center — the hallmarks of a pro-level mix or master.
Level the Playing Field with 'Loudness Match'
Streaming platforms employ normalization algorithms to ensure consistent playback levels, regardless of how loud a track is mastered. This makes it essential to consider how your music will sound once normalized.
EXPOSE 2’s Loudness Match feature is designed to help you make fair and accurate comparisons between tracks by normalizing playback to standardized loudness levels using the LUFS (Loudness Units Full Scale) scale. You can preview your track as it would sound normalized to -14 LUFS, the standard for most streaming platforms, as well as alternative settings like -8 LUFS (ideal for louder environments) and -24 LUFS (suitable for dynamic content).
Matching playback levels is critical because the human ear naturally perceives louder tracks as fuller and brighter, introducing bias into your comparisons. Loudness Match eliminates this effect, allowing you to focus on the true tonal and dynamic qualities of your track.
By using Loudness Match, you can preview how your track will sound post-normalization and make better-informed mixing and mastering decisions to ensure your music translates perfectly to listeners, no matter where they hear it.
 EXPOSE 2's Loudness Match includes two settings: Integrated and Short-term. Loudness Match's default playback target is -14LUFS.
If you hover your mouse over the Loudness Match button, you can adjust the playback loudness to a different level.
Integrated will adjust the overall gain of an entire track to the specified level. This setting works well if you’re working with different versions of the same song, or if you want to hear how your music will sound after a streaming service normalizes it.
Short-term constantly adjusts the gain of the playback to the specified level. This setting is ideal for comparing two different songs, or different sections of different songs.
Conclusion
If you're having issues achieving pro-level mixes and masters, or if your music sounds worse on streaming platforms than in your studio, you owe it to yourself to take EXPOSE 2 for a test drive. It's guaranteed to give you better results and in less time.
With EXPOSE 2 in your arsenal, you'll be able to release your music — in any format — with the utmost confidence.


