In this article, you’ll learn the essential steps of how to stereo master a song. This guide can be applied to any genre of music and will give you a foundational understanding of how to approach stereo mastering.

What is Stereo Mastering?
Stereo mastering is the process of taking a single file of a final mix and preparing it for release. The primary task is to adjust the overall loudness of the song and correct any tonal balance imperfections. It’s also common to apply additional processing to enhance the sound as much as possible.

Preparing a Mastering Session
Begin by opening your DAW (Digital Audio Workstation) and importing the mix into your session. Set the BPM of the project to match the mix file; most DAW’s have a BPM (beats per minute) meter to identify this if you don’t know it.
Load up the plugins you’ll be using on your stereo output. There are 5 essential plugins for mastering that should be present in your mastering chain in the following order: Gain, EQ, Compressor, Limiter, Meter.
There are many additional plugins that can help enhance the sound that can be inserted into your chain, for example, a stereo spreader, tape saturation, harmonic distortion, etc. Your decision to use these additional plugins will be based on the mix itself and the sound you are trying to achieve.

The final step of preparing the session is to ensure the file has enough headroom. The headroom is the space between the highest peak of the audio and 0dBFS (decibels full scale). Leaving headroom during mixing is a good practice as it keeps the dynamics and transients of the audio unimpaired.

When mastering, the headroom gives you the flexibility to adjust the EQ without potentially pushing the audio too loud into the following plugins. Open up your metering plugin, then preview the loudest section of the mix and use the gain plugin (the first insert on your master channel) to adjust the peak of the audio to anywhere between -3dB and -6dB on your peak meter.

Preparing Yourself
Getting yourself in the right frame of mind will help you make better mastering decisions. Jumping into tweaking the EQ prematurely without a clear sonic direction can end up worsening the sound.
Listening to a song for the first time is a unique experience. If you’re mastering your own song then you won’t have this privilege as you will have heard your song many times whilst creating it. If you’re working on a song you haven’t heard before, take the opportunity to experience and enjoy it as a consumer will.
Before you monitor the mix again, take a listen to one or two great-sounding reference tracks that have a comparable genre, instrumentation, and vibe to the mix. The reference tracks should be a good representation of your sonic goal for this final master.

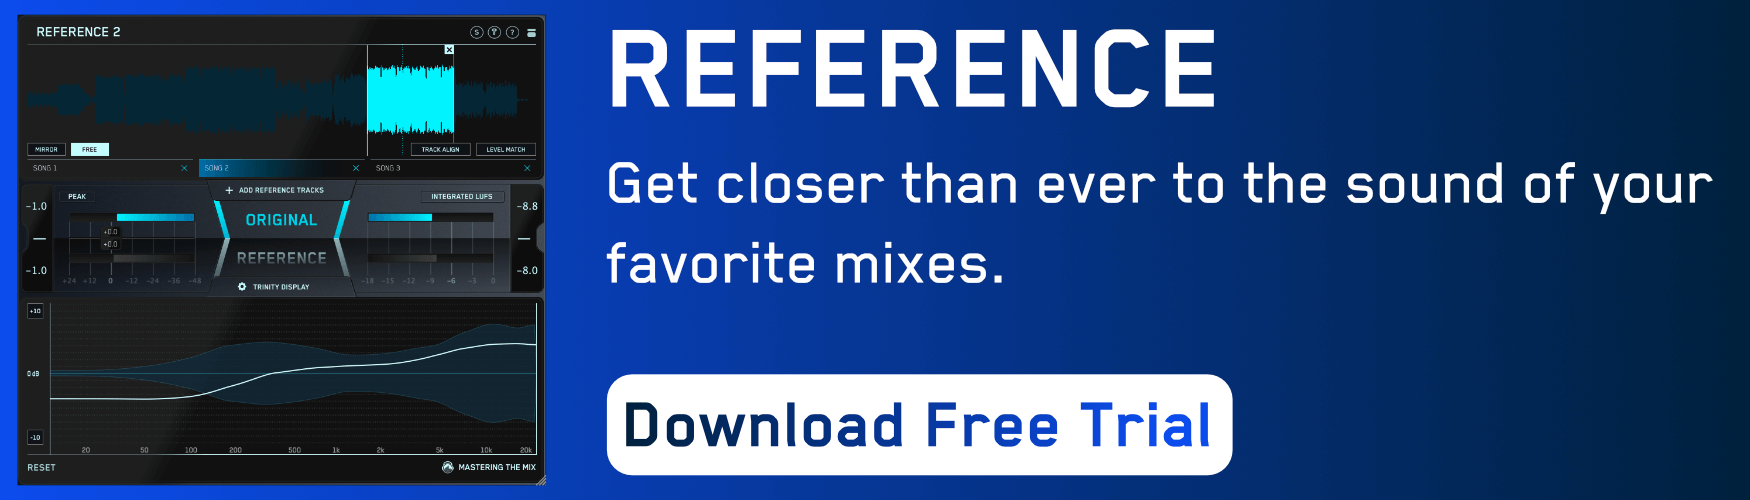
Listening to these references at this stage will give you a good frame of reference for what a great master should sound like before you start making changes to your master processing. Be sure to match the perceived loudness of the reference tracks to the loudness of the mix to make sure the comparison is fair.

For the second listen, take a more analytical approach and make a note of the aspects of the track that you feel need to change to get the mix sounding more like your reference tracks. Get a feel for how the low-end sits in the context of the overall mix and how the balance compares to the reference track. Do the same with the mid and high frequencies.
By identifying the main changes you feel are needed, you’ve created a sonic vision and a clear target to shoot for. This will keep your mastering decisions focused and efficient.

Mastering Phase
There are many ways to approach mastering. How you structure your process will ultimately be down to your preferred workflow. Use the following advice as your foundation but feel free to tweak the workflow to suit your style. Just be sure that your preferences don’t hinder the quality of the audio or introduce technical issues.
Begin With Loudness
Your metering plugin should give you a LUFS (loudness units full scale) reading. This measurement gives an accurate depiction of the perceived loudness of the audio as it’s based on how the human ear experiences loudness relative to the frequency spectrum.
Different distribution mediums have varying ‘optimum levels’ for loudness and dBTP (decibels true peak). For example, streaming platforms like Spotify and YouTube stream audio at about -14LUFS integrated, which is roughly 8 decibels quieter than the loudest releases.

If you submit a loud and heavily compressed song at -6LUFS, Spotify will turn it down to -14LUFS, but the damage done by over-limiting is irreversible. It would be advisable to create a less-loud-more-dynamic master that didn’t need to be turned down so much and avoid the issues introduced by over-limiting.

A true-peak meter displays the peak of the audios signal once the digital audio has been converted into an analog signal that can be heard through speakers. This is more accurate and relevant in real-world use than the meters that you see on your DAW mixer which displays the reading of the digital sample peak. Often the sample peak is more ‘forgiving’ and your music ends up clipping in real terms when heard through speakers. So it’s advisable to have a true peak meter to check this.

Regardless of the medium through which your audience will hear your music, knowing how to control loudness and true-peak will empower you when mastering audio.
Start by opening your metering plugin and your limiter. Set the limiter output to -1.0dB to give your master some headroom. This will help minimize true peaks and also accommodate any future conversion to lossy formats such as Ogg Vorbis and Mp3.
Monitor the loudest section of your track and raise the limiter gain until your LUFS short-term reading is hitting your target. This is a fairly quick and rough setting and you can tweak it later.


Setting the loudness before making any other changes to the sound has a number of benefits. It helps highlight existing issues with the tonal balance, it’s easier to level match to your references, and you reduce the risk of EQing your master in a way that is incompatible with your loudness target.
EQ
When you listened to the reference tracks, you established the tonal balance direction you want to take for the song. So when you open your EQ you hit the ground running and can make the first few adjustments very efficiently.
When adjusting the EQ, loop the section of the song that covers the widest range of frequencies, often the drop/chorus. If you work on the verse (where the drums might be quieter or the bass might not be present) you might overcompensate and boost the low-end too much.

Keep referring back to your reference tracks when adjusting the EQ to help you set the perfect boost or attenuation amount. Mastering should be approached with precision. Each EQ adjustment will have a sweet spot that you may miss if you’re 1dB off.
For example, the low-frequency range is tricky to get perfect. Too much of a boost in the low-end and the master will sound muddy and lack clarity. Too much attenuation of the low-end and the master will sound weak and thin. When you feel you have a great setting, try sweeping through a range of around ±1dB and Q bandwidth to see if there’s a close setting that sounds more musical.

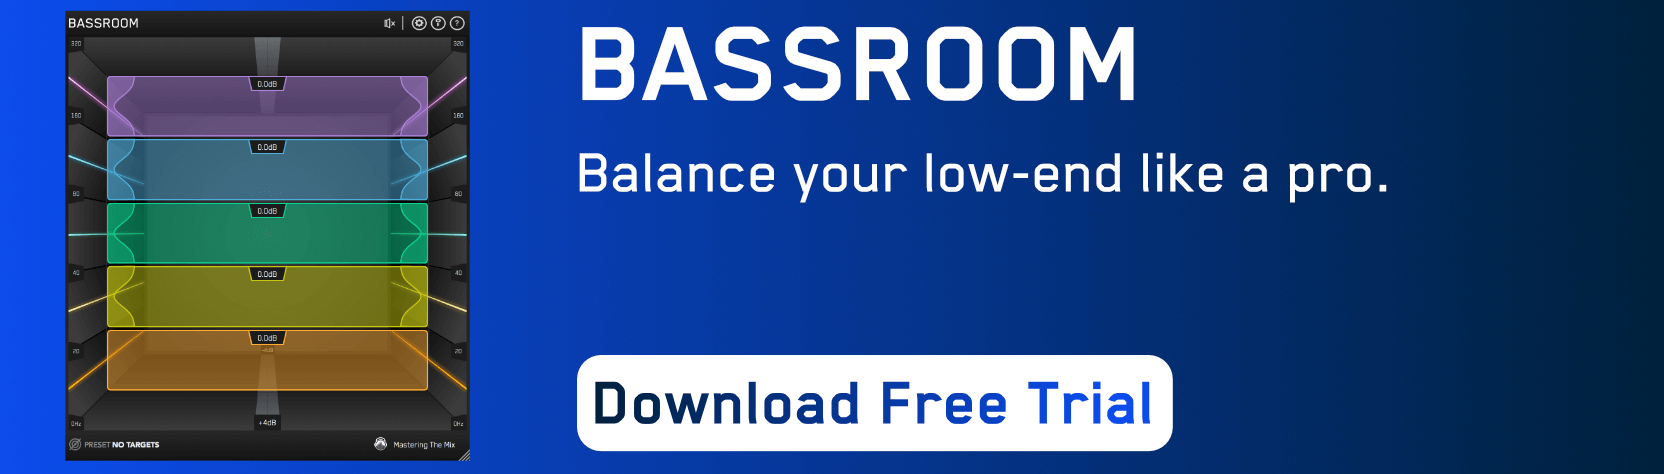
Generally speaking, you would want to go for broad Q bandwidths and EQ adjustments no greater than around 3dB. If the adjustments are greater than this then you may get more transparent results by adjusting individual elements in the original mix before mastering.
Rules can always be broken and it’s the results that count. If a master needs to have a 6dB high-end boost to sound great then go for it.
When making EQ adjustments, be sure to adjust the output gain of the EQ to try and match the output loudness to the input loudness. This will help you objectively decide whether your EQ decisions are improving or deteriorating your sound when you bypass the plugin.
Compression
(Note: Click here if you’re unsure about the different parameters within a compressor and how they affect audio).
The compressor will reduce the volume of the audio that surpasses the threshold. During mastering, compression is used subtly to control the dynamics, add color, and thicken up sounds.
As with setting the loudness and EQ, monitor the loudest section of your track when setting the compressor. If you set the threshold based on the volume of the verse, the louder chorus would push the compressor to work too hard giving an unnatural sound.
Over-compression is an incredibly fast way to ruin a mix. Squashing the transients can suck the dynamics and emotion out of a track and reduce the impact of a drop or chorus. To avoid this, dial in a low ratio of around 1.2:1 to 2:1 and a high threshold that gives only 2 or 3dB of gain reduction.

By only tickling the signal in this way, the compression will be transparent and subtle. It will maintain the impact of the dynamic variation between the sections of your song. It will also help glue the sounds of your mix together, giving them a cohesive sound.
Once your threshold and ratio are working well with your audio, you can tweak the attack and release settings to help the compressor further complement your audio.

If your attack is too fast, it will damage the sound of the transients of your audio, such as the drums or first few milliseconds of a bass. It’s important to preserve these transients to maintain an open and dynamic sounding master. Conversely, if your attack is too slow, the compressor won’t react in time to the louder parts of the audio that you want to reduce.
A great starting point for the attack of your compressor is somewhere around 25-50 milliseconds. This leaves enough space for the short-sharp transients to poke through the mix without being so long that the compressor doest react in time. You can tweak from this starting point and use your ears and reference tracks to help you dial in a setting that works well with your music.
The compressor release is equally important. If it’s too short, it can create a pumping sound where the sound feels like it’s jumping in an unnatural way. If it’s too long, the compressor will be in a constant state of gain reduction which, again, will sound unnatural.
Adjust the release so that the compressor returns back to a zero state (no gain reduction) just before the next beat for a transparent and musical compressor setting. If your compressor has a VU meter or any other visual, you should see the gain reduction dancing in time with the music.

As a final check of the compressor settings, preview how the master flows from the verse into the chorus and ensure it still has a positive dynamic impact. If the compressor clamps down too hard on that first beat of the chorus then you may need to increase the threshold to reduce the compression.
Extra Processing
At this point, you’ve set the rough loudness, EQed and compressed your master, so it should be well on it’s way to sounding how you envisioned. To bring out the maximum potential in the sound, you may want to add some additional processing to enhance the flavor, vibe, and character of the music.
Stereo adjustments during mastering can help open up the sound whilst adding clarity and definition to the track. Reducing the width of 0-250Hz so it’s mono can help anchor the foundation of the track, reduce phase issues, and help it translate better on all playback systems. Increasing the width of the higher frequencies can improve the definition.
Over-boosting the overall stereo width of a mix can lead to phase issues so be sure to open your metering plugin and keep an eye on your phase correlation meter. If the correlation meter starts moving too far away from +1 you could be introducing audible issues. Again, refer back to your reference tracks to try and get a comparable amount of width.

Tape emulation and harmonic distortion plugins can be used to add subtle warmth and take off the ‘digital edge’ of music. They do this by adding additional harmonic content giving a richer and denser sonic character. This can also hype the sense of energy in the master.


As with most mastering processes, the key with tape and harmonic distortion is to keep it subtle. Dial-in the effect so you can just about hear the effect, then slightly roll it back for a great starting point.
The list of possibilities here is endless. There are plugins that can help you reduce harshness, control your low-frequencies, increase the perceived loudness, add more punch, and more. Experiment and see which tools help you get the sound you’re after.
Revisit Loudness
With all the EQ, compression, and extra processing changes you’ve made, it’s probable that the loudness and true-peak will have shifted from what you initially set. Open your limiter and metering plugin and adjust where needed.
Final Listen and Quality Control
This is where you take a step back and look at the whole picture. Listen from start to finish and see if there are any aspects of the master that you feel need a final tweak.
As well as comparing the master to your reference tracks, you should also see how it sounds against the original mix. Your mix will be much quieter than your master so you’ll need to level match for a fair comparison. This is a great sanity check as it ensures that you haven’t made the master sound worse than the mix. This is such an important step that we created a video and guide on how to make sure your master sounds better than your mix.

Have your metering plugin open during this time so you can check for peak, loudness, dynamic, and stereo issues.

Bouncing The Audio
The final step is to export your audio so you have your new master file ready for distribution. You’ve worked so hard up until this point it’s important to not undo your work by bouncing your audio incorrectly.
Select wav as the option for a high quality, lossless bounce.
The sample rate should remain the same as your original mix file and mastering session. There are no benefits to increasing the sample rate if the audio was not originally recorded and produced at a higher rate.

The bit depth/resolution refers to the dynamic range scale of the audio. 24bits is the most widely accepted resolution for online distribution. 16Bit is the format needed for CD and some online platforms that have not yet adopted 24bit. Stick with 24bit where possible.

Dithering is a technical topic, but in a nutshell, it’s only necessary to dither the audio if you’re reducing the bit depth. So if your mix file was 24bit, and you want to create a 16bit master, you would need to dither. If your mix was 24bit and you’re bouncing a 24bit master, you don’t need to dither.
Normalization raises the volume so your audio is peaking at 0.0dB. You’ve already controlled the peak level using the output of your limiter so you don’t want to apply any normalization. It would almost certainly bring about true peak issues.
Offline bouncing when mastering is usually fine and more time-efficient for mastering. Real-time can be useful if you want to have another final listen to your master.
Checklist
Save this checklist to remind you of what you’ve learned here and ensure consistent results when you master your tracks.


