Mixing a live band recording can be much more difficult than mixing a track by a solo artist. There are typically more instruments to contend with, and more people who need to sign off on the final mix. Plus, it can be difficult to balance all of the different elements while keeping everyone in the band happy—especially when everyone wants their instrument to be the loudest.
In this blog, we'll share some of our favorite tips for mixing a band, including how to set up the session, what to do with the vocals, and how to make sure the drums and the bass don't conflict with each other.

GET ORGANIZED
Live band sessions often include tons of tracks, which can get messy. It's important to stay organized so you can quickly find what you're looking for and capture the moment before the spark of inspiration fades away. Start by grouping all related tracks together so you can find what you're looking for without wasting time.
It can also be helpful to color-coordinate groups of tracks. This makes it easier to visually separate groups and quickly locate specific types of tracks. For instance, by making all of the drum tracks one color (including bus and effects channels), you can easily see all of the drum tracks at a glance.
The exact order and color scheme that you use is totally up to you. Here's how I organize my sessions:
-
Busses
-
Effects (grey)
-
Drums (red)
-
Bass (orange)
-
Guitars (yellow)
-
Keyboards (green)
-
Vocals (blue)
-
Background Vocals (purple)
-
Aux (pink)
After organizing your tracks, route all of the instruments in a group to their own dedicated stereo bus fader. This makes it much easier to manage multiple tracks and quickly adjust the balance of the mix. Plus, it enables you to add bus processing later on, which can help give your track a more cohesive sound.

USE REFERENCE MIXES
Once you’ve set up and organized the session, you want to give yourself a sonic target to have a target in mind of what the final result will sound like. Without this, you might makee lot’s of aimless mixing choices that make your sound even worse than when you started, which can be a frustrating waste of time.
With so many different tracks to manage and instruments to contend with, it can be overwhelming trying to mix a live band recording. Reference mixes can be a great tool for helping you make critical mix decisions. For instance, which should be louder, the guitars or the drums? Should the kick or bass take up the low-end frequencies? What sort of effects should you use on the vocal.
REFERENCE makes it easy to quickly compare your track to your favorite mixes. Just drag and drop your reference mixes into the transport window, engage the level match feature to ensure a fair comparison, and toggle back and forth between your reference mixes and your track to hear the differences.
Listen closely and take note of what you need to change in your mix. Start by making big, broad changes to the whole mix to help get your track in the ballpark. Focus on things like level balance, pan position and general frequency response. After getting a rough mix dialed in, it's time to take a closer look at each of the individual tracks in your session.

MIXING DRUMS
There's no right or wrong way to start a mix—personally, I like to start my mix with the drums to build a strong foundation for the rest of the track. However, many engineers like to start with the lead vocal, since it's arguably the most important element in the track.
When mixing drums, it's important to dial in a rough mix for the whole drum kit before soloing any single track. Mixing drums can be tricky, especially when working with a live kit. Bleed can be a problem, causing you to compromise on level balance or reverb—more on that later.
Use LEVELS to check your tracks for phase issues, which is common when working with multi-mic'd kits. Phase cancellation happens when the peak of one signal combines with the valley of another signal and they cancel each other out resulting in a weak sound.

To solve this problem, you can try nudging the audio a few milliseconds forward or back. Even a small adjustment might have incredibly positive effects on the phase of your mix. Do this whilst listening in mono through one speaker and listen for the sweet spot where the audio stops phasing.
Before we dive into EQing drums, you need to think carefully about what the audio actually needs. Below are some suggestions to get your started but you’ll need to use your intuition. If the snare is already sounding bright in the context of the mix and when compared to your reference tracks then you should proceed with caution when boosting the mid and high frequencies.)
Once you get the sound of the kit closer to the sound of your reference mixes, start fine-tuning individual channels. Use a high-pass filter to remove unwanted low-end, and a bell with a relatively high Q value to remove any muddiness in the low-mids in channels like the toms, snare and hi hats. (Cutting this area on the kick channel might make the kick sound too weak, but it depends on the recording.

Listen to your reference tracks and pay attention to how the kick sounds. For example, do you need to boost the high-frequencies to help the kick cut through on small speakers? If you boost the high-end of the kick, you may decide to attenuate the high-end of the bass to allow the kick to shine in that range. This helps the two channels fuse together rather than compete for space.

You may also want to use moderate compression with a slow attack and fast release to enhance the attack of the transients and help the kick punch through the mix
Take a similar approach for the snare drum, using a high-pass filter to roll-off the low-end, a wide bell to boost the low-mids around 200 to 300 Hz, and a narrow bell to cut boxiness in the midrange around 400 to 600 Hz. To enhance the snap or crack of the snare, try boosting with a wide bell around 2 to 4 kHz. To add "air," try boosting with a high-shelf above 10 or 12 kHz. Just be careful not to get in the way of the cymbals or vocals.

Similar to the kick drum, you may want to use moderate compression with a slow attack and fast release to enhance the attack of the transients. Finally, adding a touch of room or hall reverb to the snare can be a great way to give your mix more space and depth. Listen closely to your reference mixes to determine which type of reverb you should use, and how much.
The kick and snare should both be panned to the center, but when it comes to the rest of the kit, there are two options: audience perspective and drummer's perspective. In ‘drummer's perspective’, the kit is panned from the perspective of the drummer, with the high-hat on the left and the toms panning from high to low (left to right). Additionally, any close mic'd cymbals would be panned accordingly, while the overhead and room mics would be panned hard left and hard right, according to where the drummer was seated.
In ‘audience perspective’, the panning of the kit is reversed to match how the audience sees each instrument. So, the high-hat would be on the right, with the toms panning from right to left. There's no right or wrong way to work, but most engineers choose one approach and stick to it.

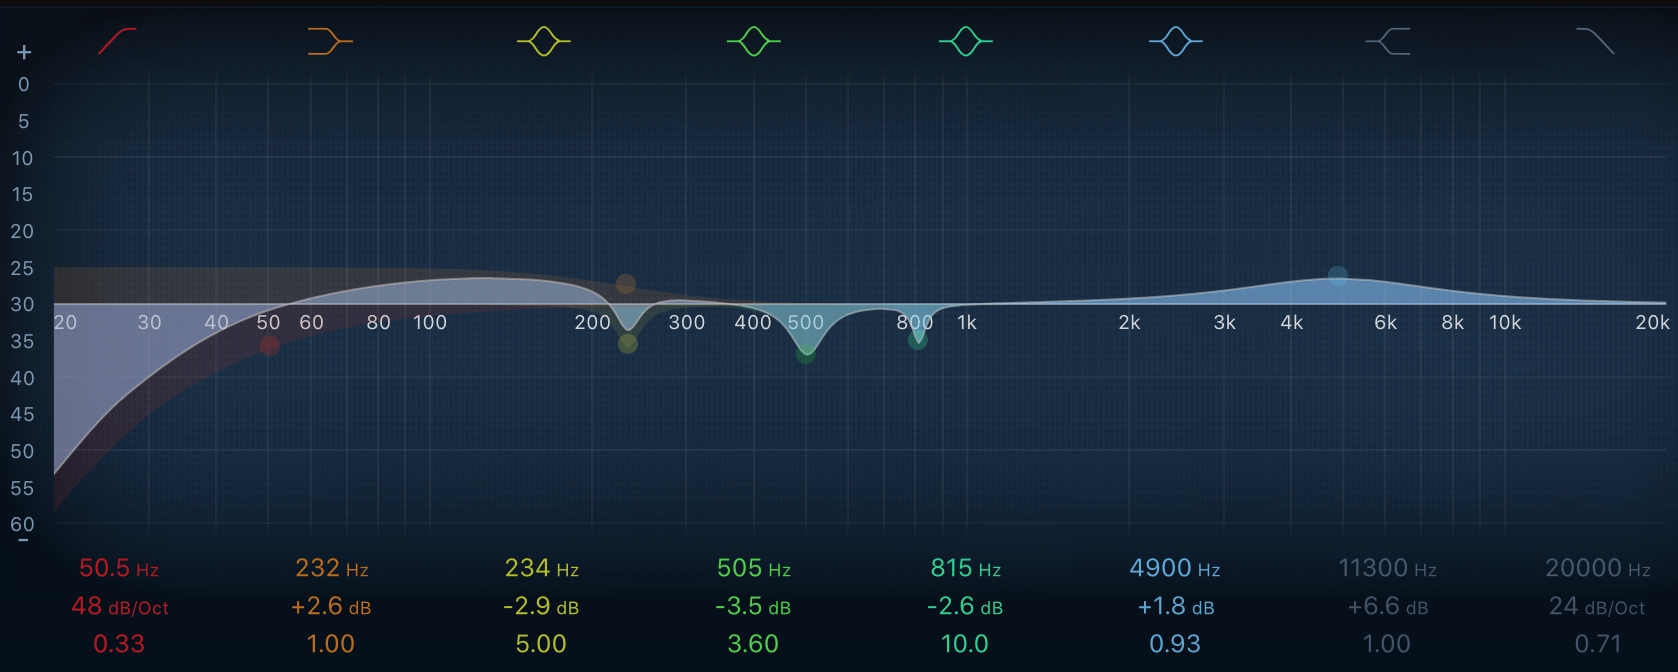
When it comes to mixing the rest of the drum tracks, treat the toms similarly to the kick. Use a high-pass filter to remove unwanted low-end, boost the lows with a shelf around 150 to 250 Hz to add power, cut liberally in the low-mids (around 200, 500, and 800 Hz), and add a little bit of snap in the 4-6 kHz range.
For the overhead and cymbal mics, use a high-pass filter to remove any unwanted low-end. Some engineers go as high as 500 Hz to help create separation between the cymbals and the rest of the kit, but I find this often makes the drums sound disjointed. Remember, your listener never has the luxury of using the solo button. Everything has to sound good in context!
Listen to your reference mixes and add an appropriate amount of reverb to help glue the kit together. We'll do some additional bus processing later on to finalize the sound. For more drum mixing tips, check out our blog on how to mix rock drums.

MIXING BASS
When it comes to the bass, it's important to consider the relationship with the kick drum. Listen to your reference mixes and determine whether the kick or bass will fill up the bottom frequencies, then use a high-pass filter to roll-off low-end below the fundamental frequency. This should help clean up the low-end and make more room for the kick.
Next, use a low-shelf or wide bell to boost the low-end if you feel like you need a more powerful sound. Cut any muddiness in the low-mids with a bell, and boost the mids or high-mids to help bring out the string or pick noise. Use a precise EQ like BASSROOM to create a frequency response curve that complements the kick drum.

For instance, if you boost 120 Hz on the kick, cut it on the bass, and if you cut 80 Hz on the kick, boost it on the bass. This helps you hear each instrument clearly without conflicting information in the low-end.
As for compression, there are two basic approaches—you can use one or both, depending on what your track needs. First, use a peak limiter with a fast attack and moderate release times (like the 1176) to prevent clipping. You may also want to use a slower, more gentle compressor (like the LA-2A) to smooth out the dynamics for a more consistent performance.
Side-chain compression can be helpful for getting the kick to cut through the mix, especially with a busy bassline. If you're still having trouble getting your bass to cut through the mix, use a saturation plug-in like IGNITE to add rich harmonics to the high-end, helping your ears detect the bass on smaller speakers.
For more mix tips, check out our blog on mixing kick and bass.

MIXING GUITARS
With the kick, snare, bass and vocals all in the center of the mix, the rhythm guitars are typically panned hard left and right. If you have additional guitar parts, pan them based on pitch, with low register parts closer to the center and high register parts panned to the sides. Of course, any lead or solo tracks should stay panned in the center.
After panning the guitars throughout the mix, spend some time EQing each track to create one cohesive guitar sound. Starting by using a high-pass filter to roll-off the low-end—I typically set mine at 80 Hz since that's the about fundamental frequency of the low E string, but depending on the part you may want to roll-off up to 200 Hz.
When adjusting the EQ, again, think about how the audio sounds, and what adjustments are needed to achieve the sound you’re looking for.

Try a low-pass filter to roll-off the high-end and help make room for other instruments like vocals and cymbals. Start at 20 kHz and continue lowering the frequency until you start to lose the detail and clarity in the guitars.
Next, clean up any muddiness in the low-mids with a narrow bell. I like to use BASSROOM and MIXROOM to help me quickly pinpoint common problem frequencies. Both plugins ‘listen’ to your audio and make EQ suggestions based on what preset you chose such as ‘distorted lead guitar’ etc. This is so much better than a generic preset which don’t take how your audio already sounds into consideration.
Watch out for muddiness below 300 Hz, boxiness from 300 Hz to 2 kHz, and harshness above 2 kHz. Depending on the track, you may need to boost some frequencies as well. Use a low shelf below 200 Hz to add power for chugging palm mutes, boost 2-4 kHz to add some bite and help your track cut through the mix, or use a high-shelf to boost above 8 kHz to add some air to the mix.

Most people associate the sound of compression with big, rowdy rock records. But the truth is, compression can actually make your guitars sound smaller. Distortion inherently compresses guitar signals, so most open or strummed performances don't need additional compression. However, it can help tame dynamic staccato stabs or punchy chugs.
For more tips on mixing distorted guitars, check out this blog.

MIXING VOCALS
The specific approach you use for mixing vocals will likely change depending on the genre or singer, but here's a quick breakdown of a signal chain that works well for most singers.
Start with a high-pass filter to remove any unwanted low-end. This will vary depending on the singer and may range anywhere from 80 Hz to 200 Hz.
If your vocals are sounding thin, then boost the low-mids around 500Hz. If they’re feeling a little muddy then try cutting 500Hz. Equally, if your vocals are sounding harsh, try reducing the high-end around 8-20Khz (find the harsh range). If the vocals are sounding dull then you may need to boost that range. Use your reference tracks to help you make these decisions.

Use additional bells with a high Q to remove any unwanted resonances captured in the recording process. These could be at any frequency, depending on your recording environment. I prefer to use a dynamic EQ to target resonances as the dips only happen when the resonant frequencies are loud enough, meaning that you don’t have EQ cuts at times when the resonances aren’t occurring.
Next, I like to use a de-esser to remove sibilance. Since de-essers are dynamic, they'll only remove sibilance when it becomes excessive. Unlike EQ, which can make your vocal sound flat or dull at times. For compression, there are two common approaches: use a fast compressor like an 1176 to limit peaks and enhance the attack of consonants (especially for percussive vocalists), or use a slow compressor like an LA-2A to smooth out the performance.
Finally, I like to use an analog-modeled EQ to add some warmth and brilliance to the track. I often use a high-shelf to boost above 10 kHz or so—just be careful around the 4-6 kHz range, as it can make your mix sound harsh or brittle.
Check out our blog on mixing vocals for more tips and tricks!


