
Every EQ move you make is relative, whether you're thinking about it that way or not. Brighten your vocal and you've just darkened everything else. CARBON Q is built around that. It's one EQ spread across your whole session, so you're shaping the relationships between your channels instead of one channel at a time.
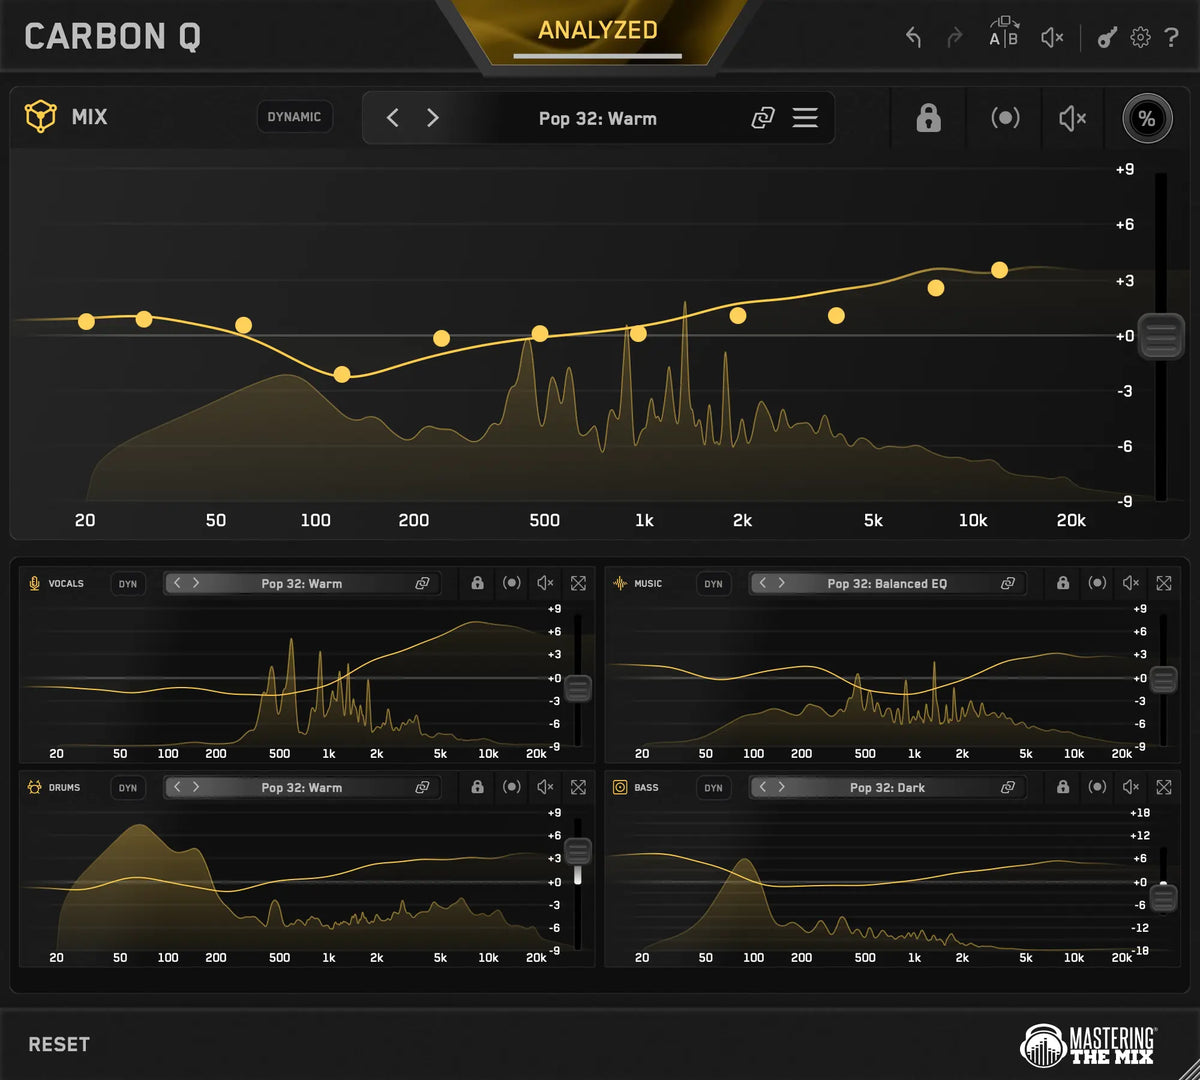
CARBON Q helps you look at your mix as a whole, with everything connected and working together. The MIX instance sits on your output channel, the agents sit on your vocals, music, drums and bass, and all of the EQ and volume controls available in one window, whichever instance you open.
Every EQ move is level matched as you make it, so you hear tone change rather than volume. The Smart Presets are worked out for the whole mix in one pass, so the vocal target already knows what the drums and the bass are doing. And if you'd rather start from a record you love, drop it in as a reference track and CARBON Q builds the vocal, music, drum and bass targets, plus the whole mix target, from that one file.
Hear the difference
Listen to what happens when every channel is EQ’d against the others instead of on its own. Both versions are matched for overall loudness, so what you are hearing is the tonal balance.


Pop Mix
This post is about tone. Volume balance is the other half of the same job, and it's got its own post: The Volume Balance Blueprint. If you haven't read that one yet, read it first, because the level moves usually come before the tonal ones.
1Tone is relative too
Solo a vocal, EQ it until it sounds amazing, drop it back in the mix and it doesn't fit. We've all done it. The vocal was never the problem. A channel isn't bright or heavy or present on its own. It's only those things compared to what's around it.
So most tonal problems are really two channels wanting the same part of the spectrum. Your guitars and your vocal both sitting at 2 to 3 kHz. Your bass and your kick both filling 80 Hz. Solo either one and it sounds fine. Together they clash, and the usual reaction is to push the one you care about louder, which makes it worse.
The fix is straightforward. Stop looking at one channel at a time.
2How to use CARBON Q
- Put CARBON Q first on your output channel and choose MIX, then on your vocals, music, drums and bass with the matching role on each. Put it last on those four, after whatever is already there, whether that's nothing or a whole chain of plugins, so the analysis hears everything you've done.

- Loop the busiest, most representative part of your song and hit ANALYZE. A tray drops down where you pick which instances to analyze, make your selection and press GO.

- Step through the ten Smart Presets and stop on the one that fits best. Or open the preset browser, go to the reference tracks tab, drop in a song you want to sound like, and select it.

- Now work from whichever instance you like. Every agent sits in the tray at the bottom with its own controls, so you can see all four channels at once and move nodes on any of them without opening another plugin.

3Start from a record you love
The quickest way to a tonal balance that works is a record that already sounds great. You've got a song in mind for every mix you do, so CARBON Q lets you use it to set your direction.

Open the preset browser, go to the reference tracks tab, and drop the file in. From that one stereo file CARBON Q separates the vocals, music, drums and bass, reads the tonal balance of each one and of the mix as a whole, and measures how loud each part sits against the rest. All on your machine, nothing uploaded to the cloud. It saves the lot as a preset. Click it and every instance in your session moves to match, EQ and level together.

Take the whole picture and hear how far your mix is from the record. Or unlink the VOCALS agent and take just the vocal. One record for the drums and a different one for the bass. Or load five and flick between them until one of them makes the mix click.

None of this replaces your ears. It puts the reference and your mix in the same sonic ballpark, so you can see the difference instead of guessing at it.
4Level matched as you move
Our ears naturally think louder means better. That's a problem with EQ, because a boost can sound better simply because it's louder. Boost 3 kHz on your vocal and it sounds more exciting. Some of that is presence. Most of it is that the vocal got louder.
CARBON Q takes that question away. As you drag a node it works out what the curve is doing to your loudness and compensates at the output as you go, settling over a few seconds of audio and then holding still. The loudness stays put and the only thing that changes is the tone. So when a boost sounds better it's because it is better, and when it doesn't you find out now instead of an hour later with fresh ears.

It covers the EQ curve only. Your Gain slider is yours, because that is what a preset or a reference uses to set your volume balance. And whatever Dynamic does to the level is the whole point of Dynamic, so that is left alone too.

5The targets know the whole mix
Most plugin preset systems completely lack any kind of context. A good vocal EQ cannot be measured on its own. You only know a vocal sounds right when you hear it in the song it's sitting in.
So our targets come out of whole mixes, analyzed whole. The vocal target, the music target, the drum target and the bass target that belong to a given reference all come from the same mix, so they already work together.

That's also why the MIX instance matters so much. It holds the full picture, calculates the Smart Presets from what it heard across the session, and shares them out. Each agent gets its share of one coherent tonal decision rather than working from its own channel alone.

And there's only so much room up there. If you lift the top on your vocal, your cymbals, your guitars and your synths, you don't get four bright elements. You get a harsh record. Same at the bottom: a big low end on the bass plus a big low end on the kick isn't twice the weight, it's mud. Every element you brighten spends some of the same budget, and every element you thicken spends the same one down low.
Records that work have already made those trade-offs, and those decisions are what our analysis captures. You can't get that from a preset that only ever looked at one channel on its own.
So stepping through the ten feels different from stepping through a normal preset list. You're auditioning ten whole tonal pictures where the parts already agree, rather than a vocal preset and a bass preset and a hope. A reference track works the same way, because it comes from one mix too.
6Every curve in one window
Every agent you add shows up as a live tile in the agent tray along the bottom of the window, with its own EQ curve, preset bar and controls. The tray is in every instance, not just the MIX one, so you can work on the whole session from whichever window you've got open. Move a node in the tray and it moves on that channel straight away, and the other way round. No syncing, no reopening plugins, no wondering which window you left a setting in.

That's the real workflow change. You're looking at your mix curve, your vocal curve, your music curve, your drum curve and your bass curve side by side, at the same scale, while the mix plays. If two channels are fighting, you can see both curves reaching for the same place.
Three controls make this practical to work in rather than just nice to look at:
- Lock freezes a channel that's already where you want it. Its EQ becomes read-only, it stops taking preset changes, and the MIX instance skips it when you run a session-wide analysis, so you can keep working on the rest without disturbing it.
- Link, in the preset bar, ties an instance's preset to the session, so changing preset anywhere moves everything together. Switch it off to give one agent its own preset or reference track, and switch it back on and the agent snaps to whatever the MIX instance is currently on.
- Bypass on the MIX instance bypasses every instance at once, which is the fastest honest A/B you have. Bypass on an agent dims just that tile so you can see at a glance what's off.
Hover an agent's role name and a panel tells you which DAW track it's sitting on, including the track name and color where your DAW passes them through. Handy once there are four tiles in the tray.
7When the tonal balance moves: Dynamic
A normal EQ curve is set in one position, so it only handles the average of your track. It can't do anything about the chorus where the bass swells up over the vocal, or the one snare in four that spikes at 3 kHz. For those you've always needed a different tool, and a different window.
Now you turn on Dynamic Mode. When CARBON Q analyzed your audio it didn't only learn the average tonal balance, it also measured where the sudden peaks happen. Dynamic puts a threshold at those peak levels on every band. When your audio pushes a band past it, the band gets pulled back into line in real time, and released as soon as the peak has passed. The rest of the time nothing happens. Your tonal balance target stops being an average and becomes something the mix holds through the loud bits.

Click Dynamic on any instance to turn it on, or right click it to switch every instance in the session to Dynamic at once. The amount runs from 0 to 100%, either as one value across the whole range or split into low, mid and high so you can hold the low end firmly and leave the top alone. At 50% it acts as a safety net, clamping down on runaway peaks. Push it further toward 100% for tighter, more aggressive control over your track dynamics.
The two crossovers between the three groups can be dragged, so you decide exactly where the low, mid and high ranges start and stop, and each group has its own attack and release so you can set how quickly Dynamic reacts to a peak and how quickly it lets go. Dynamic also has its own settings for Mid and Side.

We tried lifting bands that fell below their target as well. It sounded unnatural, the way upward processing usually does. Pulling peaks back into line sounds like the mix was played that way, so that's what Dynamic does.
8The controls
The EQ itself is five gestures.
| Move | What it does |
|---|---|
| Drag up or down | Sets that band's gain, up to ±9 dB. Nodes only move vertically, so you can't knock a frequency out of place by accident. |
| Scroll over a node | Tightens or widens its Q bandwidth. This is for narrowing in on a problem area or opening a move back out, not something you need to touch on every band. |
| Click and drag | Across the curve, selects multiple nodes so you can move them together. |
| Double-click a node | Resets that band to flat. |
| Double-click off the nodes | Resets the whole curve you're looking at. |
A few things happen on their own. The display runs ±9 dB, but individual bands sum, so a few boosts next to each other can push the resulting curve past that. When they do, the scale doubles to ±18 dB automatically so you can still see the shape of what you've built, then shrinks back when the curve fits again.

The vertical slider on the right of the EQ is the instance's output gain, also ±9 dB. Hover it for a readout, click the readout to type an exact value. Level matching never touches this one, so what you set is what you get. Mix (%) scales the whole EQ curve between flat and full, and every agent tile has its own, so you can dial one channel back from the tray. It scales the curve itself rather than summing a second copy of your signal, so there is no phase cancellation to worry about. Drag it, or double-click to type a value.
Undo, redo and A | B sit in the toolbar. All of it is undoable, so you can experiment without losing your place.
?FAQ
Why can't I move the frequencies?
It helps maintain the integrity of your audio through more transparent filters.
Do I need an instance on every channel?
No. Use the roles that match your session. What you should always have is the MIX instance on your output channel, because it calculates the Smart Presets from the whole session and shares them out. Without it, each agent is working from its own channel alone, which is exactly the isolated view this whole post is arguing against.
Is Dynamic a compressor?
It compresses, but only where and when a band goes over the target you set, so it behaves more like an EQ that holds its shape than a compressor sitting across the whole channel. It never lifts anything. If the audio stays under the target, it does nothing.
Does my audio get uploaded anywhere?
No. Everything runs on your machine, including the reference track analysis and the stem separation. Nothing leaves your computer.
Tone first or level first?
Level first, most of the time. Changing a channel's level changes its perceived tone, so if the balance is wrong you'll be EQing to compensate for something a fader would have fixed. There's a whole post on that, linked below.
All your channels, working together
EQing a whole mix isn't hard because EQ is hard. It's hard because you've only got one channel in front of you, and it is easy to forget about the context.
CARBON Q puts every curve in one window, level matches every move, and lets a record you trust set the target.
Instead of EQing one channel at a time, you're getting all your channels to work together.
Download the trial, put it across a mix you know well, and use a record you love as the target.
- The Volume Balance Blueprint, on getting the levels right before you touch the tone
- The Mid/Side Workflow I Always Wanted, on treating the center and the sides separately
- The CARBON Q manual, for everything else