Mastering is the last thing that happens to a song and the first thing people hear. It's the stage where a good mix becomes a finished record, or where a great mix gets flattened by someone in a hurry.
To master a song, work through a fixed order: clean up problem resonances, set the stereo image, then handle tone, dynamics and loudness on the master itself, check the result against a professional reference at matched levels, and quality-check the file before you release it. Mastering doesn't rescue a broken mix. It takes a finished, balanced mix and makes it translate, hit the right loudness, and hold up next to commercial releases.
The rest of this guide walks the exact chain I use professionally, stage by stage, and points you to the deep dive for each step.
This page is the complete version of how I approach mastering. Every section answers one question and links to a deeper guide for the full treatment. You can read it top to bottom as a method, or jump to the stage you're stuck on. If you only take one thing from it, take the order. The order is most of the job.
- What mastering actually does
- How to prepare a mix for mastering
- What a mastering chain looks like
- Step 1: fix resonances first
- Step 2: set the stereo image
- Step 3: the master itself
- Step 4: check against a reference
- Step 5: QC before release
- Handling the low-end throughout
- Should you master it yourself?
1What is mastering and what does it actually do?
Mastering is the final stage of music production, where a finished stereo mix is prepared for release. It's the step between your mixdown and the version that goes to Spotify, Apple Music, vinyl, or a club system. Mixing is about the balance between the individual parts of your song. Mastering treats the whole song as one stereo file and gets that file ready for the outside world.
In practice it does a few specific things. It corrects tonal balance so the track isn't too dark or too bright. It controls dynamics so the song feels consistent and punchy. It sets the loudness to the right level for streaming and other formats. And it does a final quality check so a stray click, an over-hot peak, or a mono-compatibility problem doesn't make it onto the release. There's a fuller breakdown of the why in why does a song need to be mastered and the fundamentals of mastering.
One thing to settle right away: mastering is not a fix for a weak mix. If your kick and bass are fighting, if a vocal is buried, if the low-end is muddy, those are mix problems and they need solving in the mix. Mastering can shape the overall picture, it can't reach inside and rebalance the parts. Get the mix right first, then master.
The same mix, before and after a master.
This is exactly what mastering does to a finished mix. Toggle Before and After FASTER MASTER while it plays. Both are level matched, so you're hearing the tonal, dynamic and stereo work, not just a louder file. Notice how the master sounds fuller, more controlled and more finished without losing the life of the mix.
2How do I prepare a mix for mastering?
The quality of a master is capped by the quality of the file you hand it. Before you even open a mastering chain, get the bounce right. Leave headroom on your mix bus, somewhere around –6 dB to –3 dB of peak headroom is plenty, so the mastering processing has room to work. Don't bury a limiter on the mix bus and squash the whole thing before mastering even starts. If you've been mixing into a loud limiter to hear how it'll sound, bypass it for the bounce.
Bounce at the project's native sample rate and at the highest bit depth you have, with no dithering at this stage. Make sure the start and end have a little clean space so fades and the first transient survive. The full checklist is in bouncing audio for mastering and preparing for mastering.
If your mix bus already sounds close to finished, good. That means the master is mostly confirmation and a small push, which is exactly where you want to be. A master is the last 5 percent, not the missing 30.
3What does a mastering chain look like, and in what order?
Order matters more than any single plugin choice. Each stage should work on a cleaner signal than the one before it, so you fix problems early and make creative moves late. Here's the chain I actually use, every time, as the worked example for the rest of this page. There's a deeper look at signal flow in where every mastering plugin sits in the chain.
Read it left to right. Clean the resonances so nothing is ringing. Set the stereo image so the width is right before you commit tone. Do the actual master, tone and punch and loudness together. Check it against a reference at matched level so your ears aren't fooled. Then quality-check the file before it leaves your computer. The next five sections are those five stages, one at a time.
4Step 1: how do I fix resonances before anything else?
Start by taking out what's wrong before you add anything that's right. Most mixes, even good ones, have a few resonant frequencies that ring louder than everything around them. A boxy build-up around 300–500 Hz, a harsh peak in the 2–5 kHz range, a boomy note in the low-end. On the master these resonances are the first thing a limiter grabs, so they rob you of loudness and clarity at the same time.

A static EQ cut isn't ideal here, because the resonance is only a problem when it spikes. Cut it permanently and you dull the track everywhere else. The better tool is a dynamic one that listens and only pulls a frequency down when it rings out. RESO finds those peaks and suppresses them dynamically, so the master keeps its character and only loses the parts that were fighting you.
The way I work it on a master: load REFERENCE 3 first to tune my ear to a clean, level-matched commercial track, then loop the chorus of both and listen across the upper-mids, which is where the worst resonances hide. If I hear a thin spike, RESO goes first in the chain. Hold Control and sweep the display to find the exact frequency by ear, drop a node on it, and suppress it just until the ring disappears, then stop.
In most mixes I master there are only four to eight resonances worth reducing. Go past that and you start carving out so much of the spectrum that the track loses its character. And don't try to fix resonances below 250 Hz this way: low frequencies have long wavelengths, so a narrow cut down there removes far more energy than the same cut in the mids and can strip the punch from your kick and the weight from your bass. Get the low-end right in production so it stays solid here. Full method in should you remove resonances during mastering and how to find and fix unpleasant resonances.
5Step 2: how do I set the stereo image when mastering?
With the resonances under control, set the width before you touch tone. Stereo width is where a master can sound bigger and more expensive, and also where it can quietly fall apart. Push the sides too hard and the track sounds wide on headphones, then collapses on a phone speaker or a club system that sums to mono. The low-end is the most fragile part of this, which is why the safe old rule was to keep everything below 100 Hz mono.

STEREOVAULT handles this with phase-safe widening, so you can add real width up top while the low-end stays solid in mono, and it shows you a warning the moment you push too far.
The way I actually set width is frequency by frequency, not one global knob. Think of the master in bands:
- Low and low-mid (below roughly 250 Hz): as a rule, leave these narrow and only cut width here rather than boost it, because widening the low-end is what collapses on a mono club rig or a phone speaker. That said, I do occasionally add a touch of low-end width during mastering when a track needs it, but only carefully and always checked in mono, using the method in how to add width to bass without losing mono compatibility. The default stays the same: keep the foundation centred and solid.
- High-mid and high-end: this is where width earns its money. Widen the top end to open up cymbals, air, reverbs and synth pads, and the track immediately feels bigger and more expensive without putting the low-end at risk.
Make the move, then check it in mono. If the track keeps its energy and nothing important disappears when it sums, the width is safe. If the body of the song thins out or an element drops, you've gone too wide somewhere low and need to pull it back. A wide master that survives mono is the whole goal. There's a wider treatment of width technique in 6 tips for achieving width in the mix.
6Step 3: the master itself, tone, dynamics, punch and loudness
This is the stage most people think of as "mastering", and it's where the previous two steps pay off. With a clean, well-imaged file, you shape the overall tone, control the dynamics for punch and consistency, and bring the track up to the right loudness. Traditionally that's three or four separate plugins, an EQ, a compressor, a limiter, maybe a saturator, all set by ear and easy to overdo.

FASTER MASTER does the whole move in one place, and the part that matters most is that you set an ideal LUFS target directly. You tell it how loud the master should be and it gets you there with tone and punch intact, instead of you nudging a limiter and hoping. Here's exactly how I run it.
Analyse the loudest section. Load FASTER MASTER as the final plugin in the chain, play the loudest part of the song, and hit Analyse. It reads your track and serves up the ten Smart Presets that best fit its character. Audition them with "Let's Hear It" and arrow through until one is in the right ballpark. That's your starting point, not the finish line.
Then fine-tune the modules, and the single most important thing to understand is this: every adjustment you make in FASTER MASTER is instantly and perfectly level-matched. The moment you move EQ, transients, compression or stereo, the output is re-matched to exactly the loudness you set, in real time, so you are always hearing the true tonal change and never being fooled by one option simply being louder. That one feature is what makes every decision on this page trustworthy.
- EQ. An 11-band, phase-coherent mastering EQ. Start from a preset curve, then sculpt the broad tonal balance to taste. Drag the "100%" readout to dial the EQ in as a mix percentage if a preset is too strong.
- Transients. Drag up to emphasise transients and make drums hit harder, drag down to soften sharp peaks. Because it's level-matched, you hear real punch, not just a louder signal.
- Compression. Set the amount and FASTER MASTER handles threshold and the rest. Choose Off, Light, Dynamic or Tight: Dynamic or Tight for punchy pop, electronic and hip-hop that wants control; Light for acoustic, jazz or orchestral that needs to breathe. A low-cut sidechain at 250 Hz stops the kick and bass from over-triggering the compressor, so you don't get that unmusical pumping.
- Stereo. The same band logic as Step 2, built in. Width is split across low, low-mid, high-mid and high-end, and in the presets the low and low-mid bands are set to cut-only because boosting width down there sounds unnatural. Widen the high-mid and highs for air and space.
- Limit. The final and most important move. Pick a loudness node: Streaming (-10, -9, -8 LUFS) for more dynamic masters, or Loud (-7, -6, -5 LUFS) for club-ready punch. Set your ceiling with the -0.1 control and choose true-peak or peak limiting. True-peak prevents inter-sample overshoots for distortion-free playback everywhere but limits slightly harder; peak preserves a touch more transient but risks overshoot on conversion. The Drive slider adds subtle harmonic distortion for perceived loudness without over-compressing.
Two features that save real time: Lock any module (EQ, Transients, Compression, Stereo) once you love it, and it won't change when you audition other presets. And the level-matched bypass compares your processed master against the original at matched loudness, on the whole chain or per module, so every A/B is fair. Full walkthrough in the ultimate guide to mastering with FASTER MASTER, and loudness without crushing the life out of a track is in how to get a loud punchy master.

Ranked #1 DJ by DJ Mag, a record of five times
"FASTER MASTER is perfect for when you need a quick, loud, and great-sounding master."
Try FASTER MASTER free →7Step 4: how do I check my master against a reference?
Your ears adjust to whatever you've been listening to, which is why a master can sound perfect after an hour and wrong the next morning. The fix is to compare against a professional release in a similar style, and to do it at matched loudness, because the louder of two tracks almost always sounds better even when it isn't. A fair comparison is a level-matched comparison.
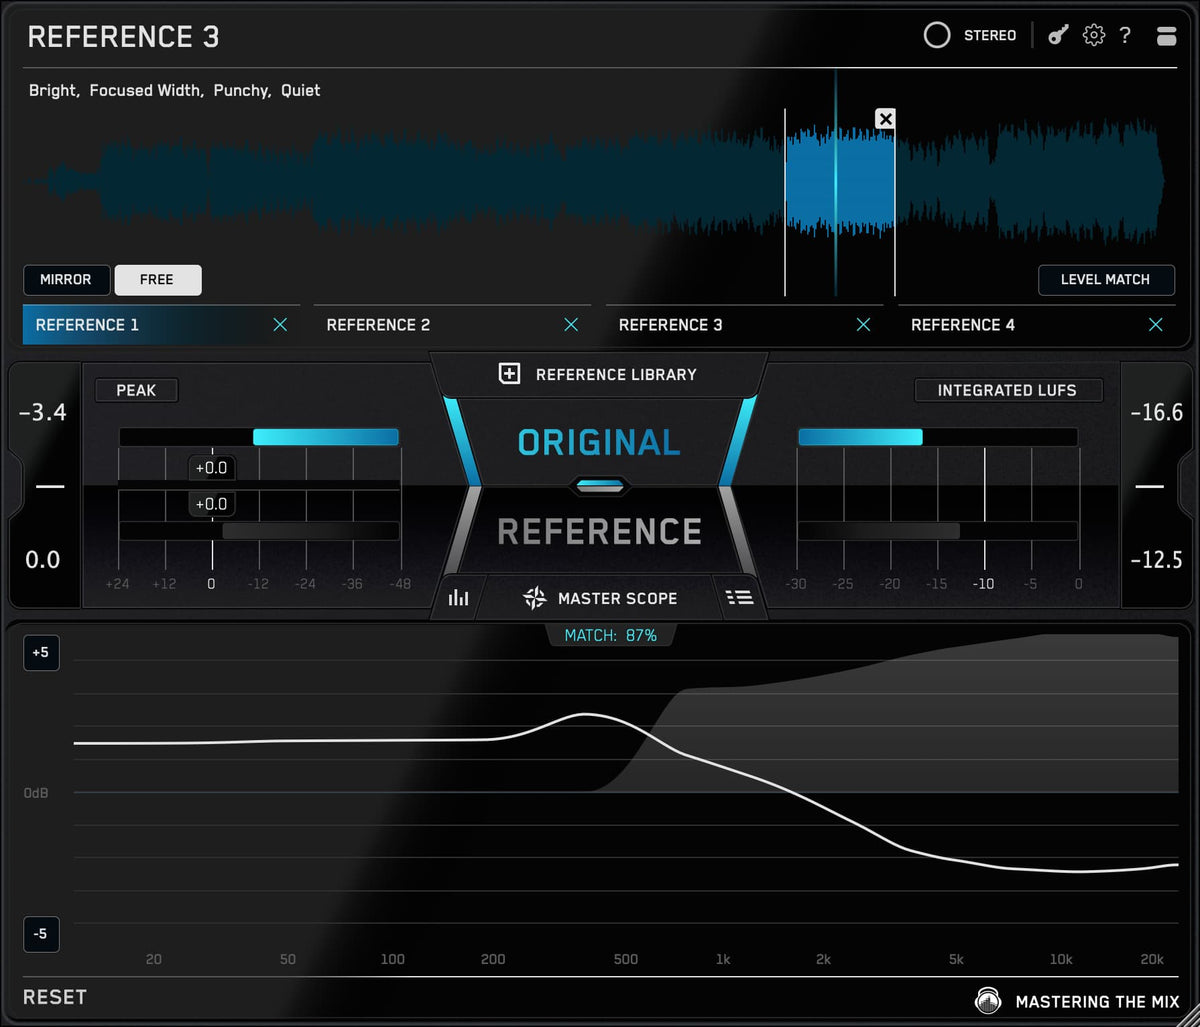
REFERENCE 3 lets you build a library of commercial tracks once, then recall them in every project. Load a track in a similar style, and Level Match is on by default so the comparison is fair. Hit the key shortcut to flip instantly between your master and the reference, and watch the Master Scope: the white line shows where to boost or cut your EQ to match the reference's tonal balance, and the filled area shows where to widen or narrow your stereo width to match its spatial depth. You're no longer guessing what "better" means, you can see and hear exactly where you're off.
LEVELS sits alongside it as the metering, so you can see your true peak, LUFS and stereo information instead of working blind.

FASTER MASTER can do this matching for you automatically. Drag a reference track onto the file-plus icon and it analyses that track's tonal balance and stereo width, then builds a custom profile that nudges your song's EQ and width into the same sonic pocket. It's not copying the track, it's capturing the qualities that make great records translate, and the reference stays in your folder to reuse on future projects. That video walkthrough is genuinely worth watching: unlock the power of reference tracks in FASTER MASTER. The mastering-specific method is in how to use reference tracks when mastering, and the loudness side is in am I mastering loud enough.
8Step 5: how do I QC the final master before release?
The last step is the one people skip, and it's the one that catches the mistake that would have shipped. Before you bounce the final file, check it for the problems you can't always hear: a true-peak overshoot that clips on conversion, a mono-compatibility issue, a sudden loudness jump between sections, a low-end that's heavier than you thought. Catch them now, not in a customer's car.

EXPOSE 2 is a standalone quality control application that scans the finished file and flags issues against release standards, so nothing slips through. It's the final gate before a track leaves your computer. The routine is in how to check your final masters like a mastering engineer.
9How do I handle the low-end through all of this?
Low-end deserves its own attention because it's where most masters go wrong and where most playback systems disagree with each other. Through the whole chain, the bottom end is the thing to keep checking: is the kick and bass balance holding up, is the sub mono-solid, does the weight match what commercial tracks in your genre are doing. A master can be perfect everywhere else and still fail because the low-end is 2 dB too heavy.
This is a big enough topic that it has its own complete guide. For the full treatment, balancing kick and bass, fixing mud and resonance, mono-safe width, and matching low-end against a reference, read how to mix low-end: the complete guide, and the mastering-specific version in how to get a tight and balanced low-end when mastering.
10Should I master it myself or pay a professional?
Both are valid, and the honest answer depends on the song and the stakes. I master professionally for artists like CamelPhat, Tiësto and Calvin Harris, and there are tracks where a fresh, experienced pair of ears and a treated room is worth every penny, a flagship single, a release with a budget, a song you're too close to. If you can afford it for the ones that matter, do it.
For everything else, mastering it yourself is not only possible, it's how you get better. The chain on this page is the same one I use. The tools exist to make the decisions faster and to show you what your room might be hiding. If you're not a mastering engineer by trade and want to go deeper, grab the free Advanced Mastering Course, or download the free stem mastering ebook. There's also the full mix-to-master transition in how to turn a good mix into a professional master.
No plugin masters the track for you. What the chain on this page does is take the slow, uncertain parts out of the way: the resonance hunt, the uncertainty over width, hitting an exact loudness target, the reference comparison, the final check. If you want the whole chain in one place, the All Plugins Bundle covers RESO, STEREOVAULT, FASTER MASTER, REFERENCE 3, LEVELS and EXPOSE 2, the full mastering signal path, fewer tools, better masters.
?Mastering FAQ
What is mastering and what does it do?
Mastering is the final stage of music production, where a finished stereo mix is prepared for release. It corrects overall tonal balance, controls dynamics for punch and consistency, sets loudness to the right level for streaming and other formats, and runs a final quality check. It treats the whole song as one stereo file, separate from mixing, which balances the individual parts. It doesn't fix a weak mix.
In what order should a mastering chain go?
Work in a fixed order so each stage acts on a cleaner signal: fix resonances first, then set the stereo image, then handle tone, dynamics and loudness on the master itself, then check against a level-matched reference, then quality-check the file before release. The order matters more than any single plugin choice.
How much headroom should I leave before mastering?
Leave roughly –6 dB to –3 dB of peak headroom on your mix bus, and bounce without a loud limiter crushing the mix. Bounce at the project's native sample rate and highest bit depth with no dithering at that stage, and leave a little clean space at the start and end so fades and the first transient survive.
What loudness should I master to?
Set a loudness target appropriate to where the track will be heard, then hit it reliably rather than nudging a limiter and hoping. Tools that let you set an ideal LUFS target directly remove the slowest part of the process. Always compare at matched level, because the louder of two tracks usually sounds better even when it isn't.
Why check a master against a reference track?
Your ears adjust to whatever you've been listening to, so a master can sound right after an hour and wrong the next day. Comparing against a professional release in a similar style, at matched loudness, gives you an objective check on tone, width and level. A fair comparison is always level-matched.
Should I master my own music or pay a professional?
Both are valid. For flagship singles or releases with a budget, a fresh, experienced pair of ears in a treated room can be worth it. For everything else, mastering it yourself is entirely possible and is how you improve, especially with tools that show you what an untreated room might be hiding and let you hit exact targets.
Should I master while mixing, or wait until the end?
It depends, and both camps are right. Some people master as they go to uncover problems early; others keep it strictly separate until the mix is finished. I like a hybrid: I put a limiter on the mix bus to bring the track up to around -6 LUFS short-term, but nothing else, no EQ, no compression, no colour. That way my loudness doesn't fall apart under pressure, but there's nothing on the bus disguising issues, so I'm still fixing everything at the source in the mix. When it's time to master, I bypass that limiter and bounce clean.
Where to start
If mastering feels like a dark art, it's usually because the steps are happening in the wrong order or all at once. Slow it down and run the chain: clean the resonances, set the width, do the master with a real loudness target, check it against a reference at matched level, then QC the file before it ships.
That's the same order I use on every record I master, whether it's a release for a name you know or a first single for an artist nobody's heard yet. Get the order right and mastering stops being mysterious. It becomes a process you can repeat, and trust, every time.