

Mid and side sounds like an advanced technique, but it's a really simple idea. Instead of treating your stereo signal as one thing, you treat the center and the sides as two. The idea is easy. Actually using it has always been the annoying bit, which is why most people try it once, get an OK result, and go back to stereo. It can genuinely transform a mix, so here's the version that's quick enough to bother with.
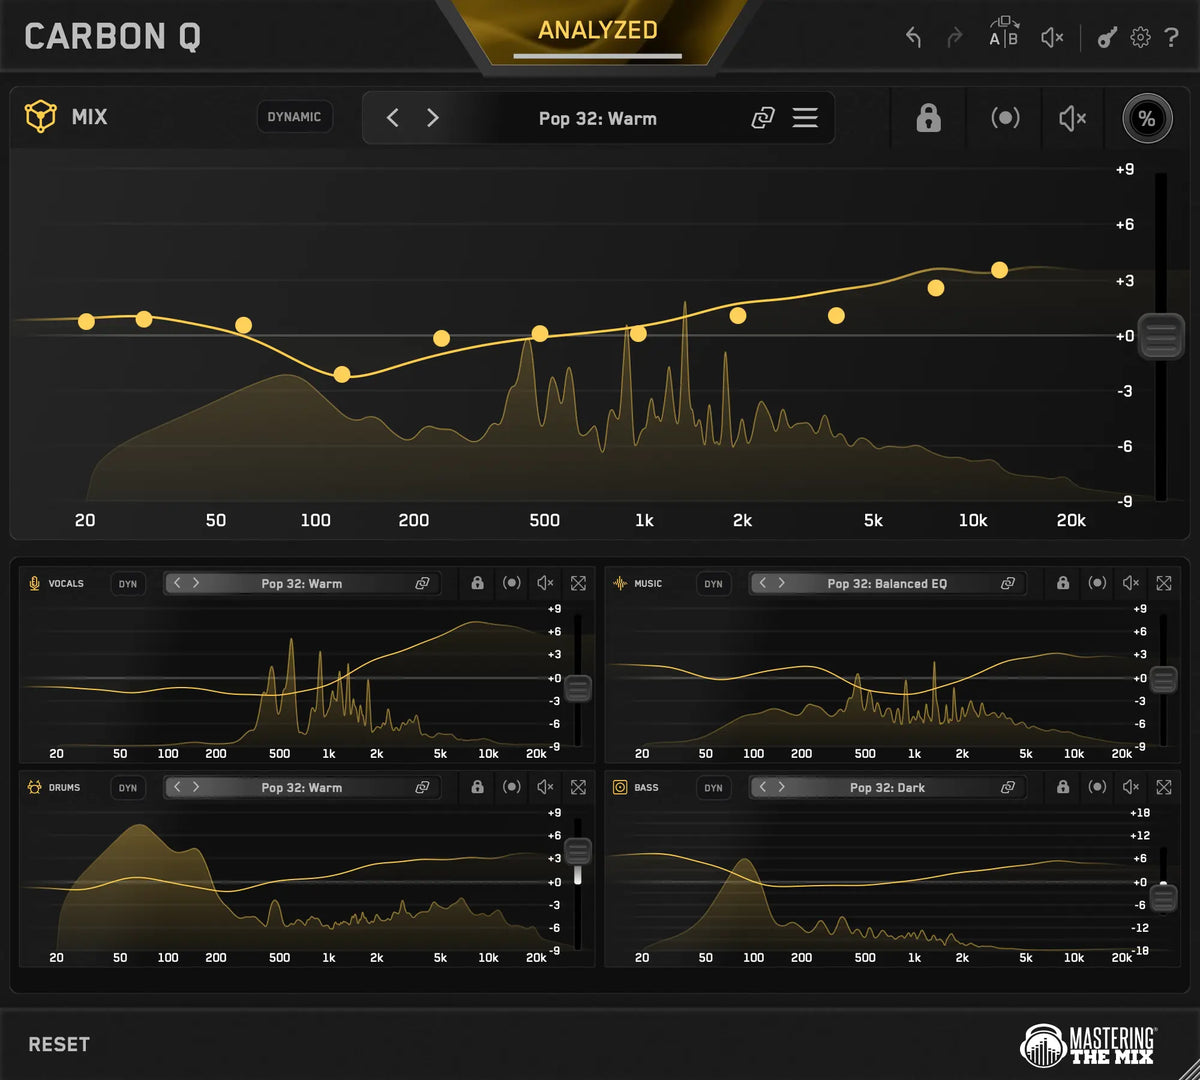
Mid is what both speakers share, the center of your image. Side is what they don't, the width around it. CARBON Q gives you a separate EQ curve for each, draws both at once, and lets you switch by clicking the dimmed one.
Run ANALYZE in Mid or Side and the Smart Presets give you a starting point for each half separately, so the center and the width get handled on their own terms. Drop in a reference track and you get its mid and side targets too, and every move you make is level matched as you make it, so you're always comparing tone and not volume.
Hear the difference
Listen to how adjusting the mid and the side can transform your mix.


Pop Mix · Mid/Side
1Mid and side, quickly
A stereo file is two channels, left and right. Mid and side is the same information looked at a different way.
The mid is everything the two channels have in common, which is the center of your image. Usually your kick, your bass, your lead vocal and your snare. The side is everything they don't share, which is the width around it. Reverb tails, wide synths, doubles, room.
Nothing gets added and nothing gets thrown away. The signal gets split, worked on, then put back together. It's still an EQ. Only the grouping changes.
2What it's actually for
On a normal stereo EQ, every move lands on everything. Add some air and you brighten your vocal, your cymbals and your reverb all at once. Sometimes that's fine. A lot of the time it isn't, and you settle for a compromise.
Mid/Side gets rid of the compromise:
- Clear the low mids out of your sides and the center stays exactly the same, but the mix stops feeling cluttered.
- Open up the top of your sides for air without making the vocal harsh.
- Tighten the low end by pulling it out of the sides, so your sub and your kick sit in the middle where they translate.
- Add weight or presence to the center without widening the reverb with it.

3Both curves, one click
The Stereo / Mid / Side selector at the top of the EQ switches between the three modes. Stereo gives you one curve across the whole signal. Switch to Mid or Side and you get a separate curve for each half.

This is the bit that makes it quick to use. In Mid or Side, both curves are drawn at once. The one you're editing is bright, and the other one sits dimmed behind it. Click the dimmed one and you're editing it. No menus, no dropdowns.


Both curves stay active the whole time, so anything you dial into Mid keeps working while you're on Side, and the other way round. The visualizer does the same thing: two traces, the one you're on filled in and the other outlined, so you can always see what you're working against.
You can jump between mid and side as fast as you can click. And because you've got an instance on every bus, that's mid and side control across your whole mix from a single window.

Setting every instance at once
Right click or shift click the Stereo / Mid / Side selector to set every instance in your session to that mode in one go, rather than switching each agent by hand. You can also choose your preferred default processing mode in Settings, so new agents start in the mode you actually work in.
4A starting point for each half
Most mid and side work stalls in the same place. You know the center and the sides should be treated differently, you just don't know where to start. So you make one small careful move, decide it's probably fine, and go back to stereo.
ANALYZE fixes that. Loop the busiest, most representative part of your song, hit ANALYZE, then GO. CARBON Q ranks everything it has against what it actually heard and hands you the ten closest Smart Presets. In Mid or Side, that starting point is worked out for each half on its own.
- Pick your mode first. The analysis always measures stereo, mid and side, so the ranking comes out the same either way, but what lands on your curve does not: in Stereo one solution is written across the whole signal, and in Mid or Side each half gets its own.

- Hit ANALYZE. A tray drops down where you pick which instances to analyze, and the button becomes GO. In the MIX instance it opens with every linked, unlocked instance already armed, so one press of GO covers the session in one pass.

- Step through the ten with the arrows and stop on the one that fits your mix best, then start moving nodes.

- Or skip the list and use a record. Open the preset browser, go to the reference tracks tab, and drop in a song whose image you admire. CARBON Q reads the mid and the side of that record separately, for the mix and for each of the vocals, music, drums and bass, so the reference lands correctly whichever mode you're working in. All of that runs on your machine, stem separation included.

In Mid or Side, presets carry a width tag as well as a tonal one, running from Mono and Narrow through Focused Width and Balanced Width to Wide and Very Wide, so you can read what a preset is going to do to your image before you click it.

Everything is level matched as it's applied, so you're comparing tone and width rather than whichever option happens to be loudest. That carries on once you start editing. Drag a node on the side curve and CARBON Q compensates the output as you go, so the mix doesn't get louder as you open the sides up.
That matters more here than anywhere, because louder reads as bigger. It is very easy to convince yourself a boost has opened up your image when all it did was turn it up.
Dynamic Mode has its own settings for Mid and Side. Turn it on in Side to keep your width in check when the wide synths swell in the chorus, without touching the center. Or in Mid to stop your low end going over its target while the sides stay open.
It only ever pulls a band back into line when your audio goes over its target, and it lets go the moment the peak has passed. At 50% it acts as a safety net, and pushing it higher gives you tighter, more aggressive control.

5Why the filters matter more here
This is where filter quality really matters, because you can actually hear it.
You're splitting the signal in two, processing each half differently, then adding them back together. If a filter is doing anything other than changing the tone, you'll hear it. A phase shift that one half picks up and the other doesn't shows up in your image, not just in your tone. Your center moves around, your width collapses in places, and your low end stops feeling solid. You got exactly the tonal change you asked for and the result still feels wrong.
CARBON Q's bands are fixed and phase stable, so you can make big moves quickly without worrying about it. On a deliberately extreme move, a +8 dB low shelf under 100 Hz, they track a market leading linear phase EQ within ±0.13 dB from 18 Hz to 2 kHz, and produce the same clean, symmetric response on a transient, at 41 ms of latency instead of 1,509 ms.
These are the same filters we shipped in MIXVAULT, and we published the whole test there, including the impulse response plots and how the two were matched, in MIXVAULT vs a Leading EQ. Same filters, so it applies here too.
?FAQ
Does mid and side EQ make my mix wider?
Not on its own. Boosting the sides makes the wide content louder relative to the center, which reads as wider, and cutting them does the opposite. It's still an EQ though, so it can only work with the width that's already in your recording. If something was tracked mono, there's no side content to lift.
Will this cause problems in mono?
Worth knowing how it behaves. In mono the side content cancels, so cutting the sides changes nothing when a club or a phone sums it, while boosting them lifts material that isn't going to be there in mono at all. That's not a reason to avoid it, just a reason to check your mix in mono after a big side move.
Should I work in mid and side all the time?
No. Stereo is the sensible default and most of your moves belong there. Mid/Side is for the times when one move would fix two things and break a third, which is exactly when a stereo EQ makes you choose.
Can a reference track set my width?
It sets the tonal balance of the mid and the side separately, per role, and the level of each part against the mix. So a reference with a wide, airy top and a tight, narrow low end hands you a side curve that opens up high and a mid curve that carries the weight. If you want to go further on width itself, that's what STEREOVAULT is for.
Does my audio get uploaded anywhere?
No. Everything runs on your machine, including the reference track analysis and the stem separation. Nothing leaves your computer.
The workflow, finally
Mid and side was never a difficult idea. It was just slow. You were always switching modes and going back to check what you had done to the other half.
Now you get both curves on screen, one click between them, a starting point for each half or one borrowed from a record you love, and it's all level matched.
It's quick enough to use on every mix, not just the odd one.
Download the trial and try it on your next mix.
- The Volume Balance Blueprint, on getting the levels right before you touch the tone
- Full Mix Relative EQ, on shaping the relationships between your channels
- The CARBON Q manual, for everything else