
Stem mastering is what you reach for when a stereo master can't get you there. Instead of processing one finished file, you master a small set of grouped stems, which means you can rebalance, clean up and shape the song in ways a stereo master never could.
To stem master a song, import your grouped stems into a clean session with -6 to -3 dB of headroom and check them against a professional reference. Fix resonances, resolve clashing frequencies between stems, then use CARBON Q across the finished stems to set their EQ and volume balance together. After that, shape the stereo width, master with a real loudness target, and quality-check the result before release.
This guide is the full method, stage by stage, using the exact chain I use professionally. It works for any genre.

If you're mastering from a single stereo file, start with the companion guide, Audio Mastering: The Complete Guide. This page is the stem version: same philosophy, more control. Prefer it as a PDF? Download the free eBook version and read it offline.
- What is stem mastering?
- The stem mastering chain
- Preparing your session
- Checking your stems against a reference
- Fix resonances with RESO
- Fix clashing frequencies with FUSER
- Balance EQ and volume with CARBON Q
- Shape stereo width with STEREOVAULT
- Mastering with FASTER MASTER
- Quality control before release
- Final thought

1What is stem mastering?
Stem mastering is the process of mastering a song using a small set of grouped stems rather than a single stereo file. Typical stems might include drums, bass, instruments, vocals and FX. Working this way gives you far more control, letting you fix issues that are difficult or impossible to solve in a stereo master.
With stems you can rebalance elements, clean up masking, tighten the relationship between kick and bass, reduce harshness, and shape the tonal balance of each group before it reaches your master chain. The result is a cleaner, more intentional master.

Stem mastering is ideal when the mix is close but needs refinement, when key elements need level changes, or when the mix has mud, harshness, or conflicts that a stereo master would struggle to fix. It gives you a higher ceiling for quality and reduces the need for compromises later.
2The stem mastering chain
This guide follows a simple, repeatable stem mastering chain built around clarity, volume balance, width, loudness and translation. Set it up on your master bus, in this order:

- RESO removes harsh or fatiguing resonances before they hit the rest of the chain.
- CARBON Q sets the EQ and volume balance of your stems together, with an agent on each stem and a MIX instance on the master bus, once RESO and FUSER have done their work.
- STEREOVAULT shapes the stereo width of the master or individual stems with precision, with clean, level-matched adjustments across the frequency spectrum.
- FASTER MASTER is the main mastering stage. It analyzes your audio, gives you tailored starting points, and helps you shape tone, punch, width, compression and loudness.
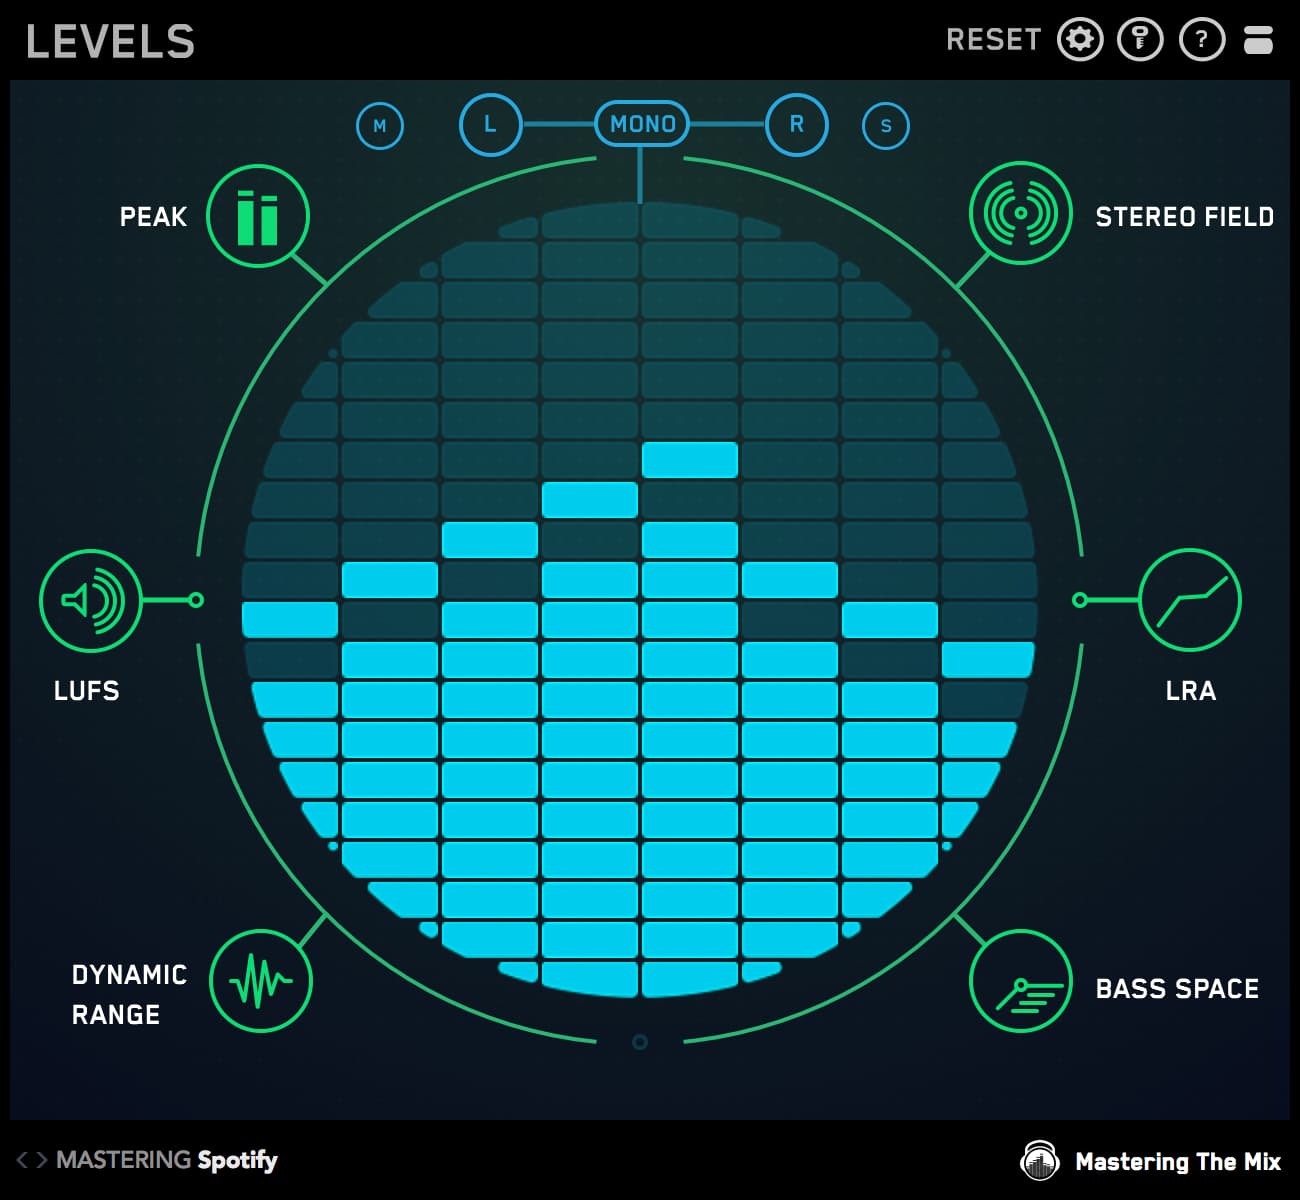
- LEVELS gives you a clear technical read on loudness, peaks, dynamics, stereo balance and headroom.
- REFERENCE 3 lets you compare your master to tracks you love and shows what to adjust in tone, stereo width, dynamics, loudness and mix balance.
You'll also see FUSER in this guide, loaded on individual stems rather than the master bus, to resolve clashes between stems. RESO can also go on a single stem if that stem is the one that rings. This chain keeps the workflow focused: clean problems first, set the EQ and volume balance of the stems, shape the stereo image, master the track, then check your result against trusted references. If you've read the stereo mastering guide, the broad tonal balance that MIXVAULT handles on a stereo master is done here by CARBON Q, across the stems and the whole mix at once. If you want to follow along, download the free trials for Mac or Windows.

CARBON Q maps straight onto a stem session. An agent sits last on your vocals, music, drums and bass stems, a MIX instance sits on the master bus, and you see and control the EQ and level of every stem from whichever window you have open. Start from a Smart Preset built from your audio, or drop in your reference track and CARBON Q gives each stem its own target from that record. Every EQ move is level matched, so you judge tone rather than volume.
3Preparing your session
A clean setup makes stem mastering faster and much easier to judge. Create a new session and import your stems. Typical groups include drums, bass, instruments/synths, vocals and FX. Name them clearly so you can move quickly between elements, and match the project tempo to the song. If you don't know it, most DAWs can detect the BPM automatically.
Vocals, music, drums and bass as separate stems is the ideal starting point, because those are the four roles CARBON Q works with. An FX stem can run alongside without an agent, or be folded into the music stem.
Check your headroom
Before any processing, play the loudest part of the song and make sure the stems, playing together, peak roughly between -6 dB and -3 dB on the master bus. If it's hotter, pull every stem down by the same amount so the volume balance stays the same. This gives RESO, FUSER, CARBON Q and FASTER MASTER the room they need to work transparently without distortion or limiter stress.

Build your master bus chain
- Gain. Clean headroom before processing.
- RESO. Resonance control.
- CARBON Q (MIX). The EQ and volume balance of your stems.
- STEREOVAULT. Stereo shaping.
- FASTER MASTER. The master itself.
- LEVELS. Technical metering.
- REFERENCE 3. Reference comparison.
On each stem, add FUSER where two stems clash (and RESO if one stem rings), then a CARBON Q agent last in the chain. Leave RESO, CARBON Q, STEREOVAULT and FASTER MASTER bypassed until you reach them in this guide. LEVELS and REFERENCE 3 are useful from the first minute.
Load your reference tracks into REFERENCE 3
REFERENCE 3 is the best way to compare your master to professional tracks and understand what needs improving. The plugin level-matches them automatically, so you can compare fairly without loudness tricking your ears. It gives instant A/B comparison, and it can show tonal balance differences, stereo width differences, phase issues, over-compression, and how close your master is to the reference.

4Checking your stems against a reference
Before fixing resonances, masking, stereo width or loudness, listen to where the stems sit against a record you trust. The volume balance between the stems often matters more than any plugin move, and knowing what you're dealing with now tells you how hard the rest of the chain needs to work.
Open REFERENCE 3 at the end of your chain and choose a reference track that matches the genre, energy and sound you're aiming for. Start with the loudest section of your song, then compare your master to the reference and ask:
- Are the vocals sitting too far forward or too far back?
- Is the bass supporting the track or overpowering it?
- Are the drums hitting with enough impact?
- Does the music feel too loud, too quiet, or too crowded?
- Does the chorus or drop feel as powerful as the reference?
Use REFERENCE 3's Mix Balance feature to guide this process. Mix Balance suggests gain adjustments for your vocals, drums, music and bass to match your reference.

You do not need to copy the reference exactly, and you don't need to fix everything here. If something is way off, a quick fader move now makes the next steps easier to judge. The precise EQ and volume balance comes later, with CARBON Q, once RESO and FUSER have cleaned the stems.
While you're here, check for low end in the wrong stems. LEVELS has a section built for stem masters called BASS SPACE. Mute the drums and bass stems, play the track, and the 40, 80, 120 and 160 Hz bars show whether the vocal or music stem is carrying low end it shouldn't. A rumble in the music stem is much easier to clean up now, on that stem, than once it's sitting under the kick and bass. There's a full method for references in how to use reference tracks: the complete guide.
5Fix resonances with RESO
Resonances are narrow, harsh peaks that make music sound fatiguing, thin or edgy. Even if the mix engineer controlled them earlier, new resonances often appear once stems combine. RESO removes these problems cleanly and transparently. Use it early in your chain to smooth out harshness before you set the EQ and volume balance of the stems with CARBON Q and shape the master with FASTER MASTER. Fixing resonances first gives you a cleaner, more open foundation.

Find the problem areas
- Play the loudest section of the track.
- Open REFERENCE 3 and jump between your master and the reference.
- Listen particularly to the upper midrange, where harsh resonances are most common.
If you hear spikes or piercing tones that aren't present in the reference, it's time to use RESO. Solo the stems one at a time to find the one causing it. If it's a single stem, load RESO on that stem, above the CARBON Q agent, and leave the other stems alone. If the harshness only builds up when the stems play together, use the RESO on the master bus.
How to locate resonances with RESO
- Open RESO as the first processor in your chain.
- Hold Control and sweep across the frequency display. This reveals resonances by slightly boosting what you hover over.
- When a frequency jumps out unpleasantly, double-click to place a node.
For a quicker start, Calculate Targets analyzes the audio and places Target Nodes where it hears resonances, and Engage Targets switches them all on. Start with each node sitting near the top of the real-time spectrum for a natural threshold.

How much to reduce
Hold Control, then drag the node down until the resonance disappears. Aim to tame it and leave some energy in that area.
- If the issue remains, slightly increase the Q (narrower bandwidth).
- Avoid fixing too many resonances. Four to eight is typical.
- RESO can control the low-end dynamics too if needed.

Check you haven't overdone it
- Built-in bypass: toggle RESO's internal bypass to hear the before/after clearly. If the "after" sounds thin or filtered, reduce the amount.
- Delta mode: solo the removed frequencies. They should sound unpleasant. If it sounds too broad or musical, you've cut too much.
- Compare to your reference: jump between your master and your reference inside REFERENCE 3. The upper mids should feel smooth and controlled without sounding dull or scooped.
When used correctly, RESO adds clarity, removes fatigue, and sets you up for a cleaner, more professional master. The deeper method is in how to find and fix unpleasant resonances.
6Fix clashing frequencies with FUSER
When stems overlap in the same frequency range, they fight for space. This causes muddiness, dullness, weak low end and a lack of clarity. FUSER gives you a precise way to fix these issues transparently.
Masking happens when two sounds share similar frequencies and are slightly out of phase. Common examples include kick and bass fighting in the low end, guitars or synths swallowing the midrange of the vocal, and pads and pianos smearing clarity in the upper mids. Left unresolved, masking can ruin an otherwise great master.

Set up FUSER
Decide which stem needs priority. Dominant is the channel you want to shine through. Submissive is the channel that should make space. Load FUSER on the submissive stem, above the CARBON Q agent, and side chain the dominant stem. This tells FUSER which sound should maintain clarity.

Step 1: match their levels
Use FUSER's input gain and level match pointer to match the loudness of both signals. If the submissive stem is louder than the dominant one, masking will always occur. This single step often cleans up more than you expect.
Step 2: resolve conflicts automatically
Once side chain is active, frequency-specific clashes will glow on the display. Red is a mid-channel conflict, yellow is a side-channel conflict. Click Resolve Conflicts to let FUSER apply intelligent, transparent ducking only where needed. You can then tweak the smart node to taste.

Step 3: manual fine-tuning
If you want full control, double-click to create nodes anywhere masking still occurs, then adjust the amount (drag down), Q, attack, release, and mid/side position. Delta lets you hear exactly what's being removed while you set attack and release.
On the drums and bass, run Phase Analyze as well. It finds the phase rotation that lets the kick and bass add up instead of partly canceling, which often brings back low end you thought was missing.
Typical stem pairs that benefit: Kick → Bass, Vocal → Instruments, Lead Synth → Pads, Vocals → Guitar / Piano, Drum bus → Percussion bus. If two sounds overlap and feel cluttered, FUSER gives you the most precise way to clear space. After resolving conflicts, your master gains a tighter low end, clearer vocals, more defined midrange, better punch, and more headroom for louder, cleaner mastering. This prepares your stems perfectly for CARBON Q.
7Balance EQ and volume across your stems with CARBON Q
With the resonances gone and the clashes resolved, the stems are clean. Now set how they sit together: how loud each stem is against the others, and how the EQ of each one fits the rest. This is where stems pay off the most, because it's exactly the control a stereo master can't give you.
CARBON Q is built for this job. It's one eleven band EQ spread across your whole session, and it handles the volume balance and the tonal balance together. Most stem sessions already line up with its four roles, so it drops straight in.

Set it up across your stems
- Vocals stem: put CARBON Q last on the channel and pick VOCALS.
- Instruments or synths stem: last on the channel, pick MUSIC.
- Drums stem: last on the channel, pick DRUMS.
- Bass stem: last on the channel, after FUSER if you used it there, pick BASS.
- Master bus: put one instance after RESO and before STEREOVAULT, and pick MIX.
The agents connect to the MIX instance straight away and show up as live tiles along the bottom of the window. From whichever instance you have open, you can see and control the EQ and level of every stem without opening another plugin. If you have an FX stem, it can run without an agent, or you can fold it into the music stem before you start.
Placement matters. When you analyze, CARBON Q listens to the audio coming into it, so it needs to hear the work RESO and FUSER have already done. That's why it goes last on each stem. On the master bus, the MIX instance hears the cleaned stems together, and everything after it, STEREOVAULT and FASTER MASTER, works on the balanced result. If you change anything above CARBON Q later, analyze again so it hears the change.
Analyze and pick a starting point
- Loop the loudest, busiest section of the song, usually the final chorus or the drop.
- Hit ANALYZE in the MIX instance. The analysis tray opens with every linked stem armed in gold, and the button becomes GO.
- Press GO. CARBON Q compares the song against world class reference mixes and puts the ten closest Smart Presets at the top of the preset browser.
- Step through them. Each one sets the tonal balance and the volume balance of every stem at once, and each is level matched as it lands, so you're comparing balances rather than loudness.

Or match your stems to a reference track
This is the move I'd make on almost every stem master. Open the preset browser, go to the reference tracks tab, and drop in the record you've been referencing. CARBON Q separates it into vocals, music, drums and bass, reads the tonal balance of each part and of the whole mix, and measures how loud each part sits against the rest. Select it and every stem moves to match, EQ and level together. The stem separation runs on your machine, and your audio is never uploaded.

It's the same question you asked in REFERENCE 3 at the start of the session, answered with the actual moves. You can take the whole picture, or unlink one stem and give it its own reference: the vocal balance from one record, the low end from another. A reference is a target to fast-track your foundation. You're still driving the final sound.
In Settings, Preset adjustment amount sets how far a preset or reference is allowed to move your stems. Low keeps things subtle, with an agent band topping out around 6 dB, the MIX around 3 dB and gain changes around 4 dB. If the mix you've been sent is already close, Low is usually the right place to start. Change it after analyzing and the current preset is reapplied straight away.
Fine-tune each stem
From here you're in control. Drag a node up or down to change that band, scroll over it to change the Q, and nudge the Gain slider to set the stem's level. Every EQ move is level matched as you make it, so you hear the change in tone rather than a change in loudness. Level matching leaves the Gain slider alone, because that's the control for the volume balance. CARBON Q never moves your DAW faders.
- Mid/Side. Switch any stem to Mid or Side for a separate curve on the center and the sides. Clear the low mids out of the sides of the music stem, or pull the low end out of the sides of the bass stem so it holds together in mono. Right click the Stereo / Mid / Side selector to switch every stem at once.
- Dynamic. Turn on Dynamic on the stem that keeps escaping in the loud sections, usually the bass or the vocal. At 50% it holds the stem to its target and only pulls a band down when it goes over.
- Lock. Once a stem is exactly where you want it, lock it, so preset changes and new analyses leave it alone while you work on the rest.
- Bypass on the MIX instance. Bypasses every stem at once, for a fair A/B of the whole balance.

The filters are linear phase, so they change the tone without smearing your transients, at 41 ms of latency. That matters here, because you have an instance on every stem and one on the master bus, and small phase shifts would stack up across all of them.
When the stems sit right, the master stage has much less to do. The full method for balancing and EQing a mix this way is in how to balance and EQ a mix: the complete guide, and every control is covered in the CARBON Q manual.
8Shape stereo width with STEREOVAULT
Stereo width has a huge effect on how polished, powerful and professional a master feels. But stereo is also easy to misjudge. A mix can feel wide in headphones but collapse on phone speakers, club systems, or mono playback.
STEREOVAULT helps you shape width with far more control. It analyzes your audio, helps you find a suitable stereo width, and gives you level-matched stereo processing so you hear the real change rather than a louder, more exciting version.

Use STEREOVAULT when the master feels too narrow, the chorus or drop needs more size, the low end feels wide but unstable, the sides feel harsh or unfocused, the mix sounds impressive in headphones but weak in mono, or you want to match the stereo width of a reference track.
Place STEREOVAULT after CARBON Q but before FASTER MASTER. This lets you clean resonances and masking first, balance the stems, then shape the stereo image before the final mastering stage.
Simple STEREOVAULT workflow
- Play the loudest section of the track.
- Open STEREOVAULT on the master bus, click Analyze, then choose the Genre and source.
- Flick through Focused, Balanced, Wide and Super Wide. The labels are relative to the genre and source you chose.
- For mastering, work in Transparent Mode and use DIFFUSE on the SPREAD tab. They're the cleanest, most phase-stable options.
- Keep everything below about 100 to 150 Hz narrow, so the low end stays centered.
- Widen areas that need more space, usually upper mids and highs.
- Use the level-matched bypass to check that the change is an improvement, then listen in mono.
For stem mastering, you can also use STEREOVAULT on individual stems. For example, you might tighten the bass stem, widen backing vocals, add space to synths, or clean up the side signal of a music stem. On a stem, STEREOVAULT goes above the CARBON Q agent.
For more on width, see the complete guide to stereo width and how to add width to bass without losing mono compatibility.
9Mastering with FASTER MASTER
Most mastering tools feel slow, complicated or underwhelming. FASTER MASTER takes a different approach. It analyzes your track, gives you tailored starting points, and lets you fine-tune each module with precision and confidence. When combined with reference tracks, it becomes a powerful, intuitive way to get a polished, release-ready master that stands up next to commercial records. Below is the full process from loading your track to final comparisons.
Step 1: analyze the loudest section
- Load FASTER MASTER as the final plugin in your mastering chain.
- Play the loudest, most energetic section of your track.
- Click Analyze and let the plugin read your tonal balance, dynamics, width, transients and overall energy.

This analysis becomes the foundation for everything that follows.
Step 2: preview your Smart Presets
When the analysis is complete, FASTER MASTER generates 10 Smart Presets based entirely on the sound of your track. Click Let's Hear It to preview the recommended preset, then use the arrow buttons to cycle through the rest.

Each preset offers a different mastering perspective on your sound, and loudness is always matched during preset switching so comparisons stay fair. Pick the preset that gets closest to the feeling you want. You can refine it in the next steps.
Step 3: import reference tracks (highly recommended)
Reference tracks get the most out of FASTER MASTER. Importing one gives the plugin a clear sonic target and lets you compare your master directly to commercially released tracks.

To add a reference: click the file + icon, drag and drop your chosen track, and FASTER MASTER analyzes its tonal balance and stereo width. A custom reference-based preset is created from its sonic profile, built from the exact song you admire.
The video walks through the whole process.
Pick a track that sounds amazing, and match your genre, vibe and instrumentation. Once imported, your references remain accessible for future projects. FASTER MASTER can play your reference level-matched against your master and build a preset that applies EQ and width changes based on the reference profile. Because everything is level-matched, the louder track can't win just by being louder.
Step 4: fine-tune your master with FASTER MASTER's modules
Once you've chosen your preset (or reference-based preset), refine the master using the plugin's core modules. Each is designed to be powerful yet simple, with real-time level matching built in.
EQ: sculpt a clear, professional tonal balance. FASTER MASTER's EQ uses pristine filters that minimize phase distortion and smearing, to keep your master smooth and natural. Adjust the EQ, then drag the 100% readout to blend it in. The level match means you hear changes in tone rather than changes in volume. Because CARBON Q has already balanced the stems, the EQ here is for the final polish, so small moves are usually all you need.

Transients: increase or reduce punch. Unlike typical transient shapers that just make things louder, FASTER MASTER keeps loudness neutral so you hear the true impact. Drag up for more punch, drag down to soften sharp peaks, and use it to add impact or remove harshness without compression artifacts.

Compression: control dynamics with intelligence. Choose Off, Light, Dynamic or Tight, adjust the Amount slider, and the plugin sets threshold, ratio, attack and release automatically. A low-cut sidechain at 250 Hz avoids pumping, and real-time level matching keeps results honest. Use more compression for pop, EDM and hip-hop; less for acoustic, jazz and orchestral.

Stereo: widen your track safely. Frequency-based stereo control across four bands: low, low-mid, high-mid and high. High-mids and highs can be widened safely for clarity and space. Low-end bands default to cuts-only for phase safety, but can be widened manually if needed. Drag inward to narrow, outward to widen. The processing is phase-coherent, so your stereo field stays stable and clear. You've already set the width in STEREOVAULT, so treat this as a final trim.

Limit: achieve industry-standard loudness. The limiter is the final stage, and FASTER MASTER makes it simple. Choose a loudness node (Streaming: -10, -9 or -8 LUFS short-term, or Loud: -7, -6 or -5 LUFS short-term), set your ceiling (e.g. -0.1 dB, true peak or peak, with the dB/TP toggle), add Drive to introduce harmonic density, watch the short-term LUFS meter for your target, and use Refresh to recalculate loudness after upstream changes. This gives you competitive loudness without crushed dynamics.

Choose your loudness
There are two lanes, and both are professional:
- Loud: around -6 LUFS short-term at the loudest section. It needs a clean, well-balanced mix to get there without distortion, which is what the stem work has given you.
- Dynamic: around -9 to -11 LUFS short-term, with more punch and movement. Spotify normalizes to -14 LUFS integrated, so a dynamic master plays back at the same level as a loud one there.
I leave true peak limiting off by default and set the ceiling for where the track is going. Spotify's guidance is true peaks below -1 dBTP for masters at or below -14 LUFS integrated, and below -2 dBTP for anything louder. Watch how the two targets interact: -6 LUFS short-term with a -2 dBTP ceiling pushes the limiter about as hard as a -4 LUFS master, and that distorts. If you need -2 dBTP, aim around -8 LUFS short-term. The full reasoning is in how loud should you master?
If you dial in perfect EQ, transients, compression or stereo settings, click the lock icon. You can then switch presets freely, the locked module stays unchanged, and you can click the lock again any time to release it. This speeds up experimenting without losing your favorite settings.

Step 5: compare, refine and finalize
Throughout your adjustments, FASTER MASTER uses global level matching so bypass comparisons are always honest. You hear the real improvement, not volume bias.

Click Play in the preset display to compare to your reference track. You hear it level-matched, A/B instantly, and switch back to your master with one click.

By previewing your track next to a commercial reference, you know exactly what's missing, you adjust confidently, and your ear gets sharper with every project. The full walkthrough is in the ultimate guide to mastering with FASTER MASTER.
10Quality control before release
Before exporting, take a few minutes to check the master properly. These final checks help catch problems that are easy to miss while you're making adjustments.
Final listening pass
Listen to the whole track from start to finish without touching anything. Focus on overall tone, vocal or lead clarity, low-end control, punch and movement, stereo width, mono compatibility, and energy between sections. If something feels distracting, fix it with the smallest possible move.
Check the technical details with LEVELS
Open LEVELS and confirm: the short-term LUFS at the loudest section hits the target you chose, true peak stays below your ceiling, dynamic range and LRA still look healthy, the stereo field is balanced with no wide bass (set the Stereo Field filter to 250 Hz or lower to check), and there are no obvious clipping or phase problems. All green means no issues, and you can click any red section to see the detail. Use LEVELS as your technical safety check before bouncing.
Compare one last time in REFERENCE 3
Open REFERENCE 3 and compare your final master with your chosen reference. Use Master Scope to check tonal balance, stereo width, phase issues and over-compression, then check Match % and Mix Balance across vocals, drums, music and bass.

The Level Line shows the exact EQ curve to apply to match your reference track. Getting within ±3 dB is a close match, and this should also put you above 80% on Match %. The Stereo Width Display shows where your master is wider or narrower than the reference. If Mix Balance says the vocal has dropped a dB under the limiter, you can still fix it at the source: nudge the Gain slider on the VOCALS agent. You do not need to chase a perfect match. If your master is close, balanced, and emotionally right for the song, you're in a strong place.
Bounce your final master
- WAV or AIFF
- Same sample rate as your project
- 24-bit for streaming and distribution (16-bit only if required for CD)
- Dither only when reducing bit depth
- Normalization turned off
Final check with EXPOSE 2
Open EXPOSE 2 and drag in your bounced master. Choose the playback preset for where it's going, such as Spotify, YouTube or CD. Check for peak clipping, loudness issues, over-limiting, phase problems and dynamic range problems, and use Compare EQ to check the tonal balance against your reference on the file you're actually releasing.

If EXPOSE 2 flags a serious issue, go back to the session, make a small correction, bounce again, and re-check. The routine is in how to check your final masters like a mastering engineer.
11Final thought
At this stage, you've checked your stems against a reference in REFERENCE 3, cleaned harsh resonances with RESO, cleared masking with FUSER, set the EQ and volume balance of your stems with CARBON Q, shaped stereo width with STEREOVAULT, mastered the track with FASTER MASTER, checked loudness, peaks and dynamics with LEVELS, compared against references in REFERENCE 3, and confirmed the final bounce with EXPOSE 2. That is a complete, modern stem mastering workflow.
Your master should feel cleaner, wider, louder, more controlled, and ready for release. If you want the whole chain in one place, the All Plugins Bundle covers RESO, FUSER, CARBON Q, STEREOVAULT, FASTER MASTER, REFERENCE 3, LEVELS and EXPOSE 2, the full stem mastering signal path.
?Stem mastering FAQ
What is stem mastering?
Stem mastering is the process of mastering a song using a small set of grouped stems, typically drums, bass, instruments, vocals and FX, rather than a single stereo file. It gives you far more control, letting you rebalance elements, clean up masking, and fix issues that are difficult or impossible to solve in a stereo master.
When should I choose stem mastering over stereo mastering?
Choose stem mastering when the mix is close but needs refinement, when key elements need level changes, or when the mix has mud, harshness, or conflicts that a stereo master would struggle to fix. Stem mastering is preferred when more significant changes are required to get a song sounding great. If the mix is already excellent, a stereo master is faster and usually enough.
How many stems should I use for stem mastering?
A small set of grouped stems works best. Four is ideal: vocals, music (instruments or synths), drums and bass, the four roles CARBON Q works with. A separate FX stem is fine as a fifth. More stems means more control but also more decisions, and beyond a handful of groups you're effectively re-mixing rather than mastering.
How much headroom should my stems have?
Play the loudest part of the song and make sure your stems, playing together, peak roughly between -6 dB and -3 dB before any processing. If they're hotter, turn every stem down by the same amount so the volume balance stays the same. This gives resonance suppression, masking tools and the mastering stage the room they need to work transparently without distortion or limiter stress.
What loudness should I target for a stem master?
The same targets as any master. There are two professional lanes: loud, around -6 LUFS short-term at the loudest section with a clean mix, or dynamic, around -9 to -11 LUFS short-term. Spotify normalizes to -14 LUFS integrated, and its guidance is true peaks below -1 dBTP at or below -14 LUFS integrated, or below -2 dBTP if louder. If you need -2 dBTP, aim around -8 LUFS short-term so the limiter isn't pushed into distortion. I leave true peak limiting off by default and set the ceiling per platform. Always compare at matched loudness so the louder option doesn't fool your ears.
What order should the stem mastering chain go in?
On the master bus: gain for headroom, then resonance control (RESO), then the stem balance (the CARBON Q MIX instance), then stereo shaping (STEREOVAULT), then the master itself (FASTER MASTER), then metering (LEVELS) and reference comparison (REFERENCE 3). On each stem, FUSER resolves masking where two stems clash (and RESO if one stem rings), and a CARBON Q agent goes last. Problem-solving first, the EQ and volume balance next, mastering after that, quality control at the end.
Can I use CARBON Q for stem mastering?
Yes, and stems are one of the best places for it. Put an agent last on your vocals, music, drums and bass stems and a MIX instance on the master bus after RESO and before STEREOVAULT. Analyze the loudest section, then pick a Smart Preset or drop in your reference track, and CARBON Q sets the EQ and level of every stem together. Use the Low preset adjustment amount in Settings if you want to keep the moves gentle.
Where to start
If stem mastering feels like a lot, it's because it's several jobs in a row. Check the volume balance of the stems against a reference before you touch a plugin. Then run the chain: clean the resonances, resolve the clashes, balance the stems with CARBON Q, set the width, master with a real loudness target, and check the file before it ships.
That's the same order I use on every stem master, whether it's for a name you know or a first single. Get the order right and the extra control stems give you becomes easy to use, and your master can go further than a stereo master could.